DIY Lemon Garland: Make Your Own in 30 Minutes (Complete Tutorial)
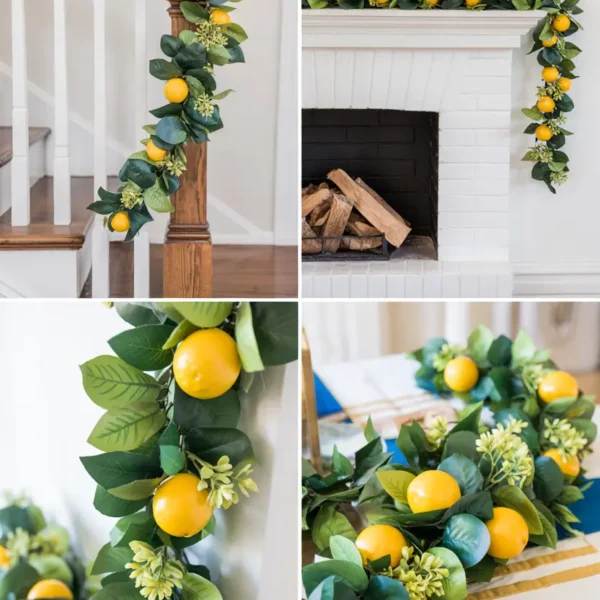
This lemon garland DIY is one of those projects that works almost anywhere — draped across a mantel, running down the center of a dining table, framing a doorway, or wound up a stairway railing, it instantly brings that warm Italian summer feel to any space.
Pre-made versions can run $40–100 on Etsy or Amazon, but making your own takes about 30 minutes and costs roughly half. The key is starting with a good faux greenery base and wiring the lemons at the right spacing. This guide covers three garland styles — table runner, mantel, and doorway — with a specific supply list for each.
Where to Use This Lemon Garland DIY
Lemon garlands are more versatile than most people expect. Here are the most popular spots to use them:
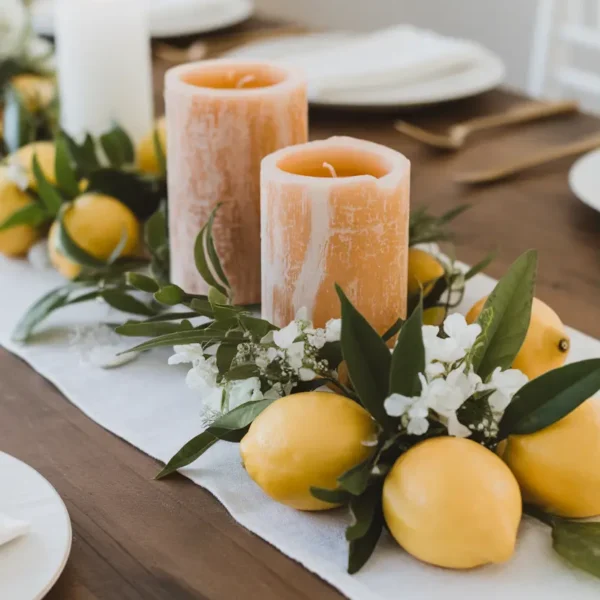
- Dining table runner — down the center of a long farmhouse table, with lemons scattered between the greenery
- Fireplace mantel — draped across the mantel with both sides hanging slightly down. Most photographed placement.
- Doorway frame — framing the top and sides of a doorway, especially for summer parties
- Stairway banister — wound around the banister rail for stair-heavy houses or wedding venues
- Above kitchen window — particularly above kitchen sinks or breakfast nook windows
- Wedding ceremony arch — as the primary structure on a copper or wood arch frame
Supplies You’ll Need
Base Greenery Garland

The greenery base is the foundation of the whole garland, so it’s worth spending a little extra here. Cheap wire-and-leaf garlands tend to look obviously artificial — the key is finding something that has real density and color variation. Look for:
- 6-foot length minimum (most spaces need 6 feet; you can always trim shorter)
- Realistic colors — sage or silver-green eucalyptus, deep green olive
- “Real-touch” or “premium” descriptions in product titles
- Reviews mentioning fullness — thin garlands need supplementing with more stems
Faux Lemons

For the lemons, quality matters just as much as the greenery. The difference between a good and a bad faux lemon is obvious up close, so look for:
- Real-touch or weighted faux lemons (not hollow plastic)
- 12-15 lemons for a 6-foot garland; 18-25 for a fuller look
- Slightly varied yellow tones for realism
Tools and Hardware
- Floral wire (22-24 gauge, $4-6) — for attaching lemons
- Wire cutters or scissors
- Optional: hot glue gun (for permanent attachment)
- Hanging hardware: Command hooks (3-4) for mantels, finishing nails or hooks for doorways
- Optional: ribbon for accent points
Style 1: The Table Runner Garland
Best for: dining tables, kitchen counters, buffets. Lays flat without hanging requirements.
How to make it
- Lay the eucalyptus garland flat on a clean work surface.
- Position lemons evenly along the garland’s length — about every 4-5 inches. For a 6-foot garland, you’ll use 14-18 lemons.
- Wire each lemon to the garland: cut a 4-inch piece of floral wire, wrap it around the lemon’s stem (or pierce through the soft top), then twist the ends around the garland’s main stem to secure.
- Tuck additional eucalyptus stems between the lemons if the garland looks sparse.
- Position on the table center.
Style 2: The Mantel Garland
Best for: fireplace mantels, console tables with wall behind, anywhere with a flat horizontal surface that has wall above and visible space below.
How to make it
- Make the garland following Style 1’s steps, but use a longer base (8-9 feet for most mantels — measure your mantel and add 18-24 inches for the side drapes).
- Position 3 Command hooks evenly across the underside of the mantel: one at center, one near each end.
- Drape the garland across the mantel: center the middle, let both ends hang down 12-18 inches on either side.
- Use small twist ties or floral wire to secure the garland to the Command hooks at hidden points.
- Add 2-3 more lemons specifically at the draped corners (where the garland turns from horizontal to vertical) — this is where the visual emphasis lives.
- Add 1-2 white candles or small accents on the mantel surface itself for vertical visual variety.
Style 3: The Doorway Garland

Best for: front doors, archways between rooms, wedding ceremony entrances. Frames the negative space of the doorway.
How to make it
- Measure the doorway’s perimeter (top + both sides). Most standard doorways need 9-10 feet of garland.
- Make the full garland following Style 1’s steps.
- Position 4-5 small hooks or finishing nails along the doorway frame: one at each top corner, one in the middle of the top, one at the middle of each side.
- Drape the garland: start at one bottom side, run up to the top corner, across the top, down the other side. Secure to each hook with floral wire.
- Adjust drape so the garland hangs slightly loose between hooks — strict tension reads less natural than gentle waves.
- Add a 2-3 lemon cluster at the top center as a focal point.
Common Variations
Lemon + Olive Branch Garland
Swap the eucalyptus base for an olive branch garland to get a more rustic, Italian countryside look. The construction process is identical — it just gives a slightly different feel with the softer, gray-green leaves.
Lemon + Mixed Greenery Garland
For a fuller, more layered look, combine eucalyptus, olive branch, and small fern garland as a base. Wire all three together at multiple points before adding the lemons. It costs more ($60–80 in supplies total) but the result looks noticeably richer and more professional.
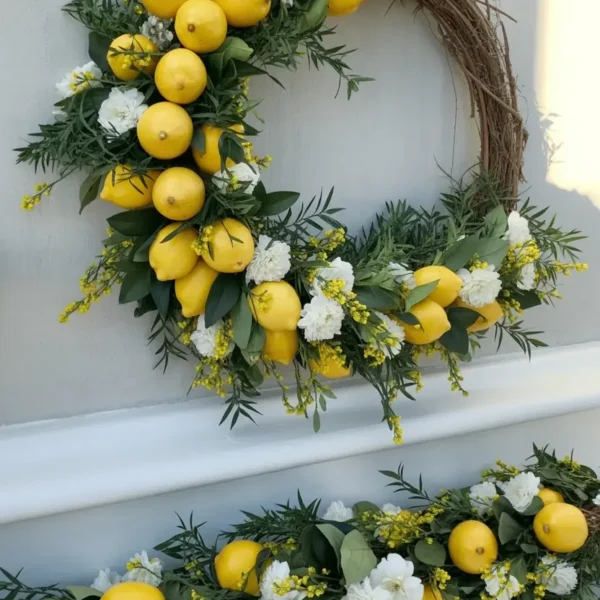
Lemon + Flower Garland
Tuck small faux white roses or hydrangeas between the lemons — roughly every third or fourth lemon, swap in a flower instead. It gives the garland a softer, more romantic look and works really well for bridal showers and weddings.
Mini Lemon Garland
For smaller spots — a single shelf, a bathroom mirror frame, a kitchen windowsill — scale the whole thing down. Use a 3-foot eucalyptus garland with 6–8 small faux lemons. The technique is exactly the same, just smaller. Total cost comes to around $20–25.
Care, Storage, and Reuse
Storing Between Uses
When you’re done with the garland, roll it loosely — don’t coil it tightly, as that can permanently bend the wire stems. Place it in a long flat plastic bin or a large zip bag and store it flat: under a bed, on a top closet shelf, or in a dry basement all work well. The main thing to avoid is direct sunlight, which fades both the greenery and the lemon color over time.
Reusing for Different Occasions
One of the best things about a faux lemon garland is that you can pull it out for event after event — a summer dinner party, a backyard barbecue, a bridal shower. To refresh the look between uses, tuck in small seasonal accents: a few small flags for a patriotic celebration, ribbon in wedding colors for a shower, or simple white candles for an evening dinner.
Maintenance
After each use, give the garland a gentle shake to knock off any dust, then wipe down the lemons with a damp cloth if needed. Check whether any lemons have come loose and reattach them with fresh floral wire or a small dot of hot glue. If a lemon has a chipped or scuffed spot, a little yellow craft paint on a fine brush fixes it quickly. Most garlands don’t need much upkeep — a quick once-over before putting it away is usually enough.
Common Mistakes
- Skimping on the base garland. A thin or flat-looking base undermines everything else. The greenery is the foundation of the whole project, so it’s worth spending a little more here than on the lemons.
- Spacing lemons too uniformly. Even spacing looks fake. Vary the gaps slightly — 4 inches in some places, 6 in others — and the garland will feel much more natural.
- Positioning all lemons at the same angle. Real lemons on a branch face every which way. Rotate yours at different angles as you wire them on — it makes a noticeable difference.
- Insufficient hanging hardware. Garlands sag in the middle if hooks are spaced too far apart. Use 3 hooks minimum for a mantel, 4-5 for a doorway.
Frequently Asked Questions
Can I use real lemons in a garland?
Not recommended for anything that needs to hang or last more than a day. Real lemons are heavy enough to drag a garland down, and they start to wilt and bruise within one to two weeks. For a single-day event — a dinner or a shower — real lemons can work in a flat tabletop runner if you handle them carefully. For anything else, faux is the better choice.
How long does a DIY lemon garland last?
Indoors, expect 3–4 years before you notice significant fading. Outdoors, direct sun will fade it in 1–2 years, while a shaded porch or covered area can stretch that to 3 or more. How you store it between uses makes a big difference — a garland that’s put away properly lasts two to three times longer than one that’s left up year-round or stored carelessly.
How do I make a longer garland for a longer table?
For a table longer than 6 feet, just connect two 6-foot garlands end to end. Overlap the ends by about 6–8 inches and twist them together with floral wire, then hide the join under a few extra greenery sprigs or a cluster of lemons. You can also find 9-foot or 12-foot garland bases on Amazon if you’d rather buy a single longer base from the start — it costs a bit more upfront but saves the joining step.
Can I make a garland with both lemons and oranges?
Absolutely — a mixed citrus garland looks more colorful and feels at home anywhere from fall through early summer. Try a ratio of about 60% lemons to 40% oranges, distributed evenly along the garland. If you can find small clementines or kumquats, adding a few gives you some nice size variation. It’s a great option when you want something that isn’t quite so tied to a single season.
Try the Mantel Version First
If this is your first garland, start with the mantel version. It’s the most forgiving — any uneven drape gets hidden by the wall behind it. It also photographs beautifully and can be reused for everything from a summer party to a holiday gathering with just a few seasonal swaps. Once you’ve made one, the table and doorway versions feel much easier.
The whole lemon garland DIY project is quicker than most people expect, and the result looks like a lot more work went into it than actually did. For inspiration on different lemon decor styles, Better Homes & Gardens has a great overview of summer decorating ideas worth browsing.
Related Articles
- Lemon Wreath DIY: https://stylicia.com/lemon-wreath-diy — companion DIY for doors and walls.
- Lemon Table Decor: https://stylicia.com/lemon-table-decor — full guide to lemon tablescapes.
- The Ultimate Guide to Lemon Decor: https://stylicia.com/lemon-decor — kitchen, table, wedding, DIY overview.
- Citrus Decor: https://stylicia.com/citrus-decor — broader citrus aesthetic across home.