17 Cozy Christmas Kitchen Decor Ideas to Inspire Your Holiday Home

There’s something so special about Christmas kitchen decor — it instantly makes your home feel warmer, brighter, and full of festive spirit. Decorating the kitchen for Christmas, where the coffee brews and the cookies bake, is one of the easiest ways to bring holiday magic to everyday life.
Whether your style leans toward rustic farmhouse coziness, modern minimalism, or nostalgic vintage charm, these Christmas kitchen decor ideas will help you create a space that feels joyful, welcoming, and effortlessly festive.
So grab a cup of hot cocoa, put on your favourite Christmas playlist, and let’s get inspired together!
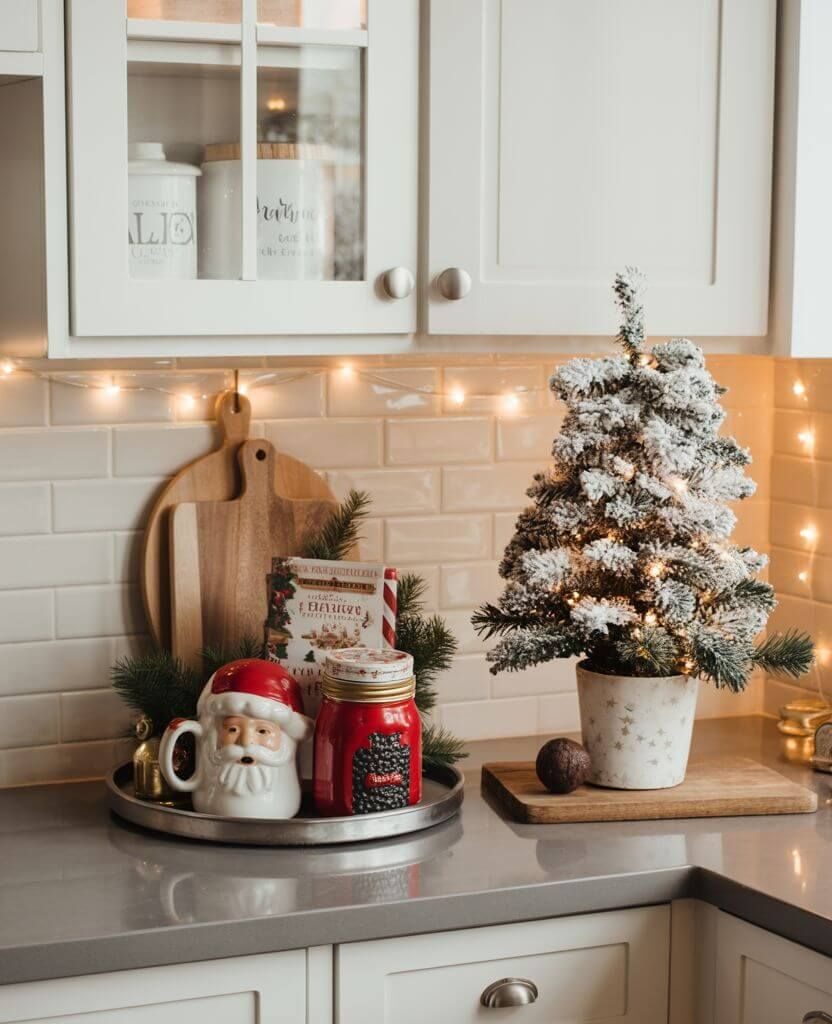
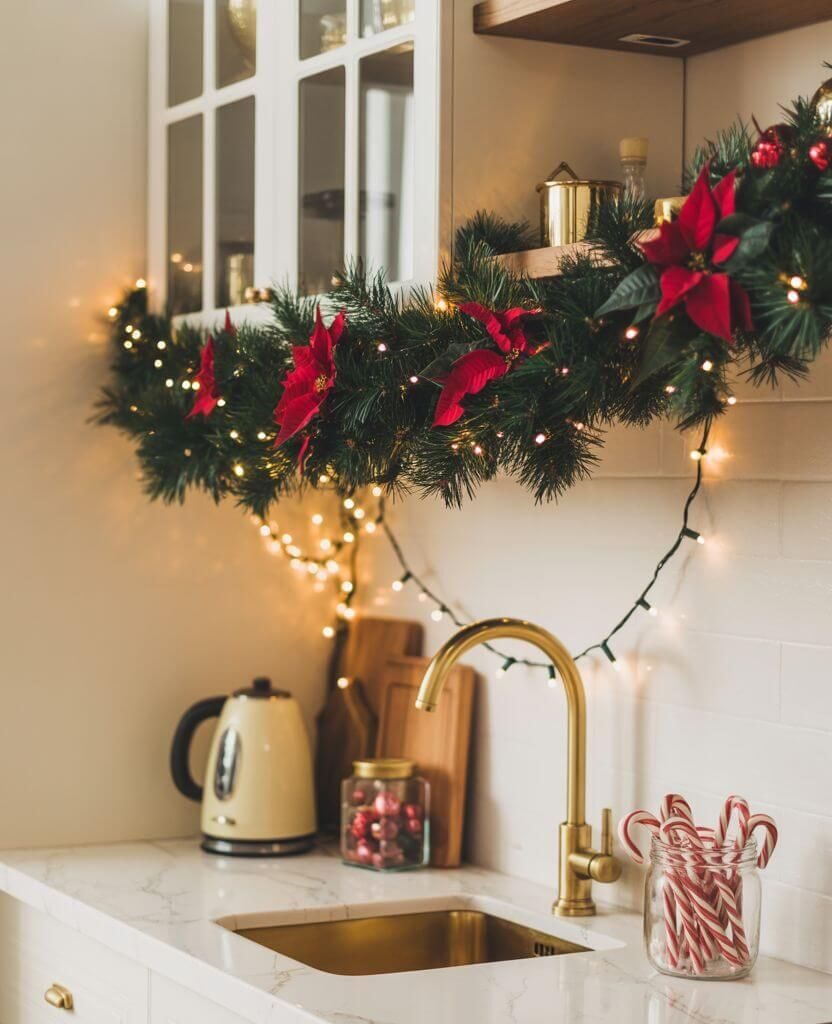
1. Classic Red and White Christmas Countertop Display
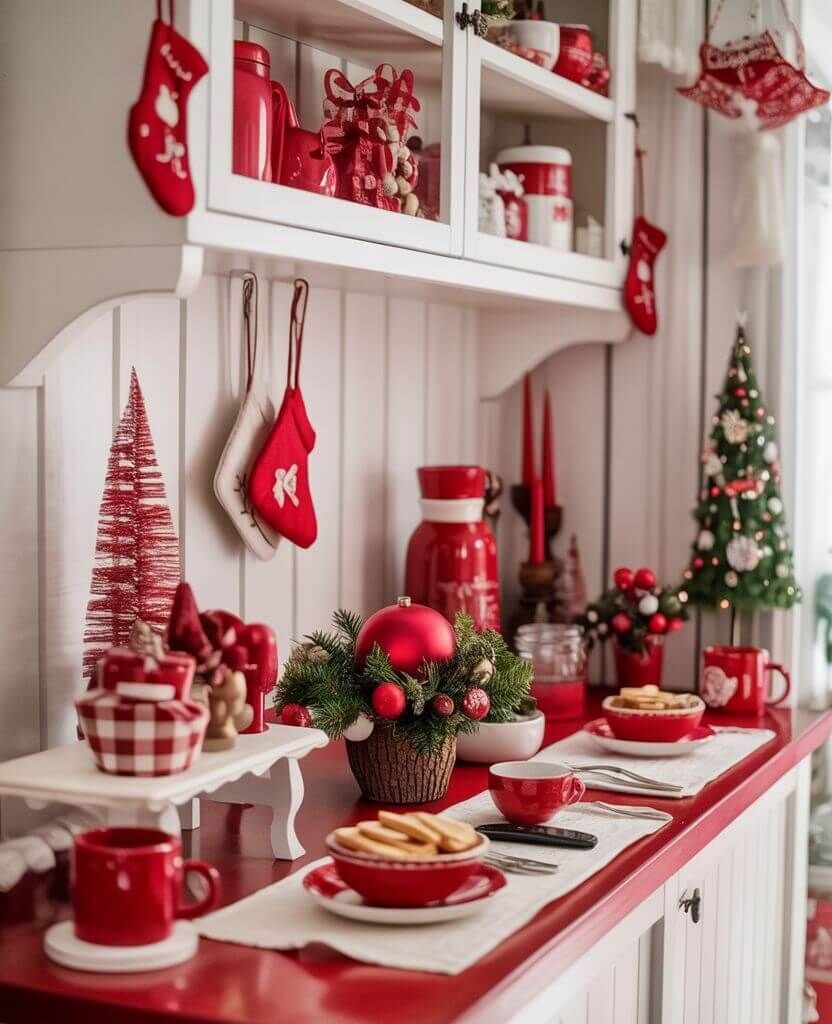
Nothing says “Christmas kitchen” quite like a classic red and white setup. Think holiday mugs, striped candy canes, and a few vintage Santa figurines perched on your countertop. The contrast of white ceramics and deep red tones instantly brings the festive spirit to life. These Christmas kitchen decor are budget-friendly.
DIY Tip:
Create your own candy cane jar! Fill a clear vase or mason jar with mini candy canes and add a ribbon around it. It’s inexpensive, quick, and instantly brightens your space. These Christmas kitchen decor are budget-friendly.
2. Gingerbread-Themed Kitchen Corner

A gingerbread-themed nook adds the sweetest holiday charm. Decorate a small kitchen corner with gingerbread figurines, cookie cutters, and a mini gingerbread house. Add a few baking tools like rolling pins or wooden spoons to make it look lived-in and festive. These Christmas kitchen decor are budget-friendly.
DIY Tip:
Bake your own gingerbread ornaments! Simply cut out cookie dough into stars or hearts, poke a hole at the top before baking, and hang them with twine around your display. They’ll make your kitchen smell divine too.
3. Gingerbread House Display on Countertop
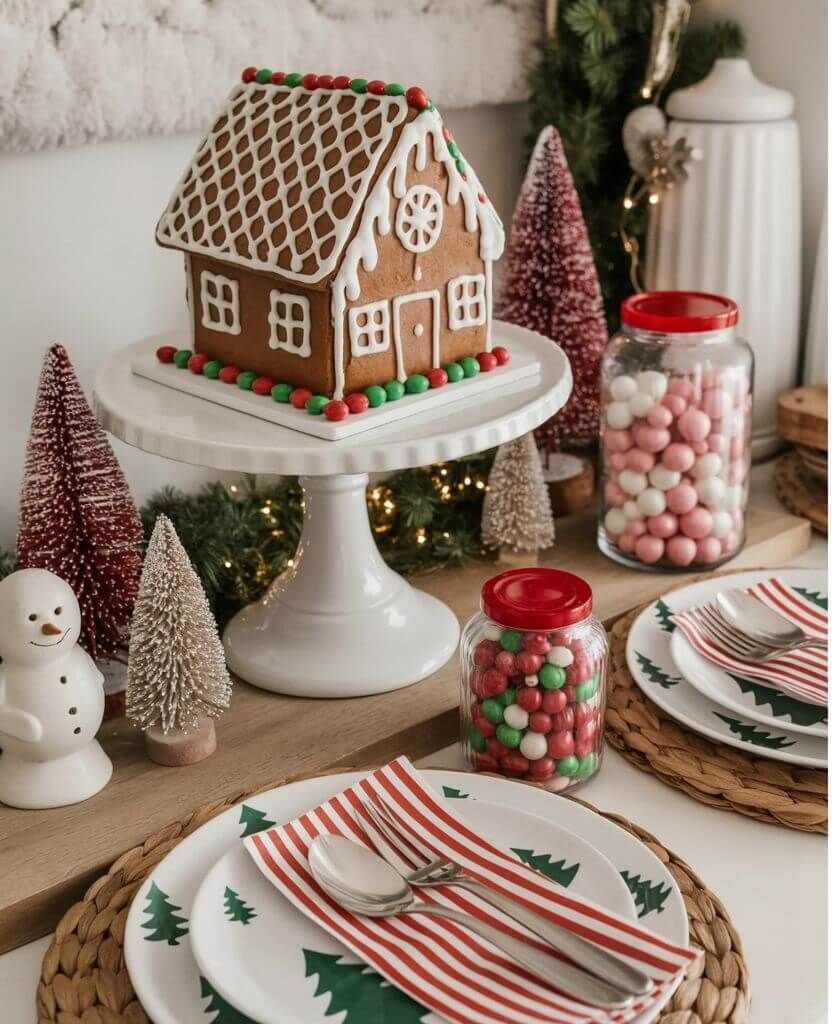
Bring a whimsical holiday touch to your countertop with a gingerbread house display. Surround it with mini trees, candy jars, and red napkins to make it feel like Santa’s bakery.
DIY Tip:
Use faux snow (like coconut flakes or powdered sugar) sprinkled around the display to give it that snowy North Pole effect.
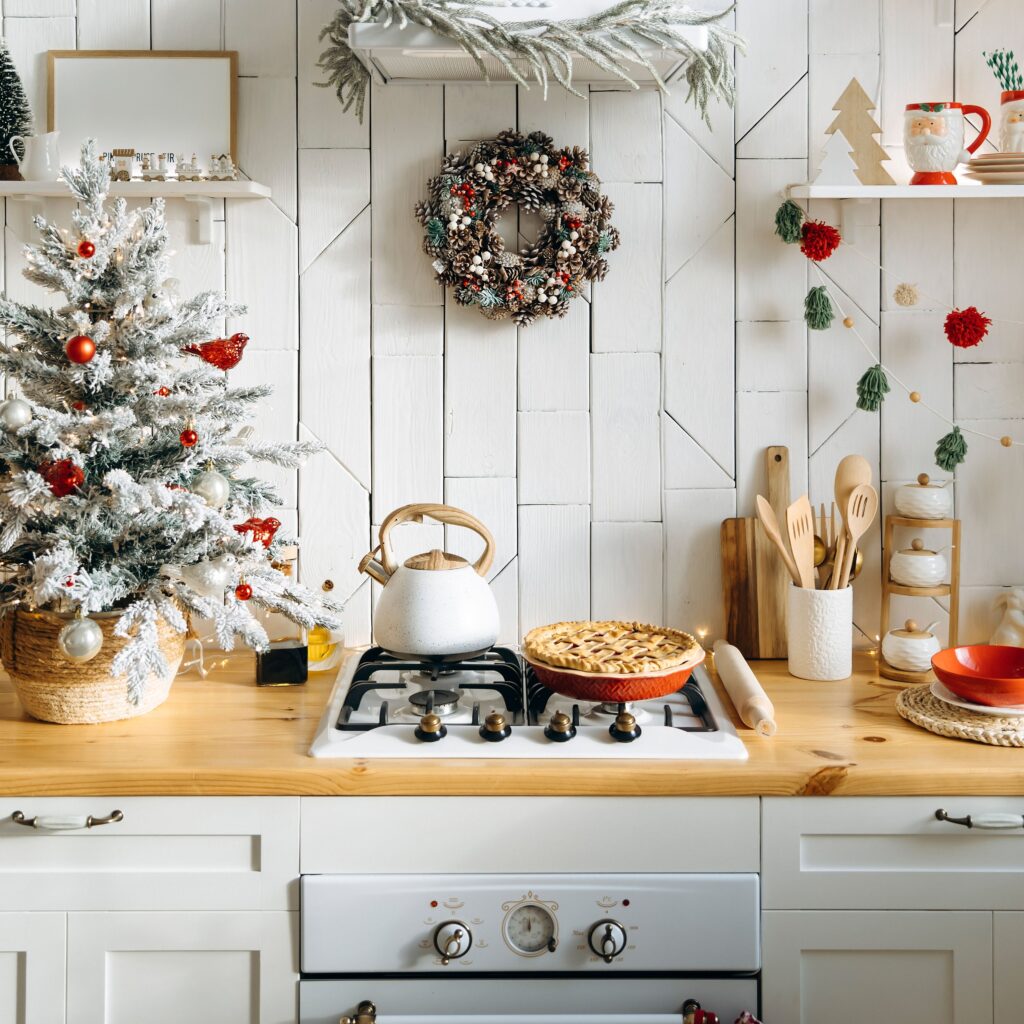
4. Christmas Wreaths on Kitchen Cabinets
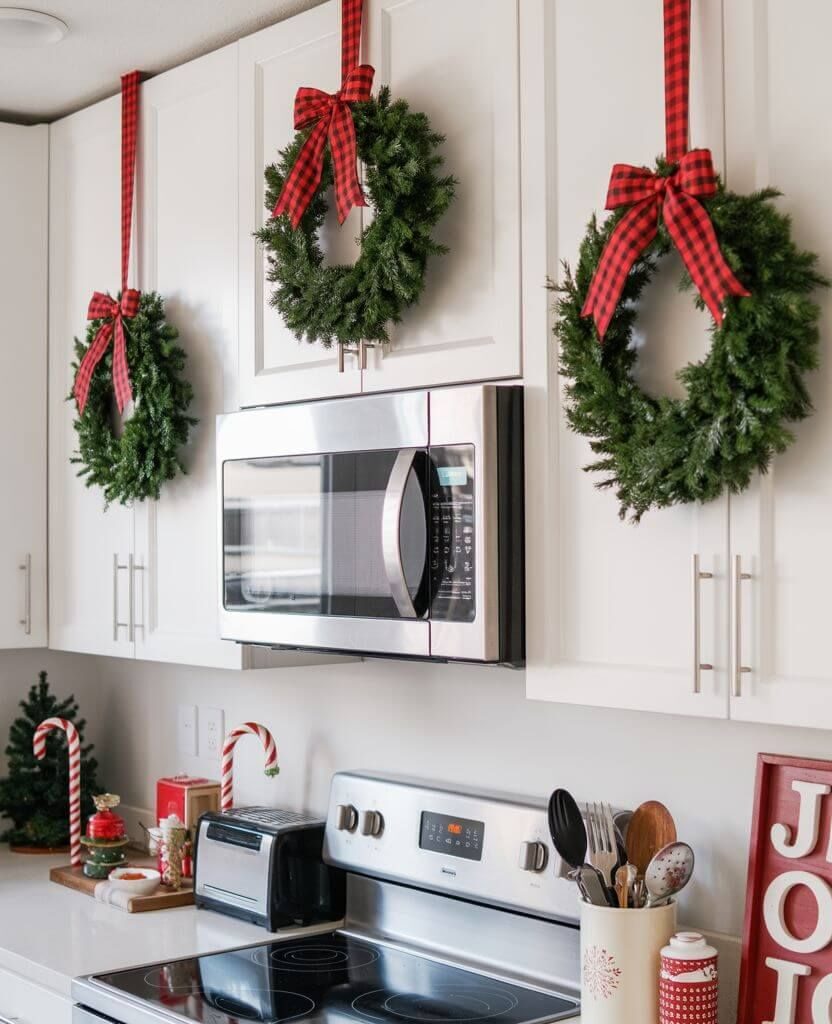
Small wreaths hanging from cabinet doors are an easy and elegant way to transform your kitchen. Add red ribbons, tiny ornaments, or dried orange slices for a rustic touch.
DIY Tip:
You can make mini wreaths using eucalyptus or pine branches. Wrap them in a circle and tie them with a bow. It’s budget-friendly and smells amazing!
5. Modern Minimalist Christmas Kitchen
If you love clean lines and neutral tones, a minimalist Christmas kitchen is for you. A simple garland, some white ceramic houses, and soft fairy lights can create a festive yet uncluttered look.
DIY Tip:
Spray-paint a few pinecones in matte white or silver and place them in a bowl on your counter. It adds instant winter elegance without going overboard.
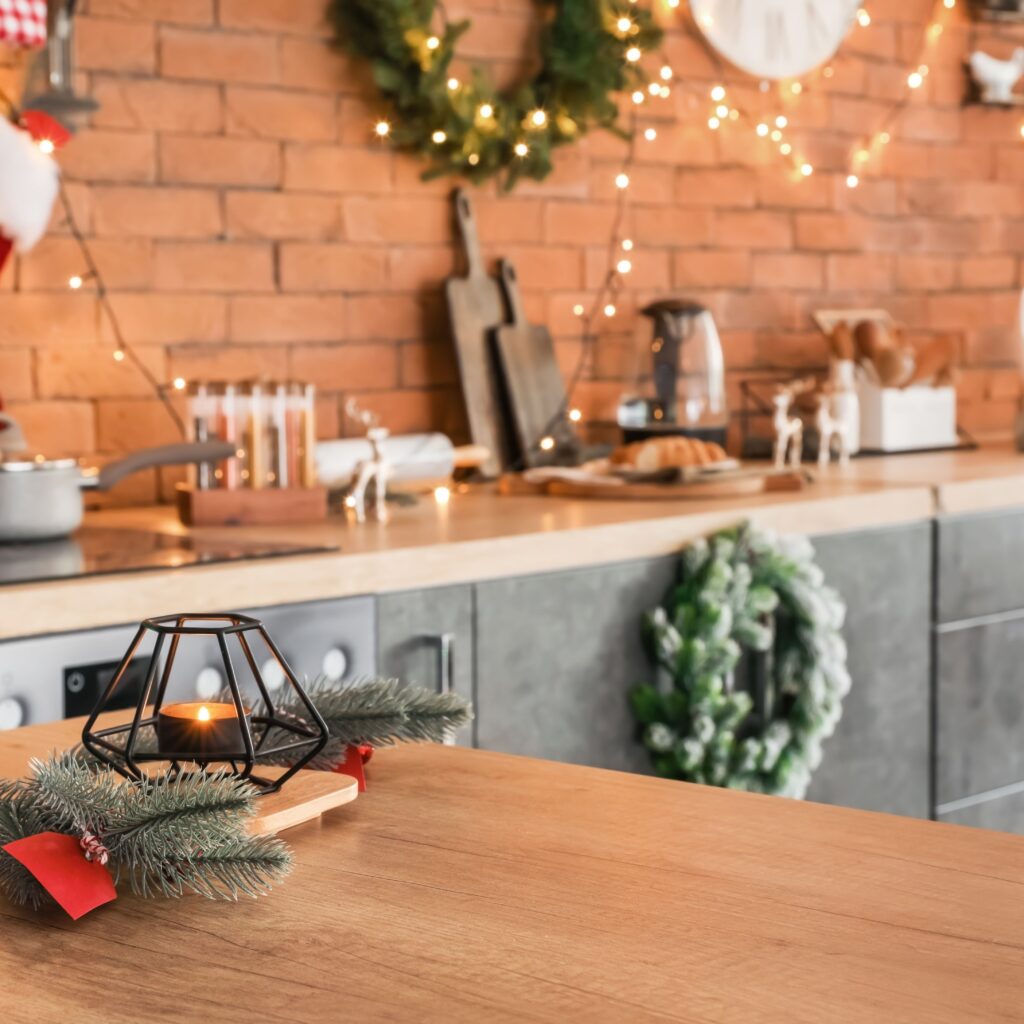
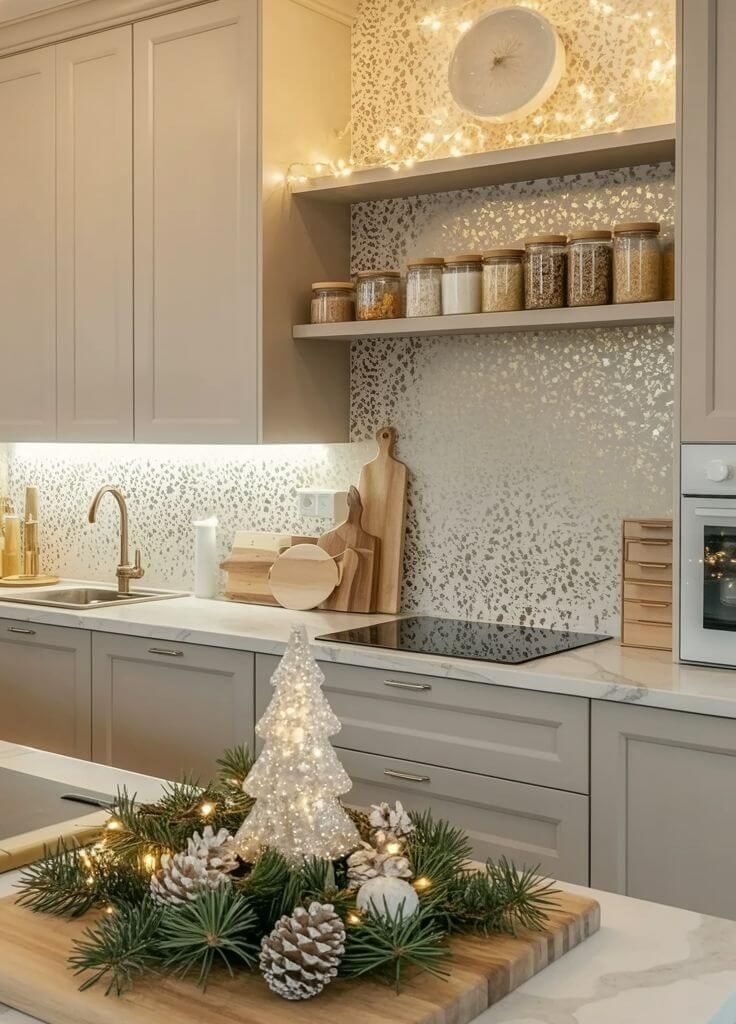
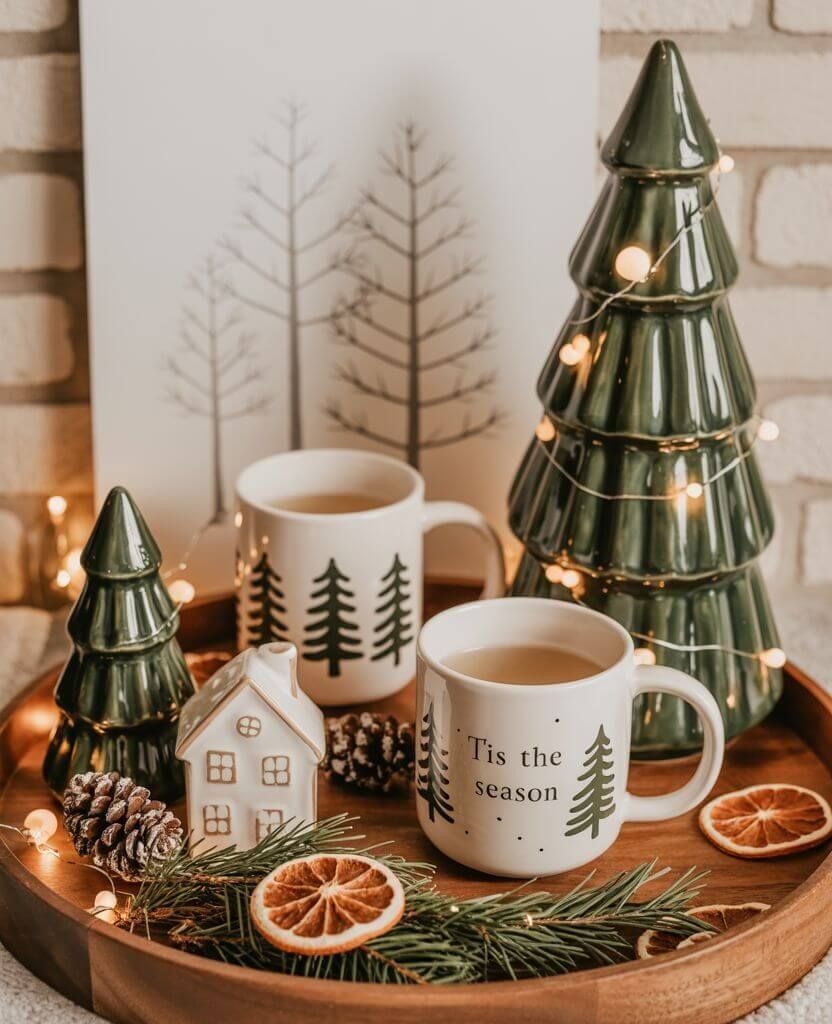
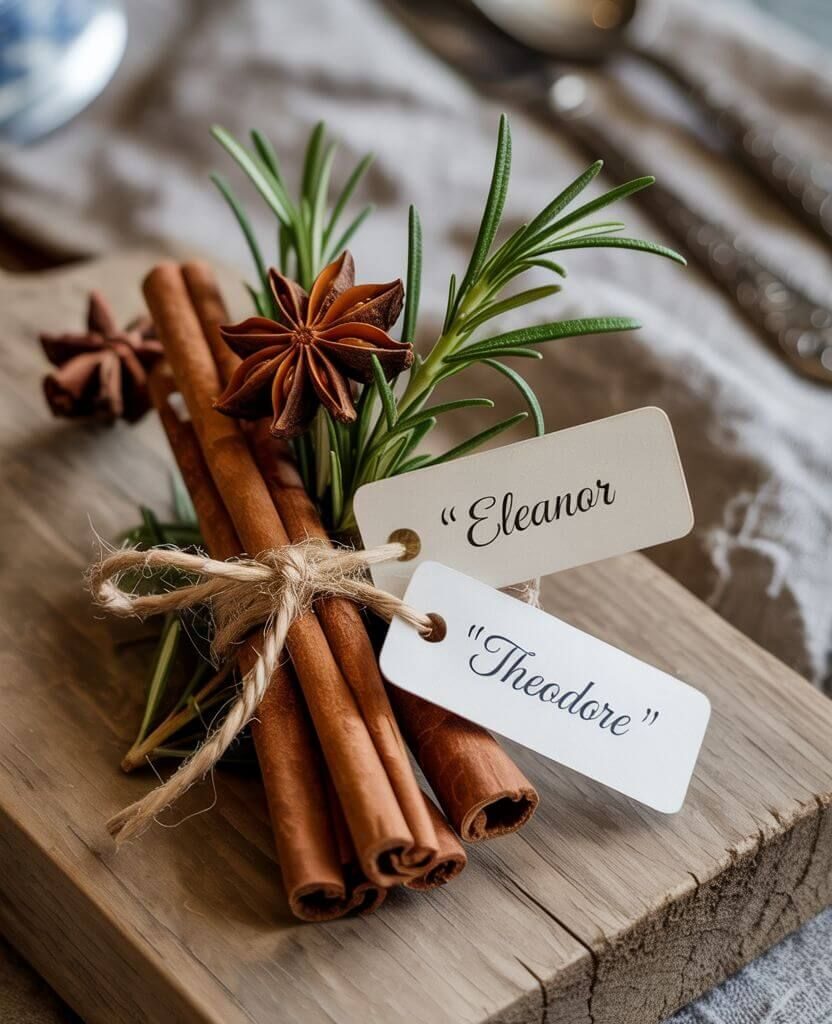
6. Cozy Christmas Tray Centerpiece
If your kitchen has an island or a wide countertop, a cozy Christmas tray is the easiest way to make it festive without clutter. Fill a rustic wooden tray with candles, mini Christmas trees, pinecones, and a few ornaments in soft red or gold. It’s warm, simple, and effortlessly stylish — like a little holiday vignette in the heart of your kitchen.
DIY Tip:
You can create your own version using things you already have — a wooden cutting board works perfectly as a base! Layer in greenery from your backyard and add cinnamon sticks tied with twine for a natural, festive scent.
7. Christmas Coffee Station
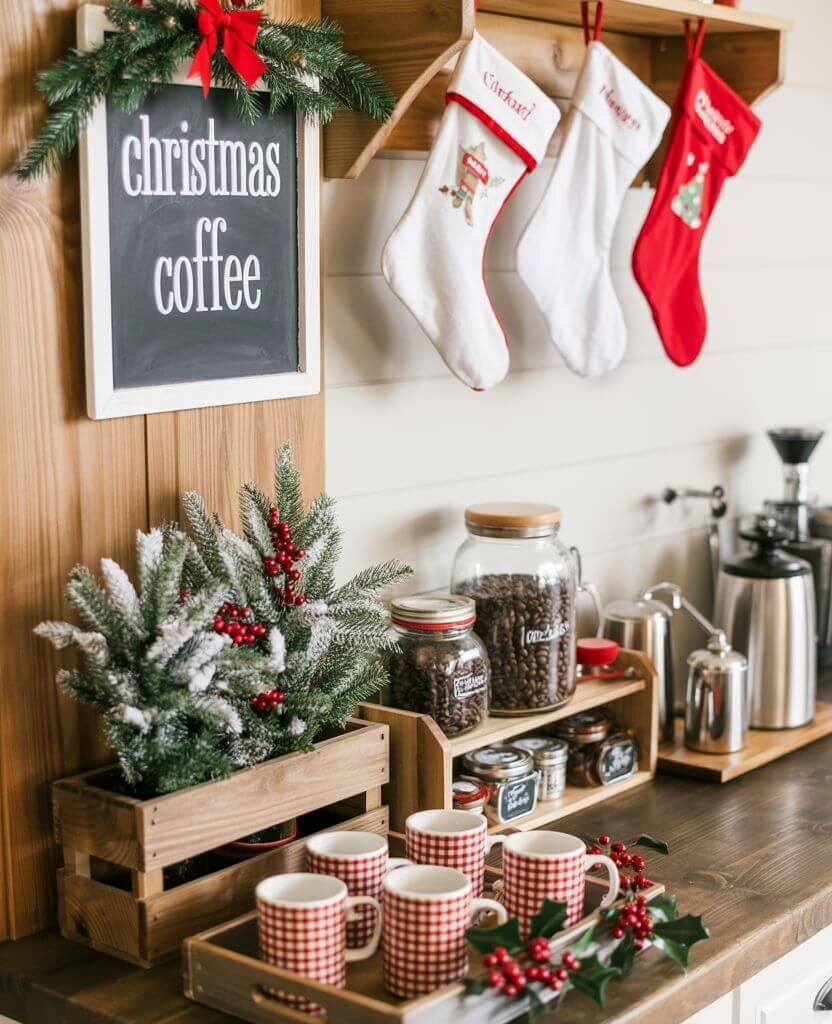
For coffee lovers, this might be the best idea on the list. A small Christmas-themed coffee or hot cocoa station instantly makes mornings feel more magical. Use holiday mugs, candy canes in jars, and a mini Christmas tree to complete the look.
DIY Tip:
Transform a small shelf or tray into a “holiday bar.” Add labels like “Cocoa Corner” or “Warm Wishes”, and keep everything in one pretty spot — it’s both practical and decorative.
8. Vintage Christmas Kitchen Charm
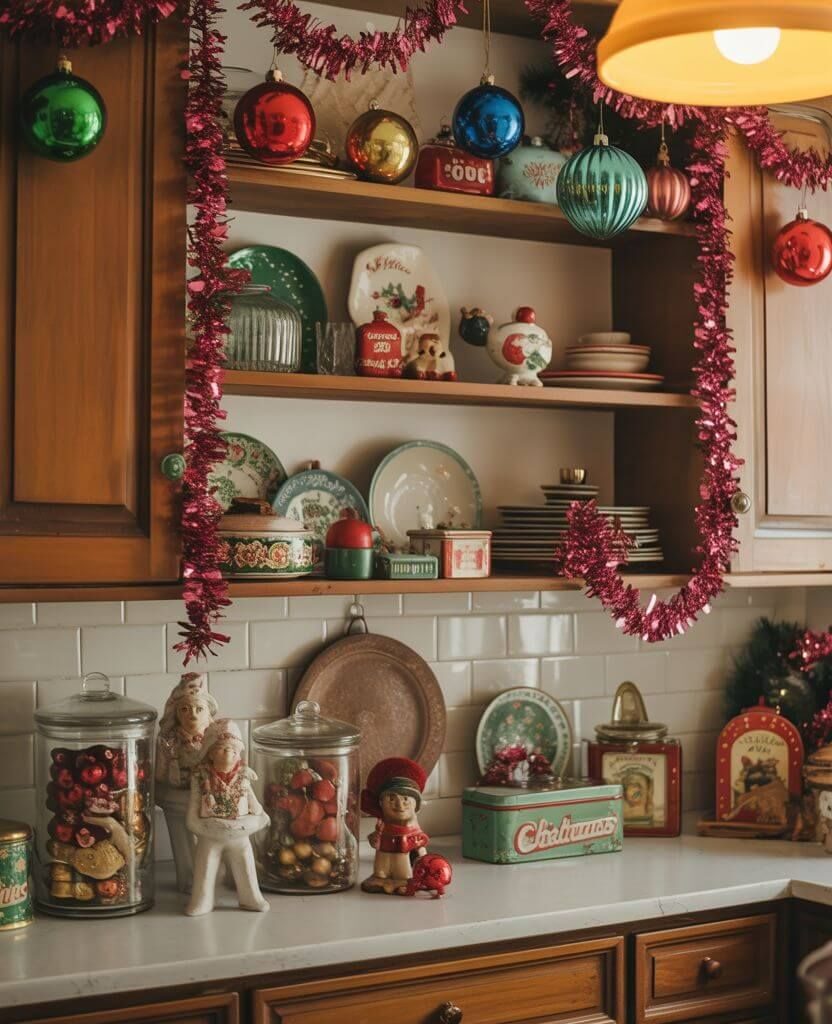
There’s something timeless about vintage Christmas kitchen decor. Think retro cookie jars, colourful ornaments, and a sprinkle of nostalgia. Combine classic holiday tins, glass milk bottles, or old-fashioned cake stands for that warm, inviting feel.
DIY Tip:
Visit a local thrift shop and hunt for vintage holiday plates or tins — they make perfect accent pieces for shelves or countertops. Don’t worry if they don’t match; that’s what gives the look its charm.
9. North Pole-Inspired Kitchen Nook
Bring a little North Pole magic into your kitchen with fun details like candy canes, Santa figurines, and snow-dusted mini trees. A small “North Pole” sign or a few red-and-white accents instantly turn a plain corner into a whimsical holiday display.
DIY Tip:
Use cotton balls or faux snow to create a frosty look. Add a little LED house or a lantern for that soft, glowing winter light — kids will absolutely love it!
10. Rustic Farmhouse Christmas Table
If your home has a farmhouse-style kitchen, this one’s for you. Bring that cozy countryside magic indoors with a burlap table runner, mason jars filled with pine sprigs, and a few candles for soft light. The mix of wood, greenery, and neutral tones feels natural, inviting, and relaxed — perfect for family meals.
DIY Tip:
Make your own simple table runner by cutting burlap or linen fabric to size and fraying the edges slightly for that authentic rustic texture. Add a few dried oranges or cinnamon bundles for a farmhouse scent.
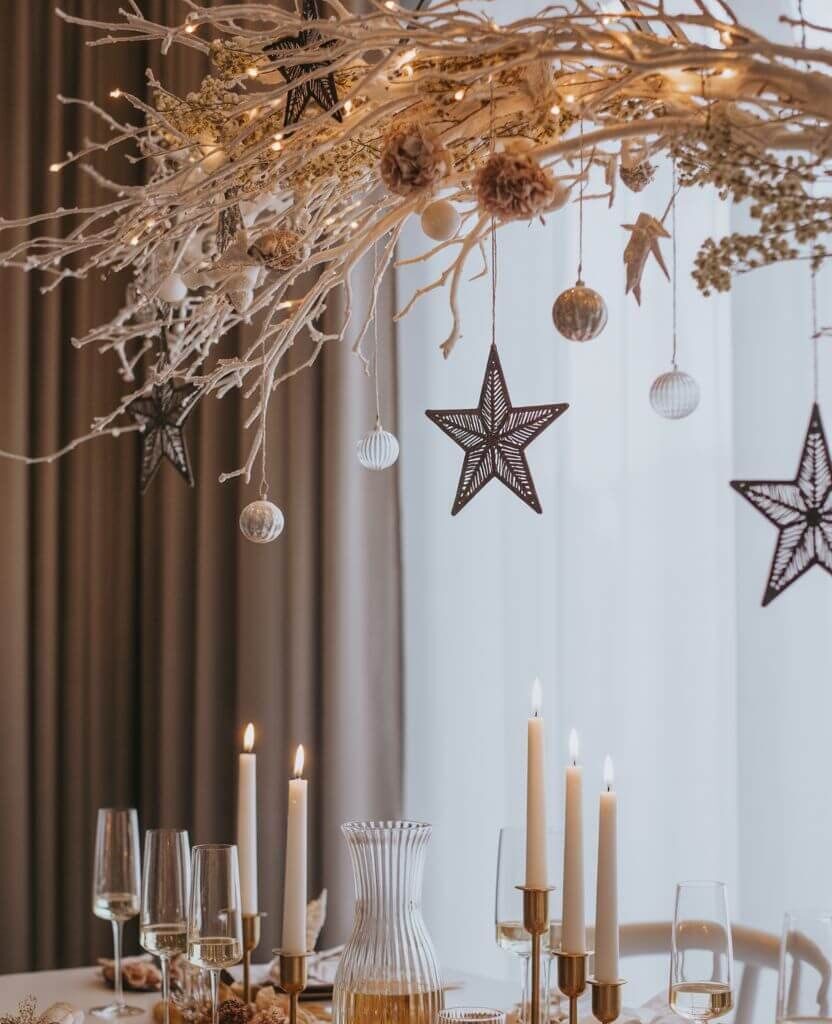
11. Christmas Ornaments Hung from Pendant Lights
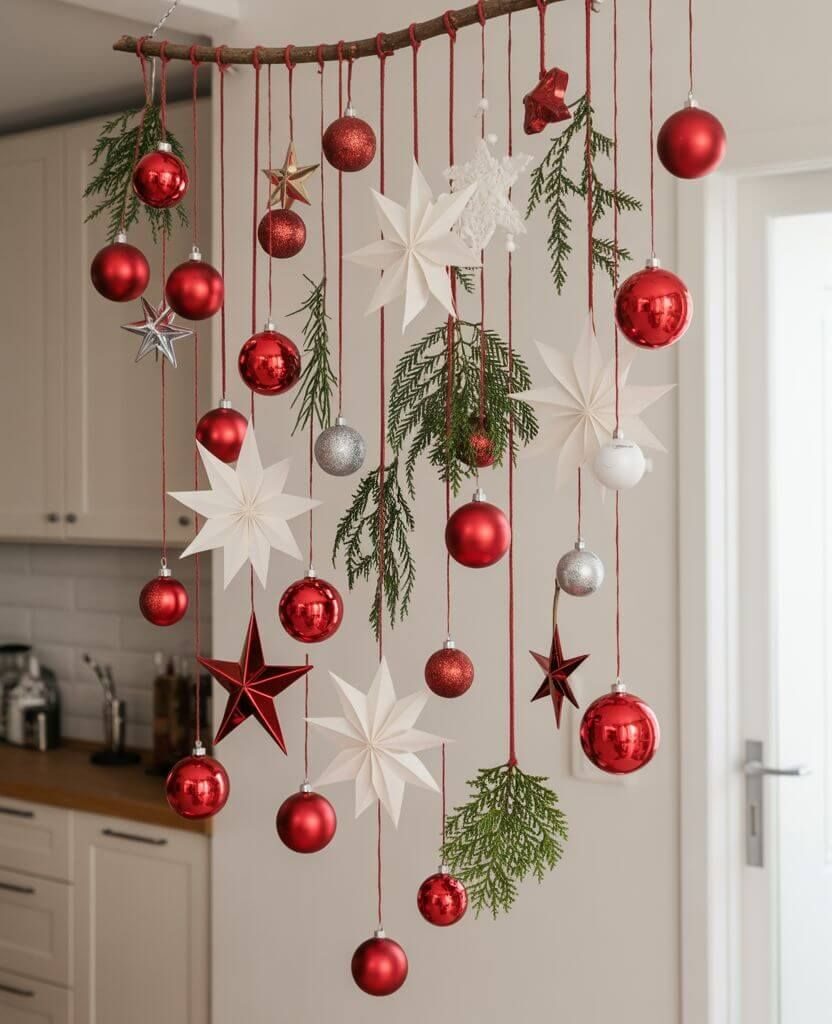
If you have pendant lights above your kitchen island, this idea is pure magic. Hang a few delicate Christmas ornaments — like silver snowflakes, red baubles, or stars — from the cords or hooks using thin ribbon. The reflection of the lights on the ornaments will make your kitchen sparkle every evening.
DIY Tip:
Mix ornaments in different textures — matte, shiny, and glittery — for a more dynamic, layered look. You can even hang tiny bells to create a soft jingle when the air moves.
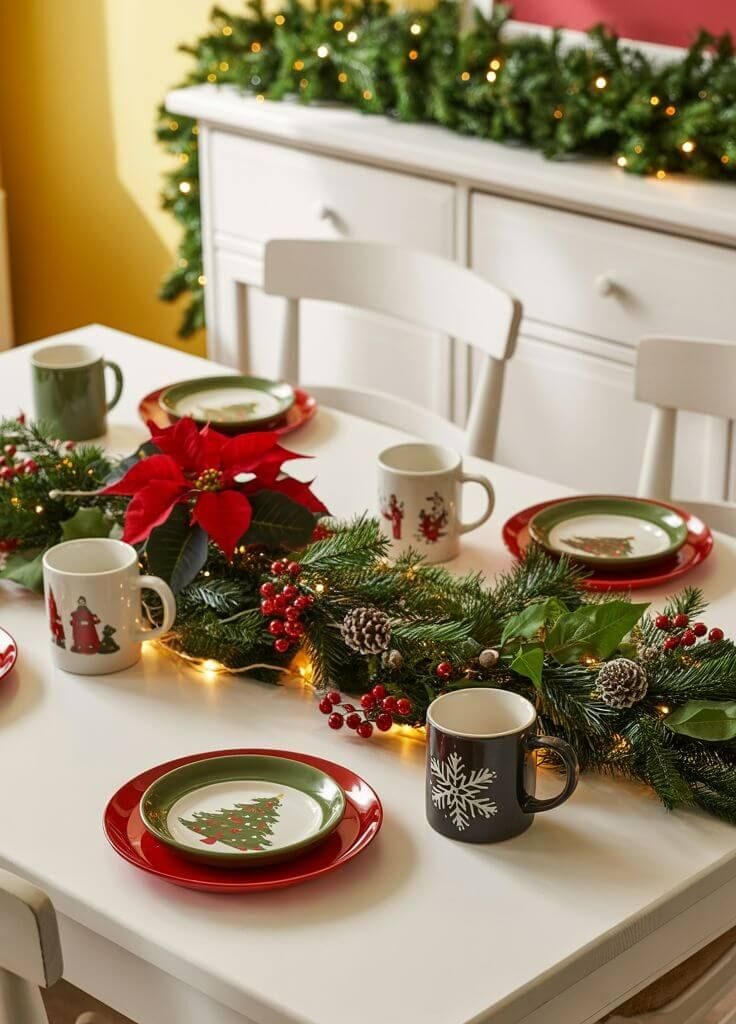
12. Red and Green Kitchen Accents
A classic red and green color palette never goes out of style. Use these timeless hues in small details — napkins, ribbons, candles, or a decorative tray filled with ornaments. It’s a subtle but effective way to tie the whole kitchen together without overwhelming the space.
DIY Tip:
Layer your tray with greenery (fresh pine or faux garland) and intersperse red berries and ornaments. Add one or two candles in gold or cream to soften the contrast.
13. Minimalist Neutral Christmas Kitchen
For those who love calm, modern interiors, minimalist Christmas kitchen decor is the way to go. Focus on soft whites, natural woods, and muted metallics. Add a garland above the cabinets or a simple pine wreath to bring life to the neutral tones.
DIY Tip:
Spray-paint a few old glass bottles in matte white or beige, and use them as vases for pine branches. It’s chic, sustainable, and effortlessly festive.
14. Cozy Window Wreath and Garland
Windows are often overlooked in Christmas decorating — but adding a garland or a mini wreath can completely change the vibe. When the evening light shines through, it creates a warm, fairytale-like glow in the kitchen.
DIY Tip:
Hang your wreath using satin ribbon instead of hooks for a softer look. Add fairy lights or small pinecones to give your garland more depth and sparkle.
15. Gingerbread Mug Tree
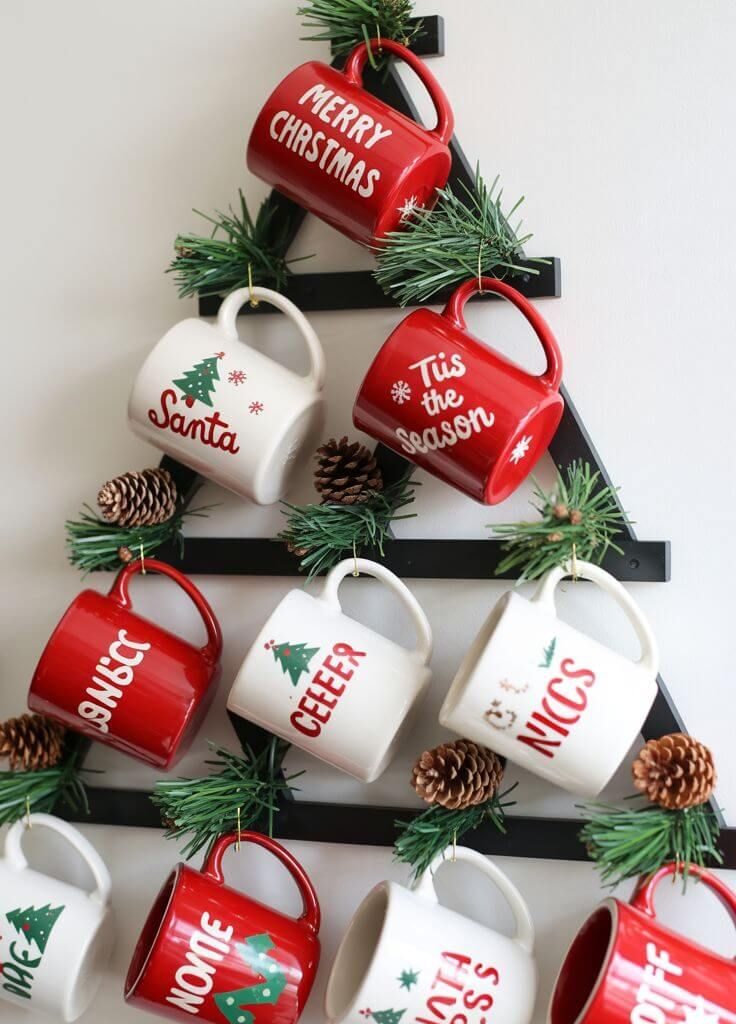
This one’s for the mug collectors! A mug tree stand filled with Christmas mugs — especially gingerbread or Santa-themed ones — adds instant holiday cheer to your countertop. It’s functional and decorative at the same time.
DIY Tip:
Don’t have a mug tree? You can repurpose a wooden drying rack or even a small coat hook board. Wrap a strand of fairy lights around it for extra charm.
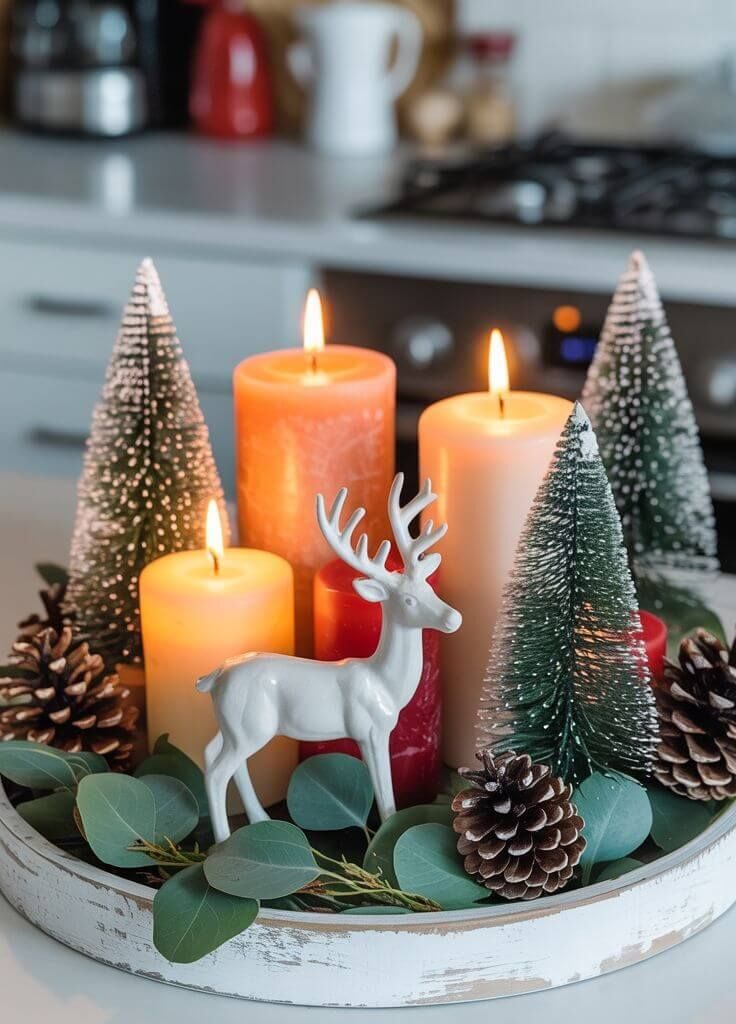
16. Wooden Tray with Candles and Pinecones

A wooden tray filled with pinecones, candles, and greenery is a timeless piece that works in any style of kitchen — farmhouse, boho, or modern. It’s the perfect balance of natural and festive.
DIY Tip:
Collect pinecones from your local park or garden, dry them, and dust them with a little white paint or glitter for a snow-touched look. Add dried oranges or cinnamon sticks for extra texture and scent.
17. Cozy Christmas Kitchen Glow
Sometimes, all you need is the right lighting to make your kitchen feel festive. Warm string lights, fairy lights under cabinets, or candles on the counter create that magical glow that feels like home.
DIY Tip:
Drape fairy lights along your shelves or above the backsplash, and mix them with small evergreen sprigs for a soft, natural touch.
How to Keep Your Christmas Kitchen Decor Fresh All Season
Once your Christmas kitchen is sparkling with lights, garlands, and gingerbread charm, you’ll want it to stay that way all season long. Here’s how to keep everything looking (and smelling!) merry and bright — from December 1st right up to New Year’s Eve.
1. Refresh Your Greenery Weekly
Natural garlands and wreaths tend to dry out, especially near the stove or under bright lights. Lightly mist them every few days or swap in faux greenery for a long-lasting look. You can also tuck in a few fresh pine branches from outside to keep that wonderful scent alive.
2. Rotate Fragrant Accents
Holiday scents make a kitchen feel cozy, but they can fade over time. Replace dried orange slices, cinnamon sticks, and pinecones with new ones mid-season. If you prefer a cleaner option, add a few drops of essential oil (like clove or sweet orange) to your decor for a quick refresh.
3. Keep Surfaces Simple and Practical
Between baking and wrapping gifts, kitchen counters can get busy. Choose lightweight decor — like trays and garlands — that you can easily move when cooking. This way, your kitchen stays both festive and functional.
4. Add a Little Sparkle Back
Fairy lights can dim after a while, so replace batteries or re-string them with a fresh set midway through the month. Adding a few new ornaments or swapping the placement of your tray decor can make your space feel brand new again without extra spending.
Quick tip:
If you love keeping things polished and modern, you might also enjoy our post on Elegant Black Christmas Tree Decorations for a Modern Holiday Look — it’s full of chic and unexpected holiday ideas that pair beautifully with a minimalist kitchen.
Let Your Kitchen Be the Heart of Christmas
Decorating your kitchen for Christmas doesn’t have to be complicated — it’s all about creating warmth, personality, and a touch of magic where you spend the most time.
From gingerbread corners to cozy tray centerpieces and vintage coffee stations, these Christmas kitchen decor ideas bring beauty and comfort to the heart of your home.
Whether you prefer minimalist elegance or nostalgic farmhouse charm, the best decorations are the ones that make you smile every time you step into your kitchen.
So light a candle, play your favourite Christmas playlist, and start transforming your kitchen into a cozy, joy-filled space where new holiday memories are made. See BHG kitchen ideas.
We hope these Christmas kitchen decor ideas inspired you to create your own cozy holiday magic at home.
Don’t forget to save your favourite ideas to Pinterest so you can easily find them when it’s time to decorate! More ideas on Stylicia.
And if you’re looking for more stylish Christmas inspiration, make sure to read our latest post on Elegant Black Christmas Tree Decorations for a Modern Holiday Look — it’s full of chic, Pinterest-perfect ideas you’ll love.

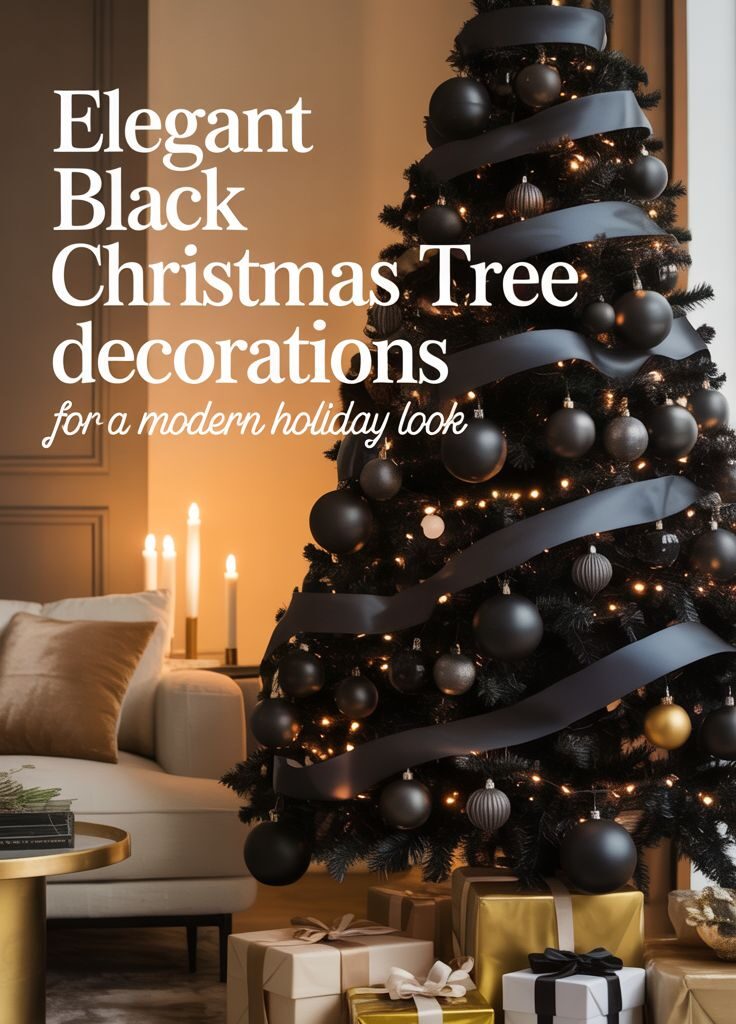
These black Christmas tree decorations look dramatic and stylish. When I think back to the Christmas tree decorations of my childhood, I always remember a joyful explosion of colours — a tree filled with every kind of ornament imaginable.
There were shiny baubles, paper snowflakes, golden garlands, and a few handmade decorations that still bring a smile to my face when I think of them.
The handmade ones were always my favourite — and even today, I think making your own Christmas tree decorations is one of the most heartwarming holiday rituals.
If you ever find the time, try it — turn on some Christmas music, sip your hot chocolate, and let your creativity flow. It’s such a relaxing way to get into the holiday spirit.
These days, though, I love experimenting with new Christmas tree ideas every year. I can’t wait to start decorating again — there’s something magical about watching the lights flicker through the branches as the ornaments slowly come to life.
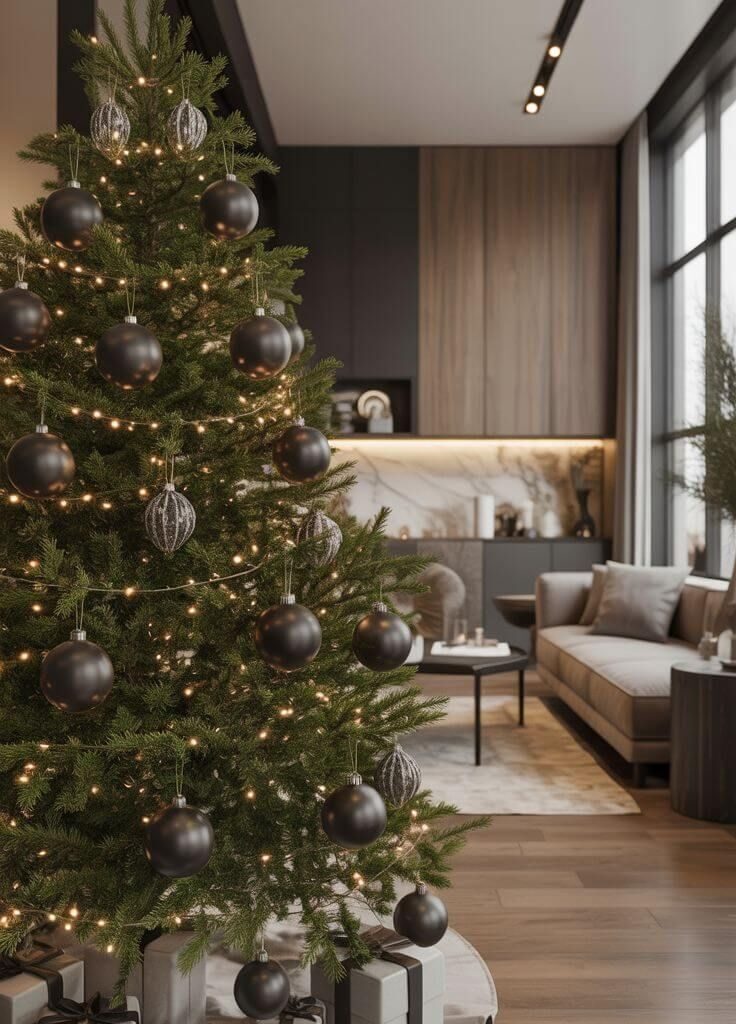
Why Black Christmas Tree Decorations?
As much as I adore those nostalgic, colourful memories, my style has evolved over time.
Now, I find beauty in simplicity — clean lines, muted tones, and thoughtful details that make a space feel calm yet festive.
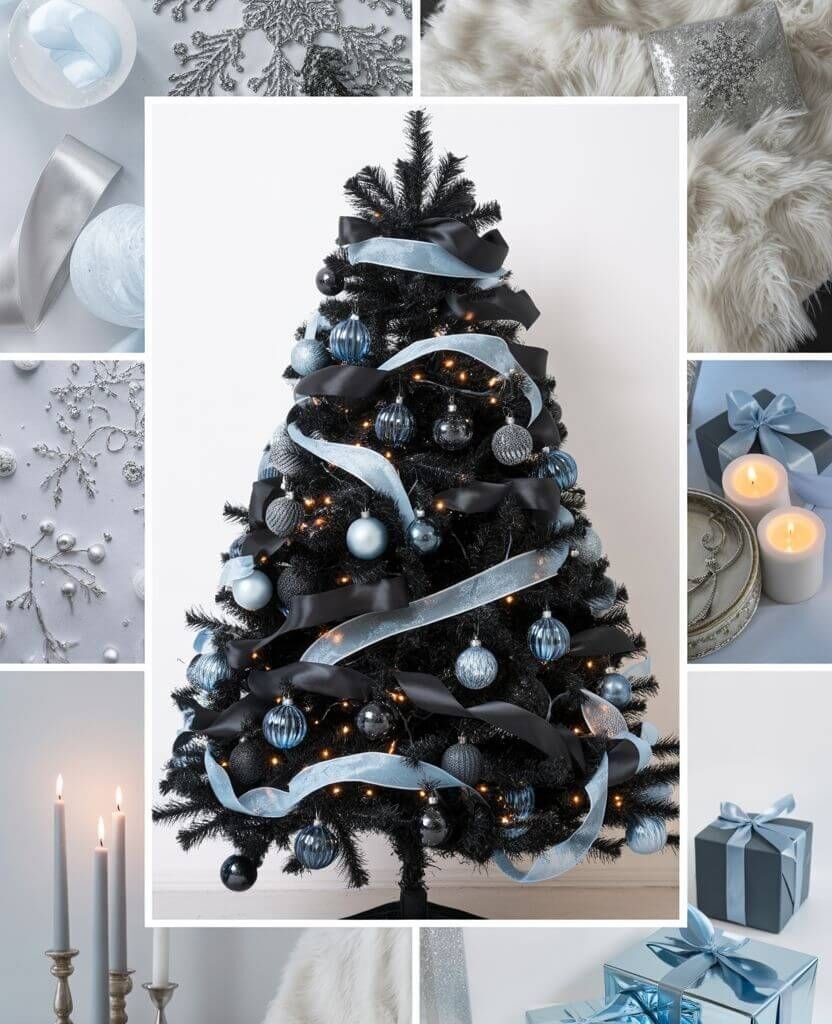
That’s probably why I’ve fallen in love with black Christmas tree decorations. They’re unexpected, bold, and incredibly elegant — the perfect way to create a modern Christmas tree that feels both stylish and sophisticated.
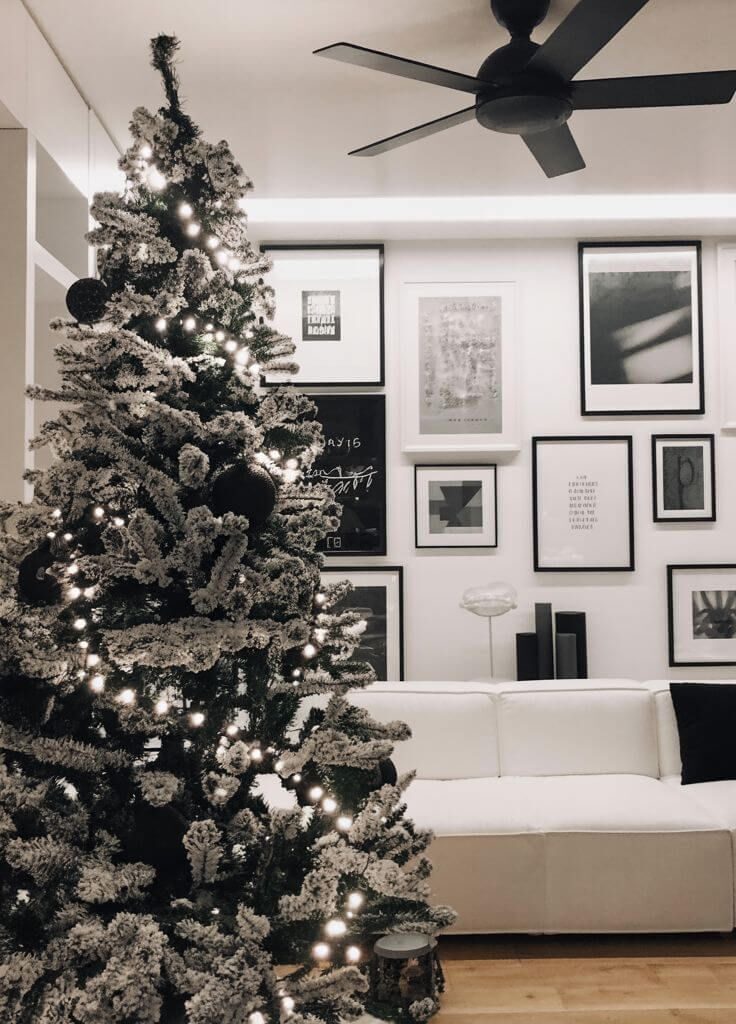
A black Christmas tree adds instant drama and depth to your living room.
Whether you pair it with gold for timeless luxury, silver for a minimalist glow, or jewel tones for a moody statement, it transforms your home into something beautifully unique. These black Christmas tree decorations make a bold statement.
This year, step away from the usual red and green, and embrace something daring — because sometimes, the most unforgettable Christmas tree decor is the one that surprises you. These black Christmas tree decorations make a bold statement.
How to Decorate a Black Christmas Tree for a Stylish Holiday Look
If you’ve never styled a black Christmas tree before, don’t worry — it’s easier (and more fun) than you think.
Here’s how to decorate a black Christmas tree beautifully while keeping it elegant and balanced: These black Christmas tree decorations make a bold statement.
- Start with the lights. Warm white lights create a golden glow, while cool tones highlight the dark branches for a modern vibe.
- Mix textures. Combine matte, glossy, glittery, and metallic ornaments for visual depth.
- Add contrast. White, gold, silver, or even blush pink ornaments pop beautifully against a dark tree.
- Think about the base. Matching gift wrap and a textured tree skirt in neutral or metallic tones complete the look.
- Keep it cohesive. Choose two to three main colours to maintain harmony while still feeling creative.
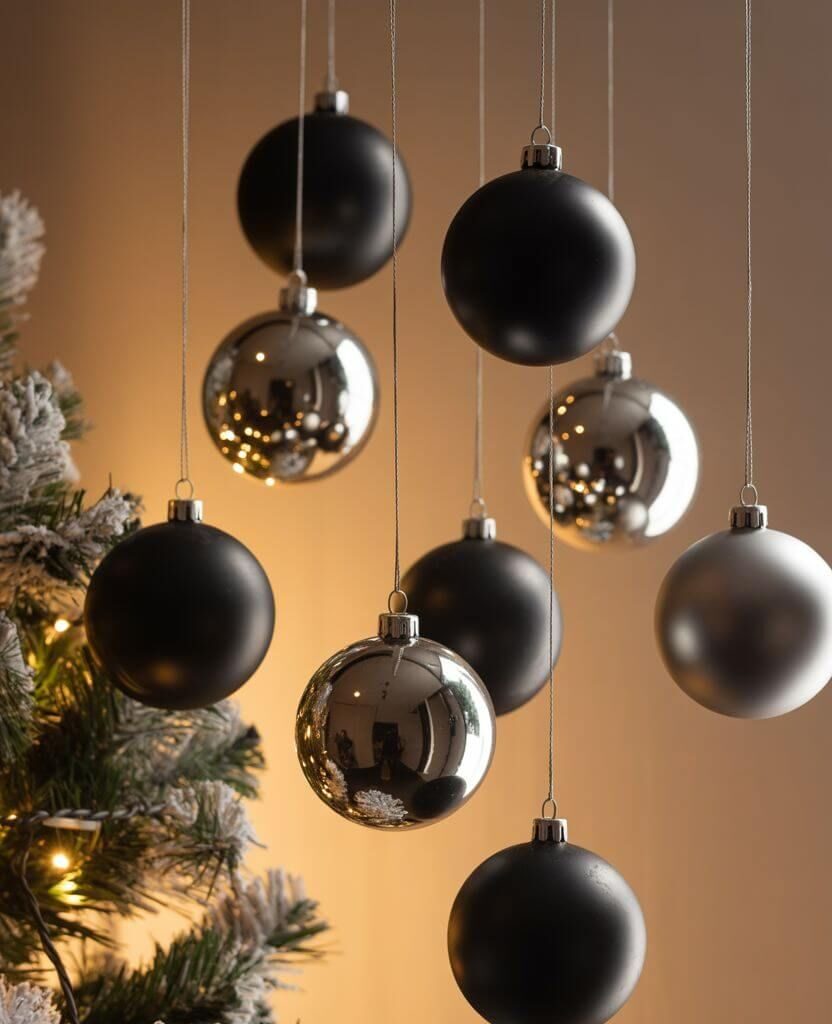
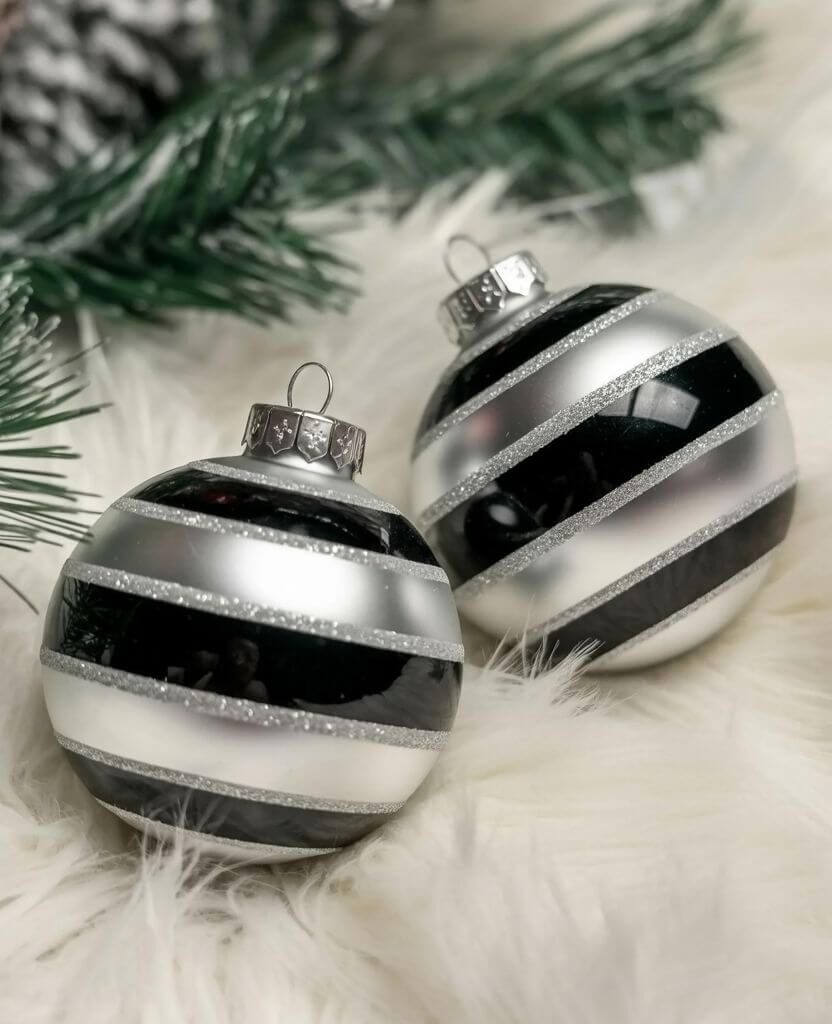
A few thoughtful touches — like ribbon garlands, black and gold ornaments, or pearl strings — can turn your black Christmas tree decor into an absolute showstopper.
Black Christmas Tree Ideas That Make a Bold Statement
Whether your home is minimal, boho, or glam, there’s a black Christmas tree decoration idea that fits your aesthetic.
A monochrome black-and-white setup feels timeless and chic, while a black-and-copper or black-and-green palette adds warmth and personality.
Try a modern black holiday aesthetic by pairing black ornaments with beige tones, wood textures, or glass details.
For something truly luxurious, layer metallic ribbons and crystal ornaments — they’ll shimmer beautifully under the lights. These black Christmas tree decorations create a stunning centerpiece.
From Gothic to Glam: Unique Christmas Tree Themes 2025
The upcoming Christmas decorating trends for 2025 are all about self-expression and mixing unexpected styles.
Here are a few of my favourite unique Christmas tree themes that will make your home feel magical:
1. Gothic Christmas Tree
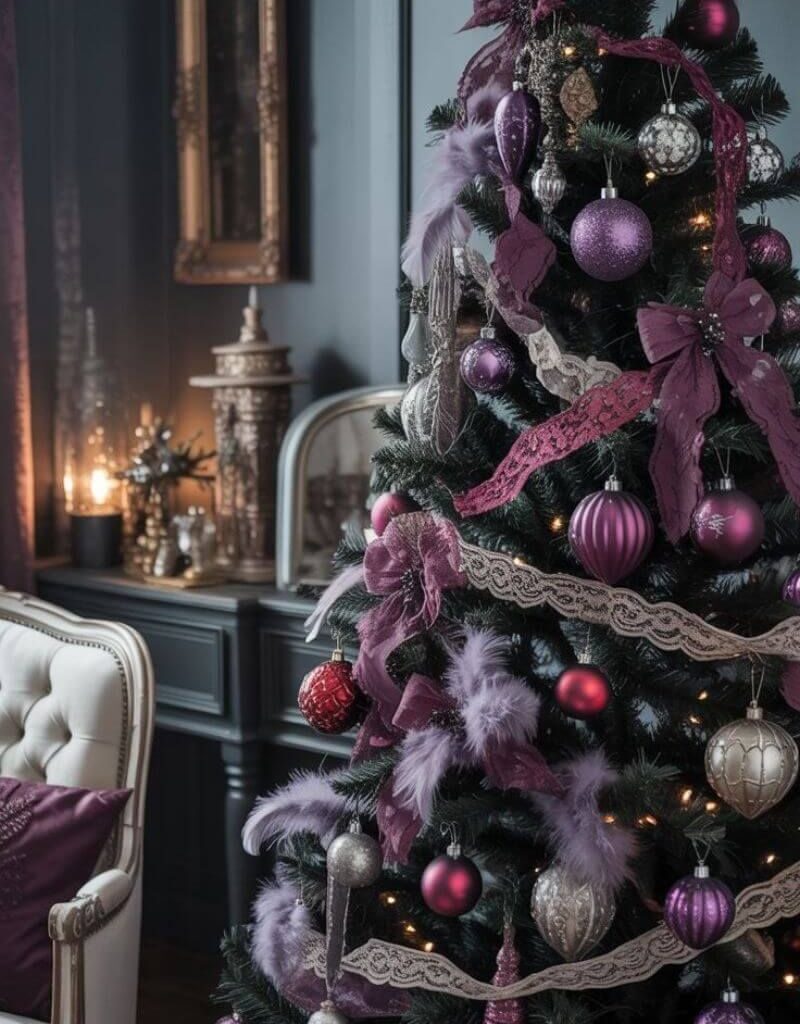
A gothic Christmas tree celebrates mystery and drama.
Decorate your black tree with deep purple ornaments, dark red roses, and vintage silver baubles.
Add lace ribbons or feather accents for a touch of Victorian romance. The result is dark, moody, and endlessly elegant.
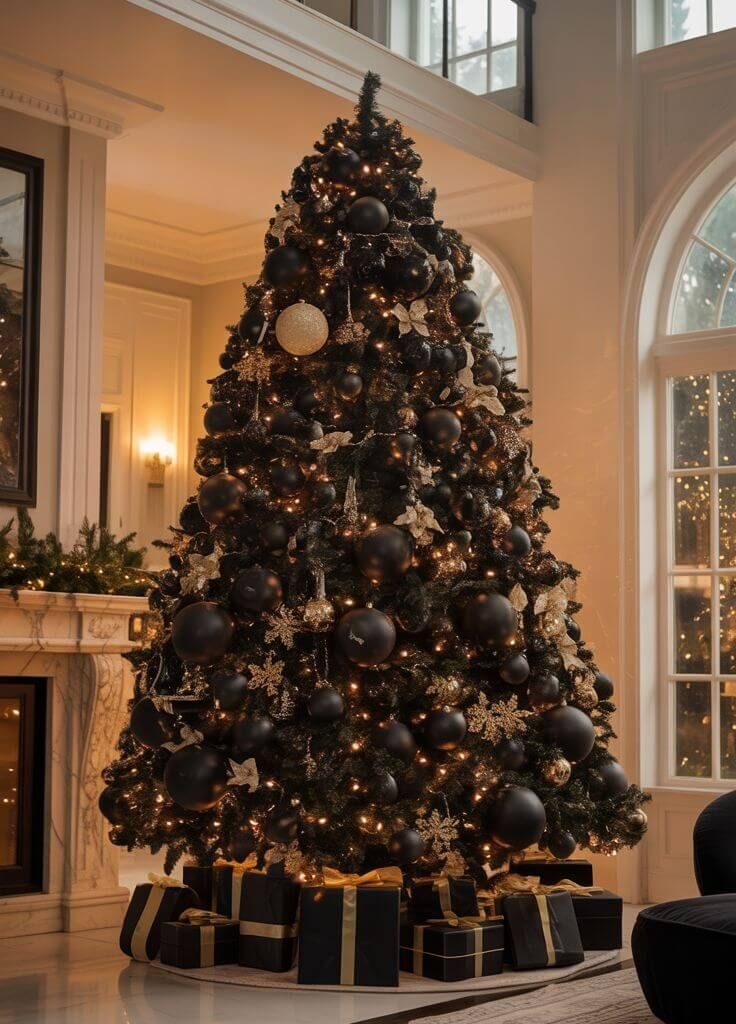
2. Glamorous Christmas Decorations

If you love sparkle, go for glamorous Christmas decorations with gold, silver, and crystal details.
A black and gold Christmas tree looks regal and timeless — perfect for a chic living room.
For something cooler, a black and silver Christmas tree adds a refined modern glow, while pearl or mirrored ornaments reflect the lights beautifully. These black Christmas tree decorations create a stunning centerpiece.
3. Unique Christmas Tree Themes 2025
Looking to break tradition? Try one of these trending black Christmas tree ideas:
- Black & Pink Christmas Tree: Soft, feminine, and dreamy.
- Black & Blue Christmas Tree: A moody winter wonderland.
- Black & Copper Christmas Tree: Warm and modern with an industrial edge.
- Black & Burgundy Christmas Tree: Rich and romantic, perfect for cozy homes.
- Black & Green Christmas Tree: Nature-inspired minimalism.
- Black & Turquoise Christmas Tree: Fresh, bold, and creative.
Each theme captures the Christmas tree inspiration of 2025 — unique, personal, and full of character.
4. Elegant and Modern Black Christmas Tree Decor
For those who love elegant Christmas decor, black is the new neutral.
It’s the perfect backdrop for subtle metallics, delicate lighting, and soft textures.
To achieve an elegant look:
- Use gold and pearl ornaments for a refined finish.
- Incorporate silk ribbons or sheer fabrics for a touch of softness.
- Keep your colour palette simple: black, champagne, ivory, or muted metallics.
This kind of black Christmas tree decor feels timeless yet current — the perfect blend of luxury and simplicity.
5. Glamorous Black Christmas Tree Ornaments That Shine
Your black Christmas tree ornaments are where the magic truly happens.
Think of them as jewellery for your tree — each one adds sparkle, texture, and story.
Try mixing:
- Crystal ornaments for shimmer.
- Matte black baubles for sophistication.
- Metallic stars and bells for a festive touch.
- Handmade clay ornaments for a personalized feel.
This balance of textures is what creates that black Christmas ornaments aesthetic you see in design magazines and Pinterest trends. These black Christmas tree decorations create a stunning centerpiece.
6. Dark and Moody Holiday Decor for a Modern Home

If your style leans toward the cozy and dramatic, embrace a dark and moody holiday decor theme.
A black Christmas tree with dim lighting, velvet accents, and scented candles creates an intimate atmosphere that feels luxurious yet grounded.
Pair your tree with warm metallic candleholders, faux fur throws, and subtle twinkle lights for a sophisticated chic Christmas living room decor.
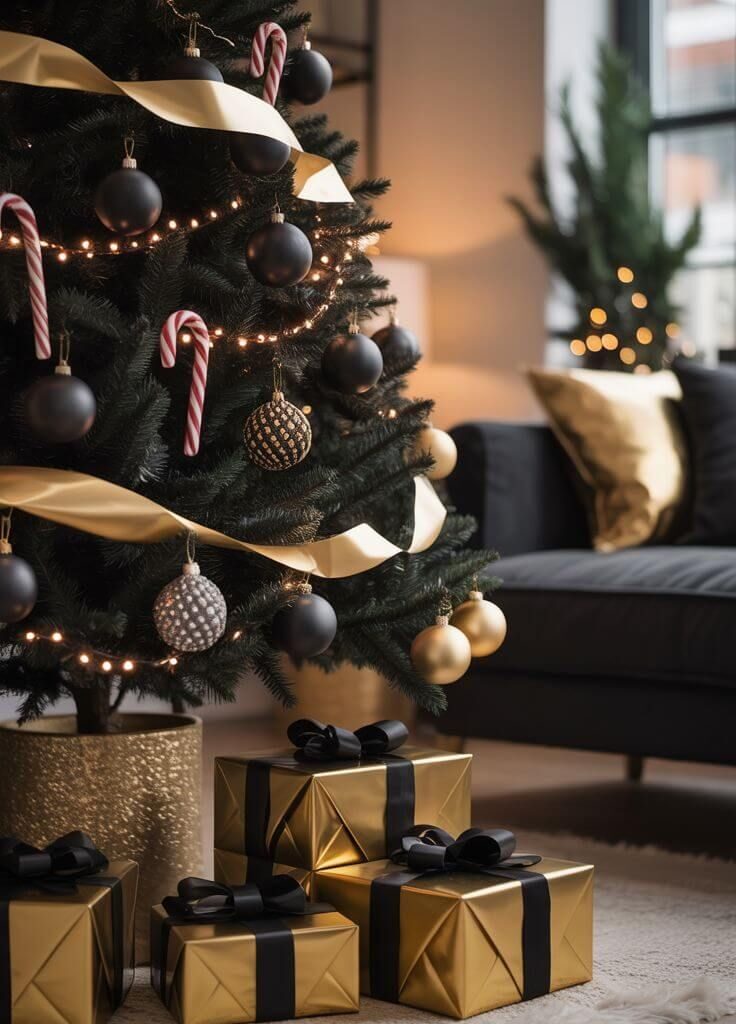
7. Luxury Christmas Tree Ideas You’ll Want to Try This Season
Turn your holiday setup into something worthy of a magazine cover.
Layer textures like velvet, silk, and metallic finishes for depth.
Add luxury Christmas tree ideas such as:
- A black and pearl theme with cascading ribbons
- Oversized ornaments in varying tones
- Black and white contrast for minimalist elegance
Black Christmas Tree Inspiration: Let Your Creativity Shine
And if you love bringing that festive feeling into every corner of your home, don’t stop at the tree — give your kitchen a cozy seasonal glow too. You’ll love these 17 Cozy Christmas Kitchen Decor Ideas that make everyday moments feel a little more magical. These black Christmas tree decorations create a stunning centerpiece.
The beauty of black Christmas tree decorations lies in their versatility.
They can be moody and mysterious or bright and glamorous, depending on how you style them. Visit BHG tree decor.
Whether you’re inspired by gothic romance, glamorous sparkle, or minimalist calm, the key is to let your personality shine through. More ideas on Stylicia.
So this holiday season, pour yourself a hot chocolate, turn on your favourite playlist, and decorate fearlessly.
Let your Christmas tree decorations tell your story — one ornament at a time.

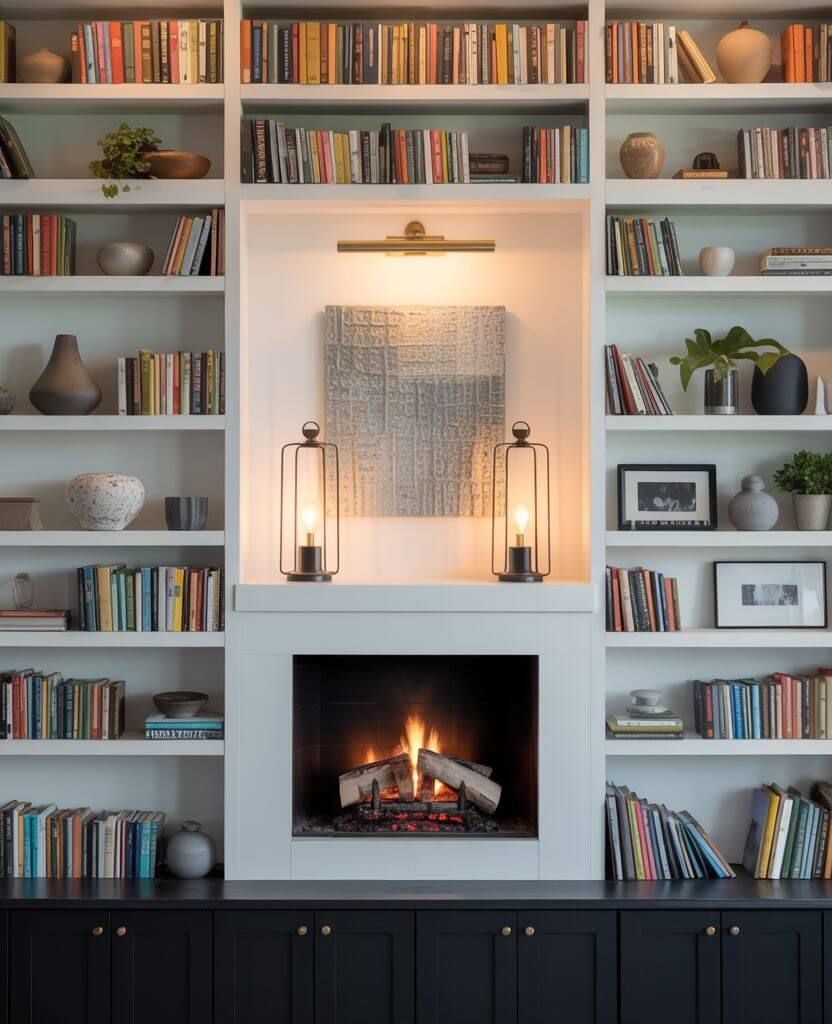
Built-ins around fireplace ideas can completely transform your living room. Whether you’re dealing with a small space or a tall ceiling, these built-in fireplace designs create both beauty and functionality.
The good news? With the right built-ins around fireplace ideas, you can completely transform your living room. Built-ins add depth, storage, balance, and personality — turning a simple wall into a stunning focal point that feels cohesive and inviting. Whether you’re dealing with a low ceiling, an outdated brick surround, or limited space, this guide will show you practical, inspiring fireplace built-ins that blend design with comfort.
Let’s explore how to create a living room that not only looks incredible but truly feels like home.
1. Fireplace Ideas for Short Ceilings: Creating Balance in Small Spaces
Low ceilings can make a room feel smaller and more closed in, especially when there’s a fireplace involved. The goal here is to create visual height and lightness.
If your living room has a short ceiling fireplace, opt for horizontal built-ins and light colour palettes such as off-white, beige, or pale gray. These tones help the eye travel smoothly across the space, creating a feeling of openness. Floating shelves placed lower to the ground balance the proportions, while soft LED lighting adds depth without overwhelming the space. These built-ins around fireplace ideas maximize storage and style.
Design tip:
Use recessed lighting above your fireplace or LED strips underneath floating shelves. This simple trick can draw attention upwards, subtly elongating the room. These built-ins around fireplace ideas maximize storage and style.
2. Fireplace Mantel With Shelves on Each Side: The Beauty of Symmetry

When the space around your fireplace feels empty or uneven, symmetry can be your best friend. Built-ins with shelves on both sides of the fireplace mantel add structure, balance, and elegance. It’s one of the most timeless fireplace built-in ideas you can incorporate. These built-ins around fireplace ideas maximize storage and style.
For a cozy yet modern look, try painting your shelves and mantel in the same neutral colour family. Add warm lighting, a few decorative vases, and personal items such as framed photos or small sculptures. Symmetrical built-ins work beautifully in both traditional and modern homes because they naturally bring visual calm and harmony.
Design tip:
Use matching wall sconces or lights on each side of the fireplace to enhance symmetry and highlight the textures of your decor.
3. Fireplace Flush With Floor: A Minimalist Approach to Modern Design

For those who love minimalism, a fireplace flush with the floor offers a clean, seamless look. This design is all about simplicity — straight lines, uncluttered walls, and a focus on materials like marble, concrete, or stone veneer.
A flush fireplace feels more integrated into the room’s architecture. Pair it with sleek built-ins featuring hidden storage to keep clutter out of sight. Choose matte finishes and subtle lighting to maintain that calm, grounded feeling. This approach works particularly well in Scandinavian-inspired or modern farmhouse interiors.
Design tip:
Keep accessories minimal — a single vase, a piece of wall art, or a stack of neutral books can make a powerful statement in a minimalist space. These built-ins around fireplace ideas are a worthwhile investment.
4. Built-ins Around Fireplace Ideas for Every Living Room Style

These fireplace built-in designs blend function and elegance effortlessly.
The mantel is more than a shelf — it’s a storytelling space. Whether your home leans rustic, modern, or transitional, your mantel decor sets the tone.
For a traditional look, try a wooden mantel with ornate details and symmetrical vases. For a modern aesthetic, choose a simple floating mantel in matte white or natural oak. Layer it with framed artwork, candles, or greenery for a touch of warmth.
Design tip:
Switch your mantel decor seasonally — light florals in spring, pumpkins in autumn, and candles in winter — to keep your space feeling fresh and inviting.
5. Fireplace Bench Decor: Comfort Meets Function

If your fireplace has a ledge or bench built around it, you’re in luck — this area can become the coziest spot in your home. Add bench seating with soft cushions and throw pillows to create an inviting nook for reading or relaxing.
A fireplace bench also serves as smart, hidden storage. Built-in drawers or baskets underneath keep blankets and books out of sight while maintaining a clean look. For smaller spaces, this idea adds both charm and practicality.
Design tip:
Layer different textures — linen, faux fur, or knit — to make the bench feel extra warm and welcoming. These built-ins around fireplace ideas are a worthwhile investment.
6. Brick Fireplace With Shiplap Wall: A Rustic Modern Makeover

Combining brick and shiplap brings together the best of both worlds — rustic warmth and modern charm. A brick fireplace with a shiplap wall feels timeless yet fresh, making it one of today’s most popular design combinations.
For a light and airy feel, paint the shiplap in crisp white or soft gray. This instantly updates traditional brick and keeps the space feeling bright. You can also blend textures by adding wood accents and matte black lighting fixtures.
Design tip:
Mix contrasting materials — like metal sconces or wooden mantels — to add depth and personality.
7. Fireplace Lighting Inspiration: Setting the Perfect Mood

Lighting plays a huge role in how your fireplace area feels. Soft, warm lighting highlights architectural details and adds an intimate atmosphere. Consider recessed lighting, wall sconces, or LED strips built into your shelves.
Place dimmable lights above or beside your fireplace to draw attention to your favourite decor items. Lighting isn’t just functional — it transforms the fireplace into an evening focal point.
Design tip:
Install sconces on each side of the fireplace for symmetry, or line the built-ins with LED strips for a soft glow that feels modern yet cozy. These built-ins around fireplace ideas are a worthwhile investment.
8. Fireplace Ideas and Decorations: Adding Personality and Warmth

When exploring different fireplace built-ins ideas, consider how the materials complement your flooring and wall tones.
Your fireplace should reflect your personality. Whether you love minimalist elegance or cozy rustic vibes, decorating your fireplace built-ins helps tell your story.
Add framed art, potted plants, candles, and books that inspire you. Don’t be afraid to mix textures — metal with wood, glass with ceramics — to create dimension and interest. The key is balance: too little decor feels cold, while too much feels cluttered.
Design tip:
Group items in threes and vary their height for a designer look that feels effortless.
9. Fireplace With Lights on Each Side: Elegant Symmetry That Draws the Eye

Few things create a more polished look than lights on each side of the fireplace. Wall sconces or small pendants add both function and charm while emphasizing the fireplace as the room’s natural focal point.
Choose lighting fixtures that complement your style — brushed gold for elegance, matte black for modern simplicity, or bronze for a rustic touch. These details not only enhance balance but also create visual warmth.
Design tip:
Use smart lighting controls to adjust brightness levels and set the perfect ambiance at any time of day. These built-ins around fireplace ideas are a worthwhile investment.
10. Arched Built-ins Around Fireplace — Curved Shelving That Adds Timeless Charm
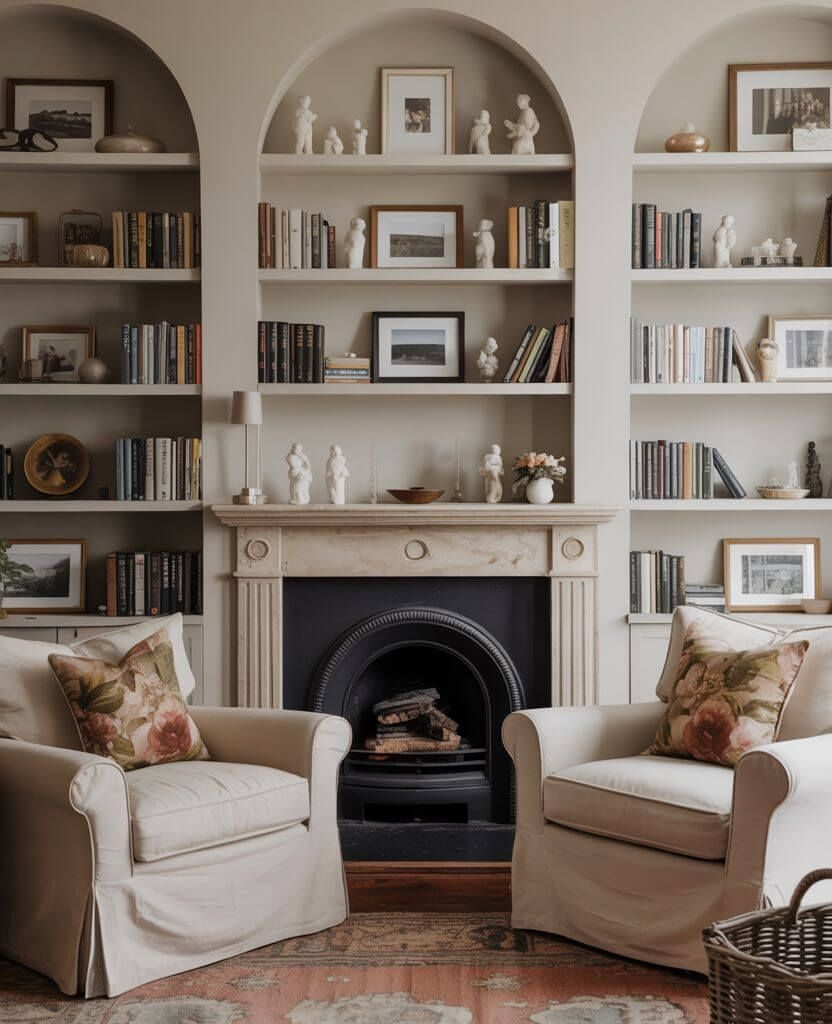
If you love designs that feel soft and architectural at the same time, arched built-ins around the fireplace are the perfect choice.
The curved shelves naturally draw the eye toward the centre, framing your mantel beautifully and adding a touch of timeless character to your space.
You can style these arched built-ins with neutral-toned books, ceramics, and framed art to create a balanced, elegant look. The curves break the rigidity of straight lines, making the room feel warm, classic, and inviting — ideal for traditional or transitional living rooms.
Design Tip:
For smaller spaces, choose lighter paint tones like cream or sand beige to keep the atmosphere airy. For larger homes, consider a soft taupe or warm grey for a more dramatic, sophisticated mood.
A Fireplace That Feels Like You

With the right built-ins around fireplace ideas, your living room becomes both a visual and emotional focal point.
Your fireplace isn’t just a design element — it’s the heart of your home. From short ceiling fireplace ideas to mantel styling, every choice you make shapes how your space feels. Whether you dream of a rustic brick feature or a minimalist built-in design, remember: great interiors blend beauty with purpose. Visit Architectural Digest.
Built-ins around your fireplace aren’t just about shelves and storage — they’re about creating balance, warmth, and connection. With the right mix of lighting, textures, and thoughtful decor, your fireplace can become more than a focal point — it can become a reflection of you. More ideas on Stylicia.
Loved these fireplace built-in designs? Pin this guide to your “Living Room Ideas” board so you can revisit these elegant fireplace inspirations anytime you start planning your next home update.

These tips to get ready for Christmas in November will save you time and stress. A calm, cozy, and clutter-free holiday starts here.
I’ve always been a planner type — lists, calendars, colour-coded notes, all of it. But somehow, when December rolled around, everything turned into chaos. I’d be wrapping gifts at midnight on the 23rd, still decluttering the living room, and rushing to finish handmade presents I started weeks ago.
That’s when I realised something important: if you get ready for Christmas in November, the holidays feel completely different. There’s less stress, more joy, and way more time to actually enjoy the season. Anyone who starts preparing early isn’t being “too much” — they’re simply choosing to welcome Christmas with love, calm, and intention.
If you’ve ever felt overwhelmed by the December rush — when joy turns into stress and your to-do list steals your calm — this post is for you. Here are 10 real-life things you can do in November to get ready for Christmas and create a cozy, clutter-free, and truly magical season.
1. Declutter Before You Decorate — Create Space for Joy
Before the tinsel takes over, give your home a quick reset. Decluttering before Christmas is one of the most powerful things you can do for your peace of mind. Clear away old décor, toys, and random clutter that has built up throughout the year. Donate what no longer fits your space or style, and make room for the items that truly spark joy this season.
Start small — one shelf, one drawer, or one corner at a time. Your goal isn’t perfection; it’s breathing space. When your home feels lighter, decorating becomes more enjoyable and your mind feels calmer too.
2. Finish — or Simplify — DIY Christmas Gifts
If your half-finished knitting project is staring at you from the corner, it’s okay to simplify. Handmade gifts are beautiful, but they can quickly turn stressful when you’re short on time. November is the month to finish what you can — and gracefully let go of what you can’t. Start to get ready for Christmas in November with these simple strategies.
Focus on easy, heartfelt projects that don’t require hours of crafting: DIY spa salts, hot cocoa mix in jars, or handwritten recipe cards tied with twine. Simple gifts made with love are just as meaningful as elaborate ones. Start to get ready for Christmas in November with these simple strategies.
3. Create a Realistic Christmas Budget

A stress-free Christmas starts with clarity. Sit down with a warm drink and make a list of your expected expenses — gifts, décor, food, travel, wrapping supplies, and even the little extras that sneak up later. Start to get ready for Christmas in November with these simple strategies.
Creating a Christmas budget in November gives you a clear view of what’s ahead and helps you avoid that January regret. You don’t have to be strict, just mindful. A simple spreadsheet or a notebook can keep you organized and confident all season long.
4. Start Your Christmas Baking Early

Baking now means less chaos later. If you love to gift homemade treats, try baking in batches this month and freezing them. Cookies, muffins, or breads can be made ahead of time, so by mid-December you’re free to enjoy the smells of cinnamon and sugar without the rush.
If you don’t want to bake yet, prepare dough and freeze it — you’ll have fresh cookies ready in minutes when guests arrive. Small actions now add up to big calm later. When you get ready for Christmas in November, you avoid the December rush.
5. Declutter Your Digital Space Too
Your phone and inbox deserve a holiday refresh as much as your home. Take an hour to delete old photos, unsubscribe from promo emails, and organize your digital receipts and shopping lists into folders.
When December gets busy, having a tidy digital space makes a huge difference — no frantic scrolling, no missing confirmations, no wasted time. This little decluttering ritual keeps your online life as calm as your living room.
6. Update (and Simplify) Your Gift List
This is where most people lose track — buying more than they planned, or forgetting someone entirely. Start by writing a simple Christmas gift list: who you’re buying for, what you’ve already purchased, and what’s still on the list.
Apps like Notion or a paper notebook both work fine. Seeing everything in one place helps you stay on budget and shop with intention. And don’t forget to include yourself — even if it’s just a cozy pair of socks or a day off in December.
7. Set Up a Simple Wrapping Station

You don’t need a whole room for wrapping — just a dedicated spot where everything lives: scissors, tape, tags, ribbon, and paper. A small basket, a storage bin, or even a repurposed stool can keep your wrapping stress-free.
Keep your wrapping station stocked and accessible, so when you buy gifts, you can wrap them immediately instead of saving it all for Christmas Eve. It’s one of the easiest ways to avoid that “last-minute chaos” feeling.
8. Plan Your Christmas Menu (and Keep It Simple)
Instead of a complicated twelve-dish dinner, plan a cozy and doable menu that lets you actually enjoy your guests. Choose a few crowd-pleasers that can be made ahead or prepped the night before. When you get ready for Christmas in November, you avoid the December rush.
November is perfect for testing recipes and making a grocery list early. You can even start buying non-perishables or baking ingredients in advance. Planning now means you’ll spend December cooking with joy — not exhaustion.
9. Prepare Your Home for Guests
You don’t need a magazine-perfect home — just a welcoming one. Fresh linens, a few candles, and decluttered spaces make guests feel instantly at ease. Take a walk through your home and imagine it from a visitor’s perspective.
Focus on the entryway, guest bathroom, and living room. Add a few cozy touches like blankets or soft lighting. A calm, intentional space sets the tone for a peaceful Christmas season.
10. Decorate with Intention, Not Pressure
The debate never ends: decorate before or after Thanksgiving? The truth is — do what brings you joy. Some people wait until December, while others begin as soon as Halloween ends. Last year, I decorated early because I wanted to enjoy every moment together — and it turned out to be the most relaxing Christmas I’ve ever had.
You don’t need to decorate everything. Start with the tree, lights, or a few favourite corners. Decorating intentionally reminds you that Christmas isn’t about perfection — it’s about connection.
Bonus Tips for an Even Calmer December
If you’re ahead of schedule, here are a few small but mighty extras to make December even smoother:
- Buy leftover Halloween candy and save it for stockings or baking.
- Prepare your Advent calendar — whether you buy one or create your own.
- Plan your holiday outfits early to avoid last-minute stress.
- Book appointments or travel before the rush begins.
- Write down your December goals — less perfection, more presence.
Each of these small steps adds up to something bigger: a Christmas that actually feels peaceful.
Final Thoughts: A Calm Christmas Starts in November
Every year I remind myself — it’s not about doing more, it’s about doing earlier. Planning ahead doesn’t make the holidays less magical; it actually brings the magic back. Because when December comes, you’ll have time to bake with your kids, drink mulled cider by the fire, and actually enjoy your decorated home. See BHG for holiday ideas.
So light that candle, grab your notebook, and take the first small step today.
Because the secret to a peaceful Christmas isn’t luck or perfect timing — it’s starting with love and intention in November. More tips on Stylicia.

These fall Thanksgiving decor ideas will warm up your home. It’s that magical time of year again — the air feels crisp, candles are flickering, and cozy sweaters are back on the scene.
If you love decorating seasonally (hello, fall home decor lovers!) but your schedule — or your wallet — says otherwise, you’re in the right place.
You don’t have to skip the cozy magic of fall just because store-bought decorations feel overpriced or overdone.
Sometimes, the simplest touches — a dried orange garland, a handmade wreath, or a humble pumpkin centerpiece — can completely transform your home.
This guide is for you if you:
- crave a warm, personal atmosphere for your Thanksgiving dinner,
- want elegant, easy fall decor ideas that don’t take all weekend,
- or simply want to enjoy the season with your family, creating something beautiful together.
Let’s get inspired!
1. Create a Thankful Tree – A Meaningful DIY Fall Home Decor Idea
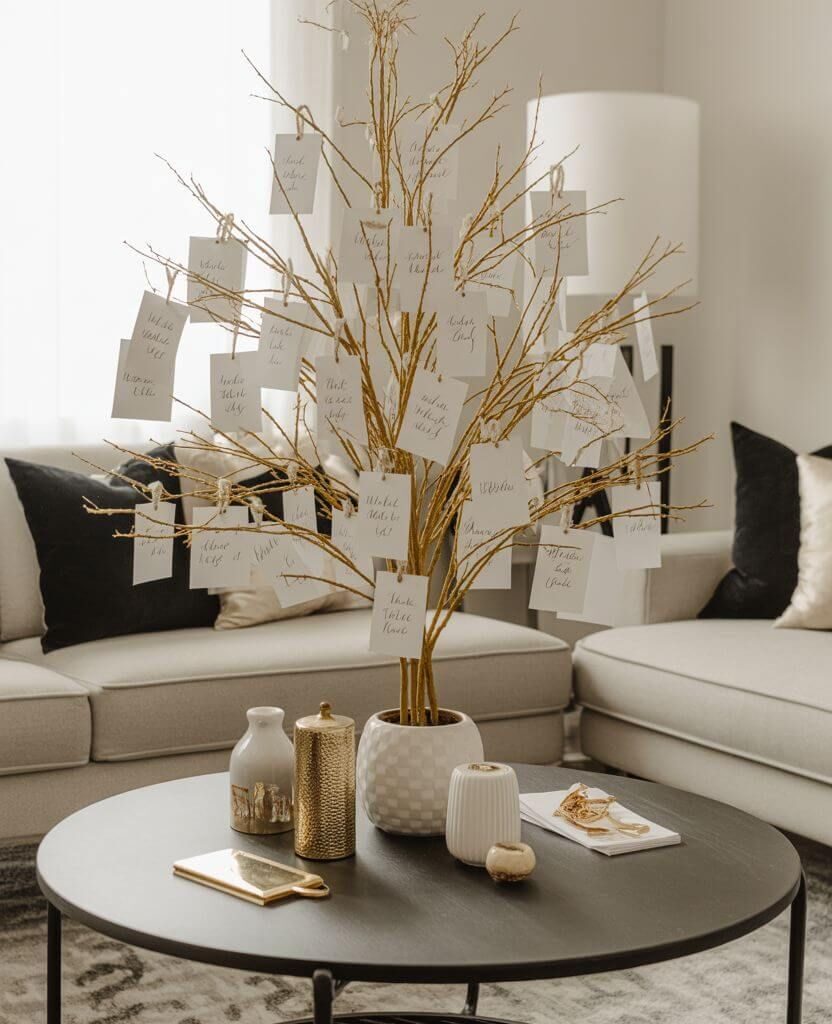
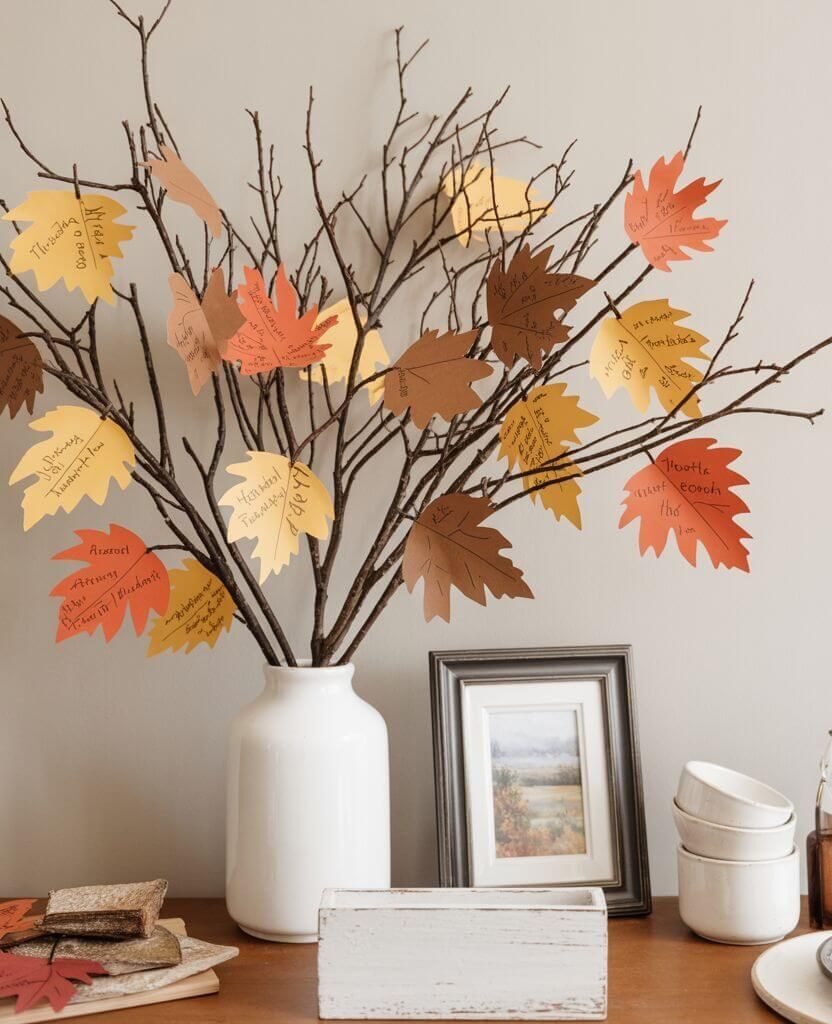
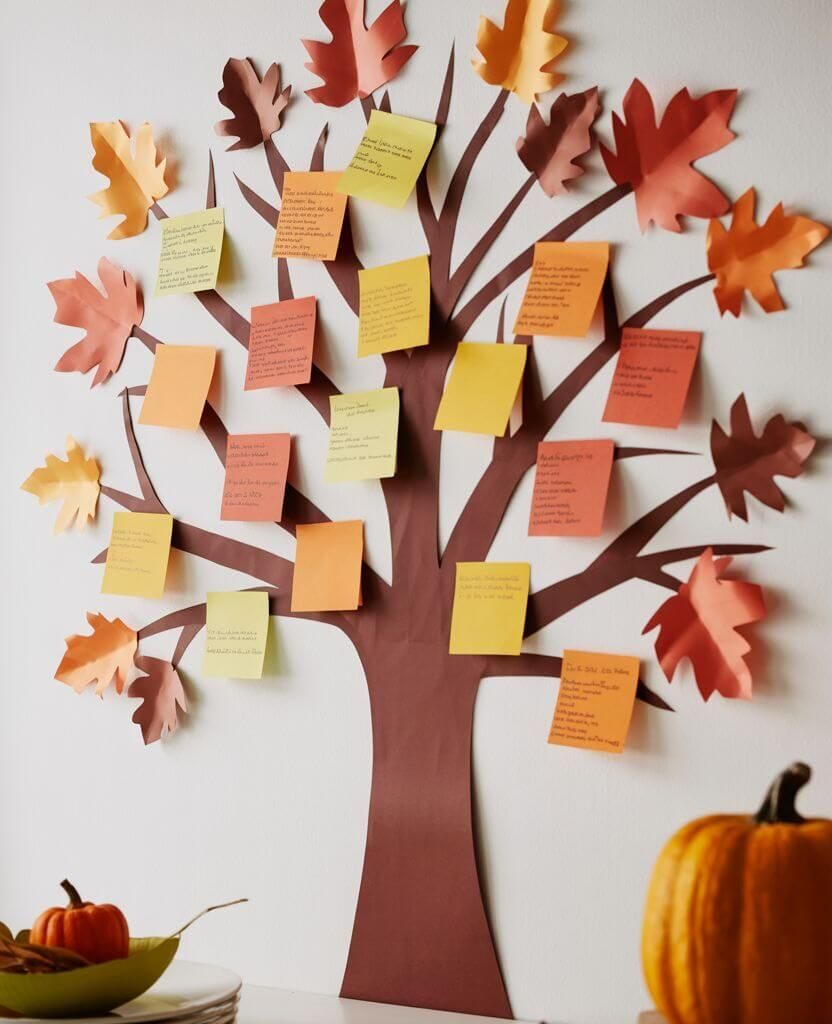
Nothing says Thanksgiving spirit quite like gratitude itself. A Thankful Tree is a meaningful, interactive decor piece that instantly becomes a family favourite.
How to do it
- Gather a few bare branches from your yard or buy faux ones from a craft store.
- Place them upright in a rustic pot filled with gravel or floral foam.
- Cut small tags from craft paper and ask everyone in your family — even your little ones — to write what they’re thankful for.
- Tie the notes to the branches with twine.
I still remember when my son drew a smiling pumpkin on his gratitude tag — it became the highlight of our Thanksgiving table.
Tip
Display it on your dining table or entryway to spark warm conversations throughout the season. These fall Thanksgiving decor ideas are perfect for any budget.
Where not to use it
Avoid placing it in high-traffic areas or near heat sources — those twine strings can be flammable. These fall Thanksgiving decor ideas are perfect for any budget.
Style it your way
For Christmas: wrap the branches in fairy lights. These fall Thanksgiving decor ideas are perfect for any budget.
For spring: swap tags for painted wooden eggs.
Kid-friendly idea
Let kids draw their gratitude instead of writing — perfect for little hands and big imaginations.
2. DIY Pumpkin Centerpiece – A Rustic Fall Table Decor Idea
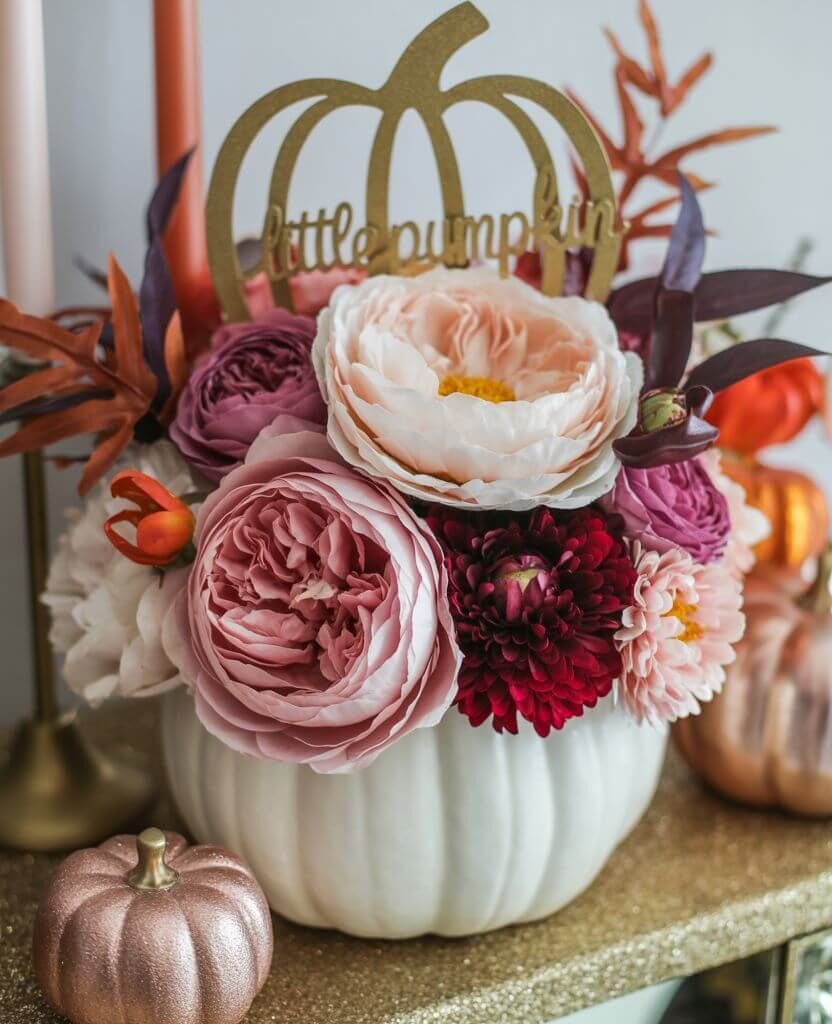
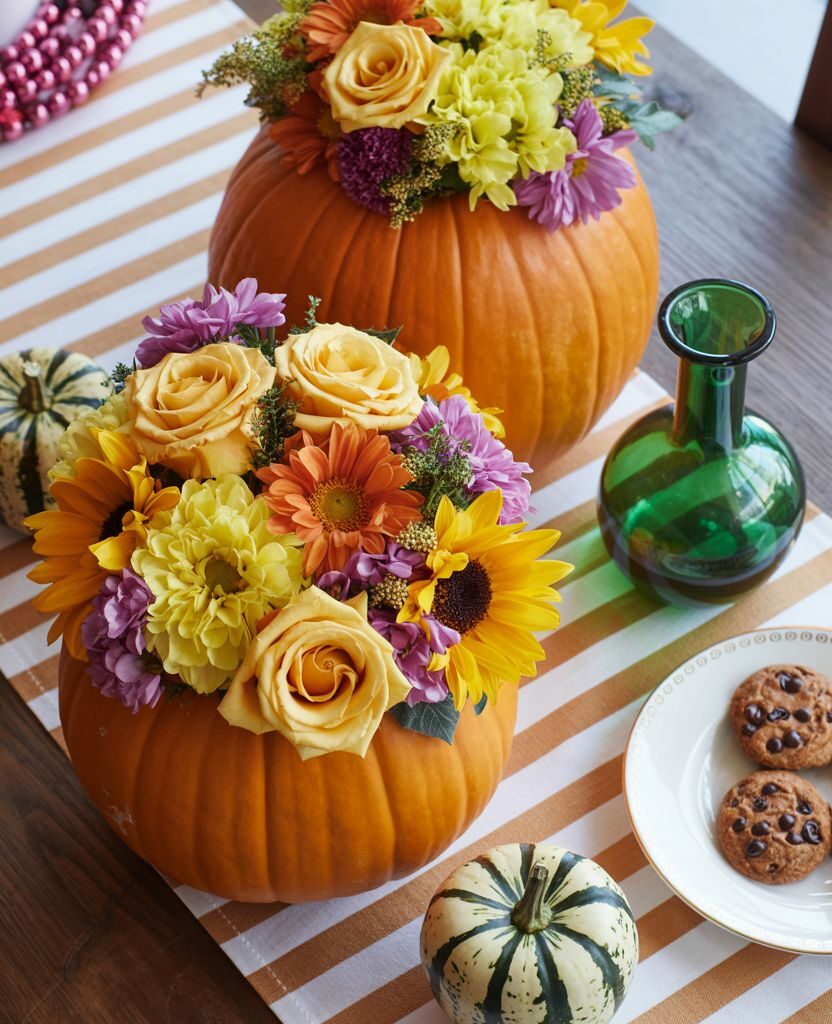
Forget the glass vase — nature already made one.
This pumpkin centerpiece brings that perfect balance between rustic charm and modern simplicity.
How to do it
- Pick a medium-sized pumpkin — not too big, not too small — and slice off the top third with a steady hand.
- Scoop out the seeds (save them for roasting later!) and dry the inside with a towel.
- Soak a piece of floral foam in water, place it inside the pumpkin, and start building your arrangement.
- Begin with eucalyptus or dusty miller leaves to create a soft, green base.
- Then add your statement blooms — burgundy dahlias, white mums, or soft peach roses.
- Fill gaps with smaller accents like ranunculus or baby’s breath to balance the colour.
- Place the lid slightly tilted on top, or leave it off entirely for a fuller look.
- Set the arrangement on a wooden tray with scattered acorns or dried leaves to complete the scene.
Every year I try a new colour palette — but somehow, the mix of creamy whites and deep oranges always wins my heart.
Where not to use it
Keep it away from direct sunlight to prevent wilting.
Style it your way
Paint the pumpkin gold for a glam twist or use white florals for a minimalist vibe.
3. DIY Dried Orange Garland – Cozy Fall Decor That Smells Like Autumn
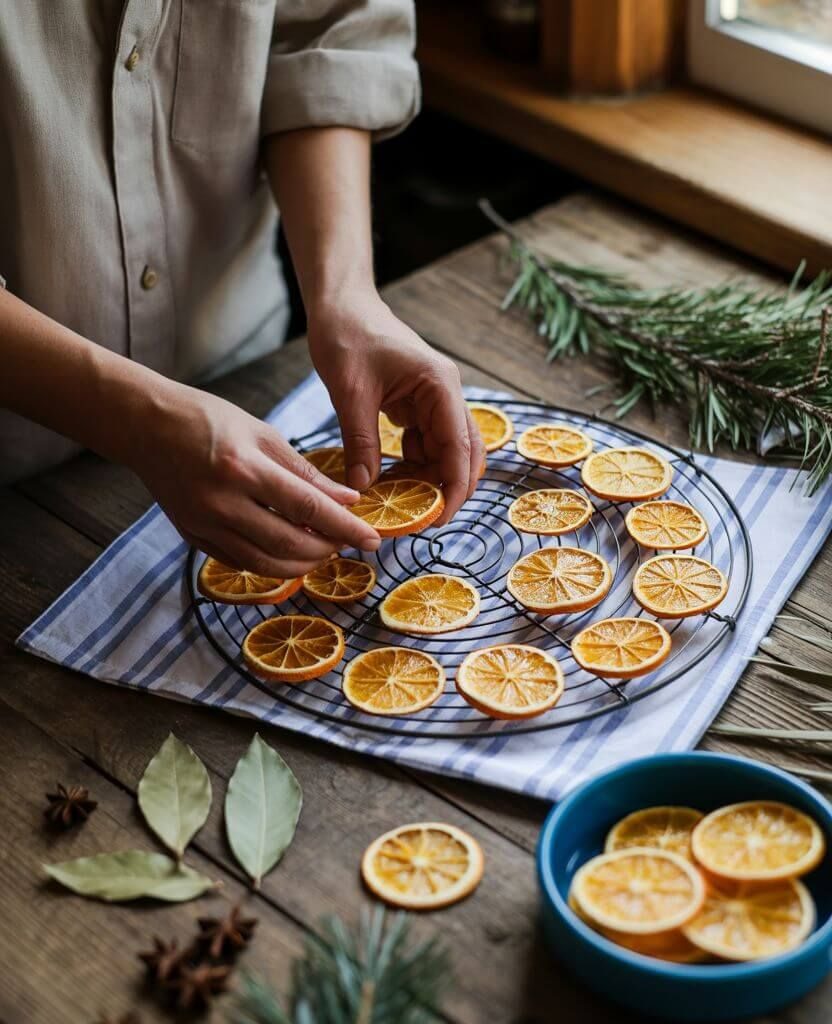
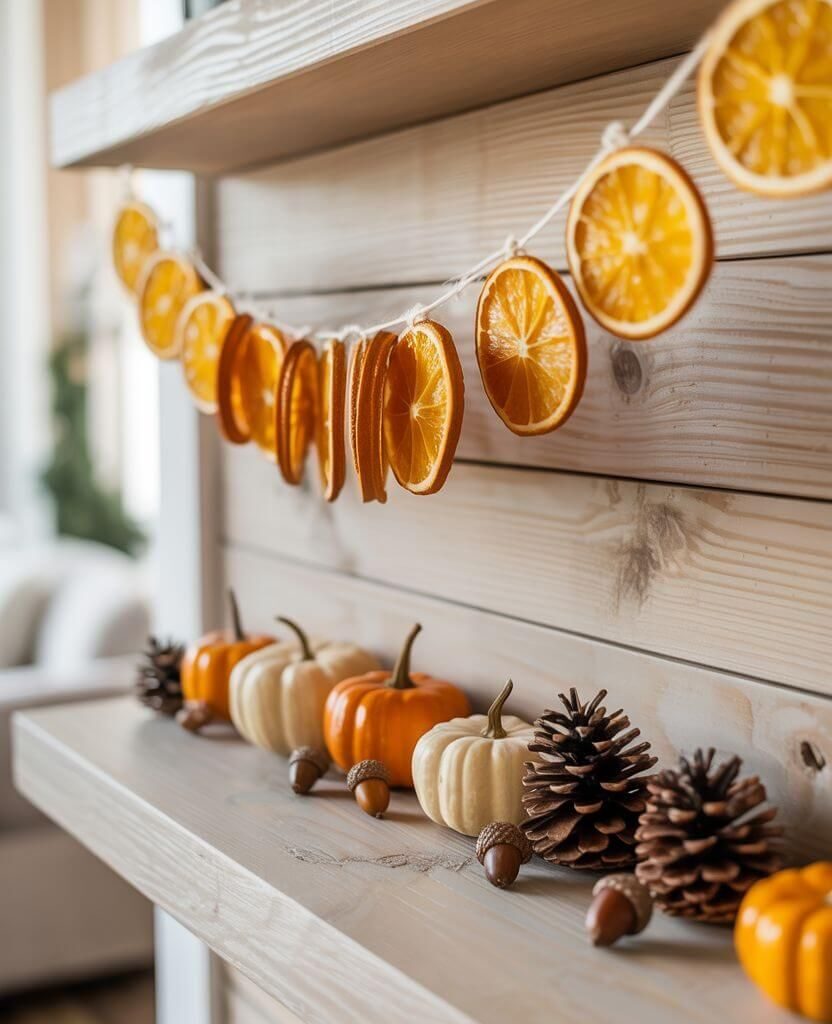
There’s nothing like that warm citrus-cinnamon scent filling your home — nostalgic, simple, and so Pinterest-perfect.
How to do it
- Preheat your oven to 90°C (200°F). Slice oranges into 0.5 cm-thick rounds — not too thin or they’ll curl.
- Pat them dry with paper towels and lay them flat on parchment paper.
- Bake for 2–3 hours, flipping halfway, until they look translucent and golden.
- Once cooled, thread a long piece of twine through each slice using a thick needle.
- Between each orange, tie on cinnamon sticks or sprigs of rosemary.
- Continue until you have a garland long enough for your mantel, window, or staircase.
Hang it while still fresh — the scent of baked citrus and spice will fill your home with cozy autumn energy.
Tip
Hang it on your mantel or entryway mirror — it doubles as natural fall home fragrance.
When my kitchen smells like oranges and cinnamon, I instantly feel like fall has officially arrived.
Style it your way
Swap rosemary for pine sprigs during winter or add star anise for a spicy, earthy scent.
4. Layered Mantel Garland – Add Instant Depth to Your Fall Living Room Decor

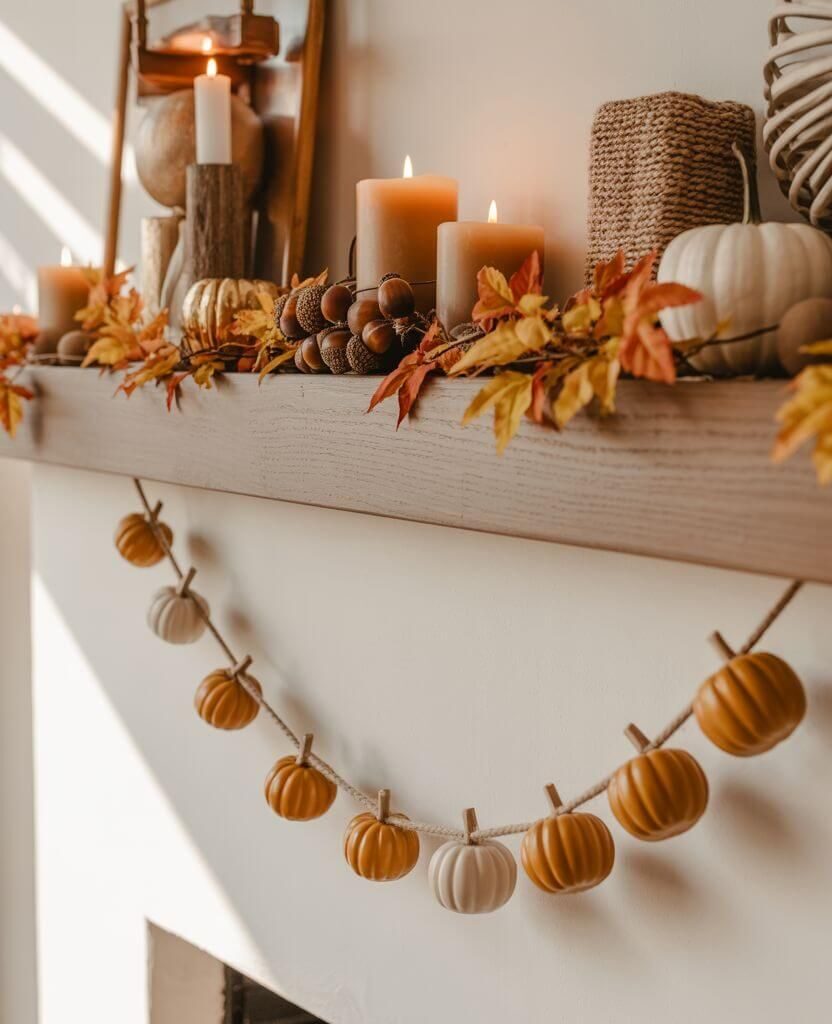
Mantels often steal the spotlight, so give yours a cozy layered look.
It’s one of the easiest fall home decorating ideas that looks effortlessly styled.
How to do it
- Start with your base layer — a string of soft fairy lights.
- Wind them loosely along the mantel, letting some light spill over the edges.
- Then, add a faux eucalyptus or mixed-leaf garland and shape it so it looks naturally uneven.
- Next, drape a strand of wooden beads or mini pumpkins across the front for depth.
- Play with layers — the trick is not perfection but relaxed abundance.
- Step back and check for balance: a few asymmetrical touches actually make it look intentional and designer-approved.
Tip
Stick to natural, varied tones — nature is never just one colour.
Style it your way
Use dried pampas grass for a Scandi-chic look or real orange leaves for traditional harvest charm.
5. Mini Pumpkin Candle Holders – 15-Minute Fall Table DIY
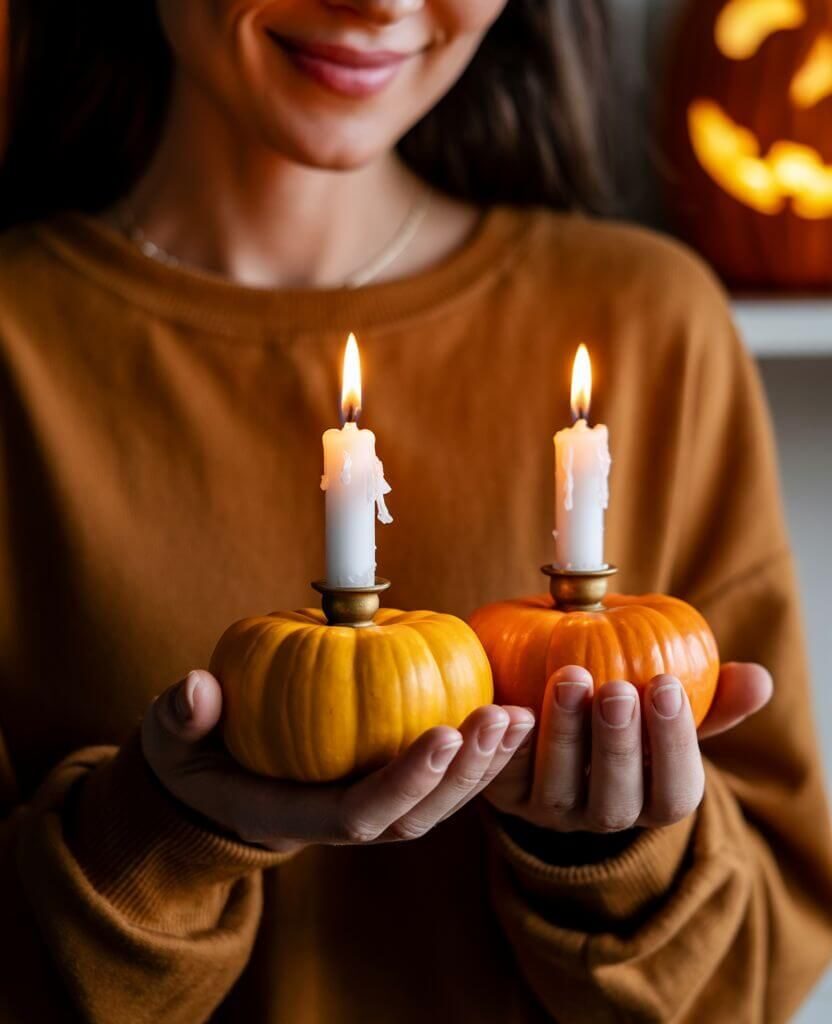
Fast, charming, and oh-so-cozy. These mini pumpkin candlesticks make your table glow with warmth.
How to do it
- Gather 4–6 mini pumpkins — choose ones with sturdy tops.
- Using a small knife or corer, carve a hole just wide enough for your taper candle.
- Push the candle in gently, twisting it to secure.
- Line them up along your table runner, alternating heights and candle colours if you like.
- When lit, the flickering light reflects beautifully off the pumpkin’s curves, creating a golden, cozy glow.
- Add dried leaves or small gourds between them for a fuller, organic look.
Last Thanksgiving, I let my son choose the mini pumpkins — he proudly picked the wonkiest ones, and they looked perfect.
Style it your way
Go metallic with gold-painted pumpkins for a glam dinner look.
6. Family Recipe Table Runner – A Sentimental Thanksgiving Table Decor Idea
Bring nostalgia to your Thanksgiving table by turning a family recipe into art.
How to do it
- Choose a fabric runner in a neutral tone — linen or cotton works best.
- Have your favourite family recipe printed onto it (there are many Etsy sellers who do this beautifully).
- Lay it across your table and use it as the heart of your tablescape.
- Stack your plates with care: earthy stoneware at the bottom, crisp white salad plates on top.
- Tuck dried wheat or rosemary sprigs into napkins for that farmhouse charm.
- Light two brass taper candles nearby for a soft, flickering glow that feels timeless and heartfelt.
My grandmother’s apple pie recipe now runs down the centre of our table — it’s like she’s still part of every holiday dinner.
Style it your way
Print an inspiring gratitude quote instead if you don’t have a recipe to feature.
7. Rustic Wooden Box Centerpiece – Farmhouse Fall Table DIY
This rustic fall decor idea adds instant warmth and texture to your dining space.
How to do it
- Find a long, shallow wooden box (or repurpose an old drawer).
- Line the bottom with moss — preserved or dried, whichever you prefer.
- Add three pillar candles in the centre, staggered in height.
- Nestle mini pumpkins, pinecones, and twigs around them, creating little clusters.
- Don’t aim for symmetry — the best arrangements look casually gathered.
- Finish by sprinkling in a few golden leaves or fairy lights for evening dinners.
- This one’s perfect for a long dining table or even a console in your entryway.
Tip
Flameless candles keep it safe for homes with little ones.
I love this one because it feels like a walk through an autumn forest — earthy, imperfect, beautiful.
8. Foraged Foliage Chandelier – DIY Thanksgiving Table Statement Piece
This hanging fall foliage chandelier turns an ordinary dinner into something magical.
How to do it
- Take a circular metal frame (like a wreath base or old chandelier).
- Wrap it with fairy lights first — this creates a glowing foundation.
- Then weave in faux fall garlands or dried leaves, mixing deep reds, golds, and browns.
- Let some strands hang down unevenly for that cascading, organic look.
Secure everything with thin floral wire or transparent thread. - When you hang it above your table, the lights will bounce softly off the leaves — giving that magical, “enchanted forest dinner” vibe.
Tip
Use bendable wire lights for easy shaping.
Style it your way
Swap leaves for ivy and eucalyptus for a year-round, natural look.
9. Fall Dioramas in Bell Jars – Enchanting Autumn Mini Scenes

Tiny worlds in glass jars — delicate, cozy, and endlessly creative.
A wonderful fall home decor idea for shelves or coffee tables.
How to do it
- Start with a glass cloche and a wooden base.
- Cover the base with moss or small pebbles for texture.
- Place one or two main figurines inside — a mini deer, pumpkin, or mushroom.
- Surround them with tiny acorns, twigs, or faux leaves for depth.
- Weave a short string of micro fairy lights through the scene and gently place the dome on top.
- When lit in the evening, it glows like a storybook illustration — small, cozy, and magical.
My son loves creating these — his “woodland squirrel world” became our fall favourite.
Looking for more inspiration for your fall table?
You’ll love these 12 Gorgeous Centerpiece Ideas for Thanksgiving — each one is elegant, cozy, and perfect for the season.
10. Front Door Pumpkin Topiaries – Welcoming Outdoor Thanksgiving Decor
Your front porch deserves some love too. These stacked pumpkin topiaries create an elegant, warm welcome.
How to do it
- Find two tall urn planters for either side of your front door.
- Fill the bottom with sand or stones for stability.
- Stack three pumpkins in decreasing size, securing each layer with wooden skewers.
- Tuck faux leaves, berries, or small gourds around the base for colour.
- Finish the look with a lush wreath above your door to tie it all together.
- If you’re going for neutral tones, swap the orange pumpkins for white and add soft greenery instead.
Tip
Use faux pumpkins for durability, especially if exposed to weather.
11. Scented Simmer Pot Bundles – Beautiful and Fragrant Thanksgiving Place Cards
Fragrance meets function with these DIY place cards that fill your home with a delicious fall scent.
How to do it
- Lay a linen napkin on each plate.
- Gather two cinnamon sticks, a sprig of rosemary, and one star anise.
- Place them together and wrap them with natural twine, threading through a paper name tag.
- Tie a little bow and glue a single clove or dried orange slice on top.
- The scent of cinnamon and herbs greets guests before they even taste the food — and the bundles double as party favours.
They always ask what’s making the table smell so good — and it’s this simple little bundle.
12. Gilded Nut Wreath – A Chic DIY Fall Wreath Idea
Turn everyday nuts into shimmering autumn decor.
How to do it
- Lay out your nuts (walnuts, acorns, hazelnuts) on parchment paper.
- Spray them gold or ivory and let them dry fully.
- Start gluing the largest nuts first onto a foam wreath form, filling gaps with smaller ones.
- Layer tightly so it feels abundant.
- Let it dry overnight, then hang it with a wide ribbon on your front door or above your mantel.
Style it your way
Keep them natural for rustic charm or go all-gold for holiday sparkle.
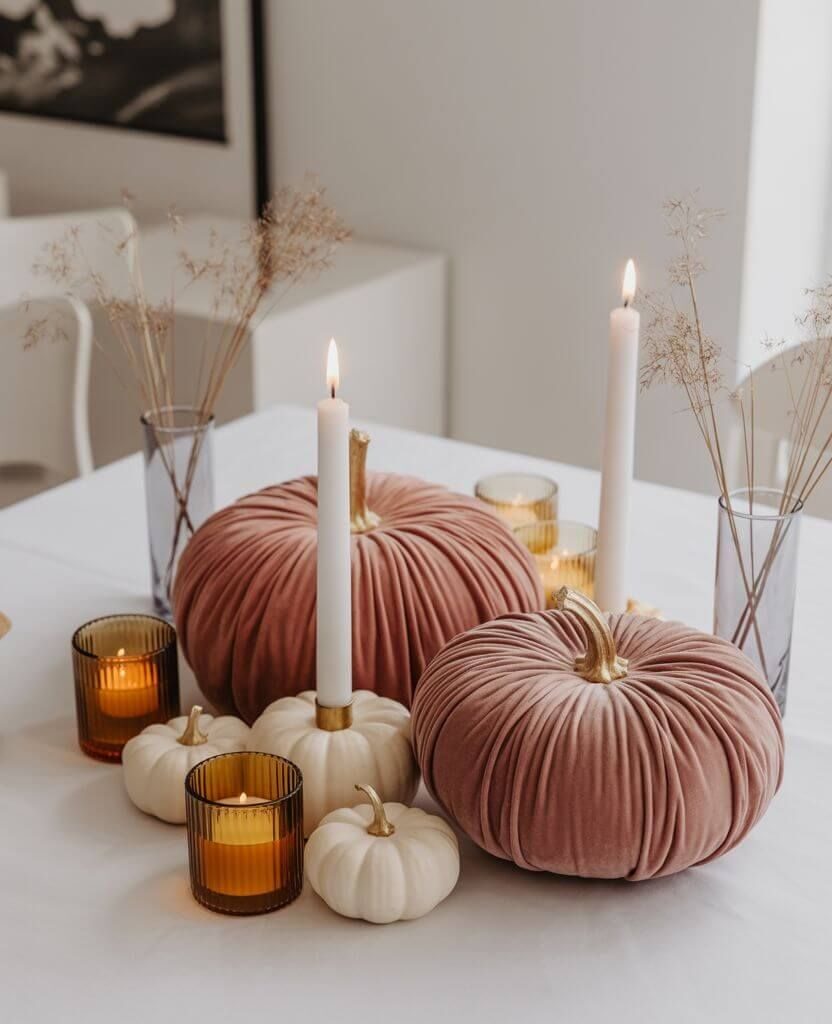
13. Jewel-Toned Thanksgiving Table – A Bold Fall Decor Upgrade
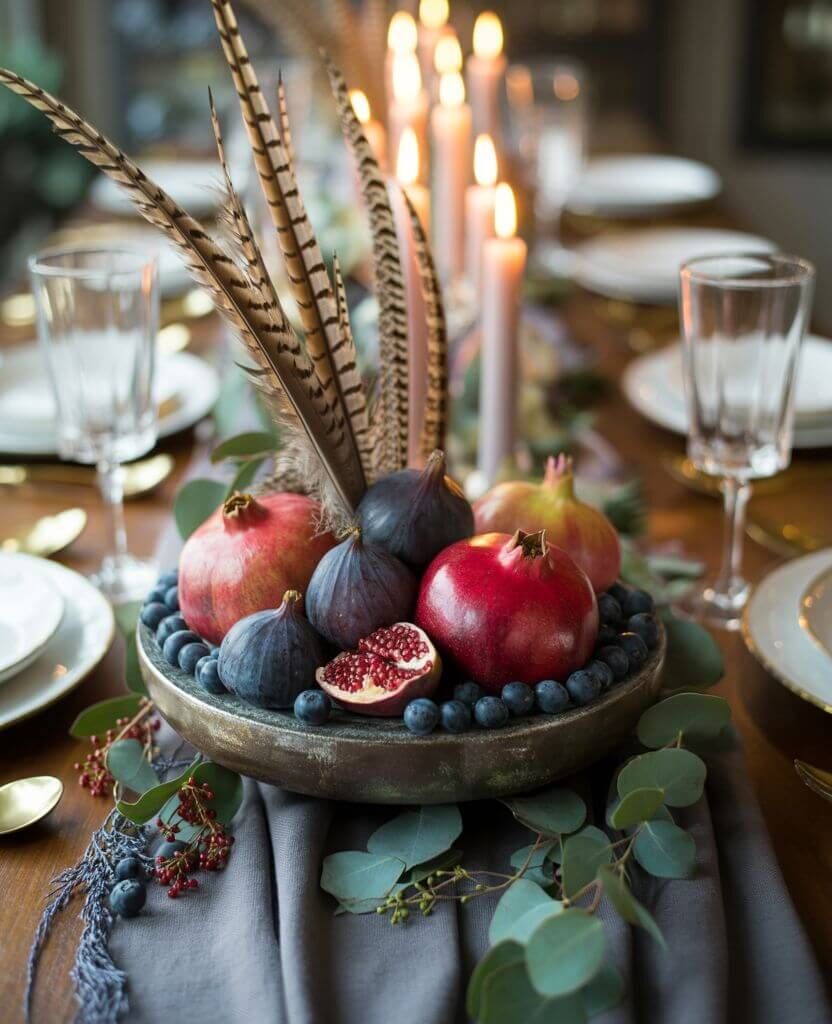
Step away from the usual orange — this rich, jewel-toned table feels modern and dramatic.
How to do it
- Begin with a dark linen runner — grey, black, or deep plum.
- Arrange a low wooden bowl in the centre filled with jewel-toned fruits: pomegranates, figs, and berries.
- Add pheasant feathers or eucalyptus for height and movement.
- Use gold or brass flatware and coloured glass goblets for that moody elegance.
- Candlelight will bring the jewel tones to life as the evening darkens.
It’s my go-to when I want guests to walk in and say “wow.”
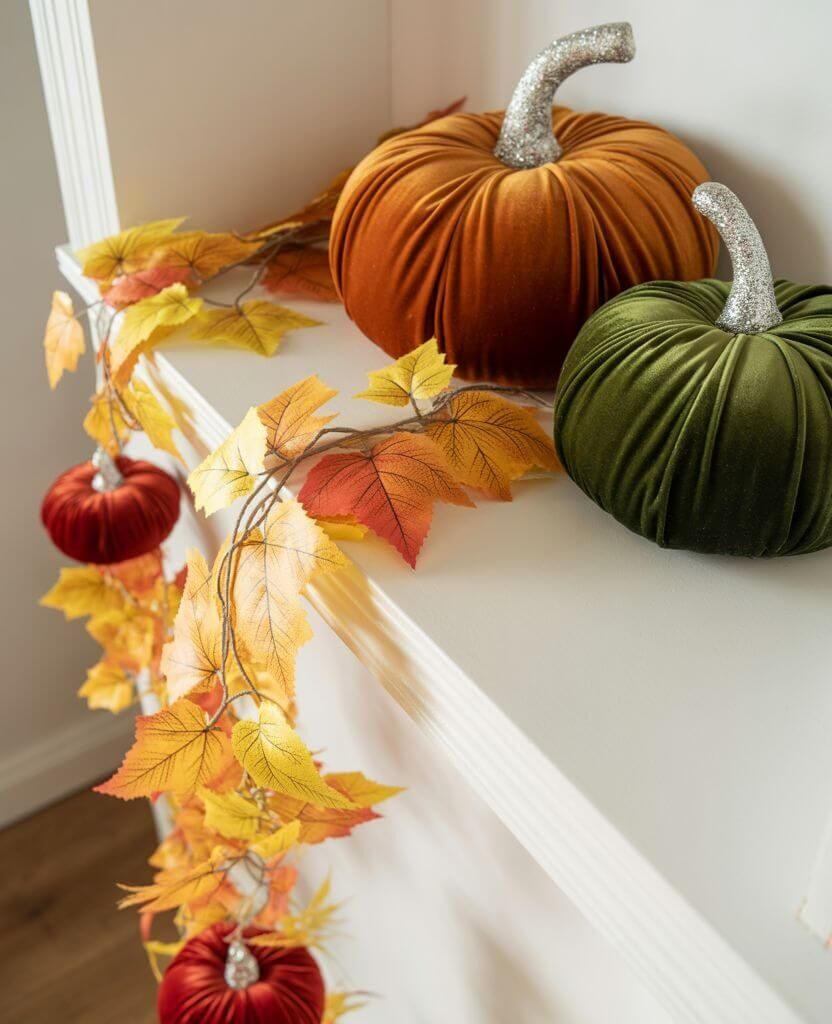
14. Velvet Pumpkin Vignettes – Luxe Fall Coffee Table Decor

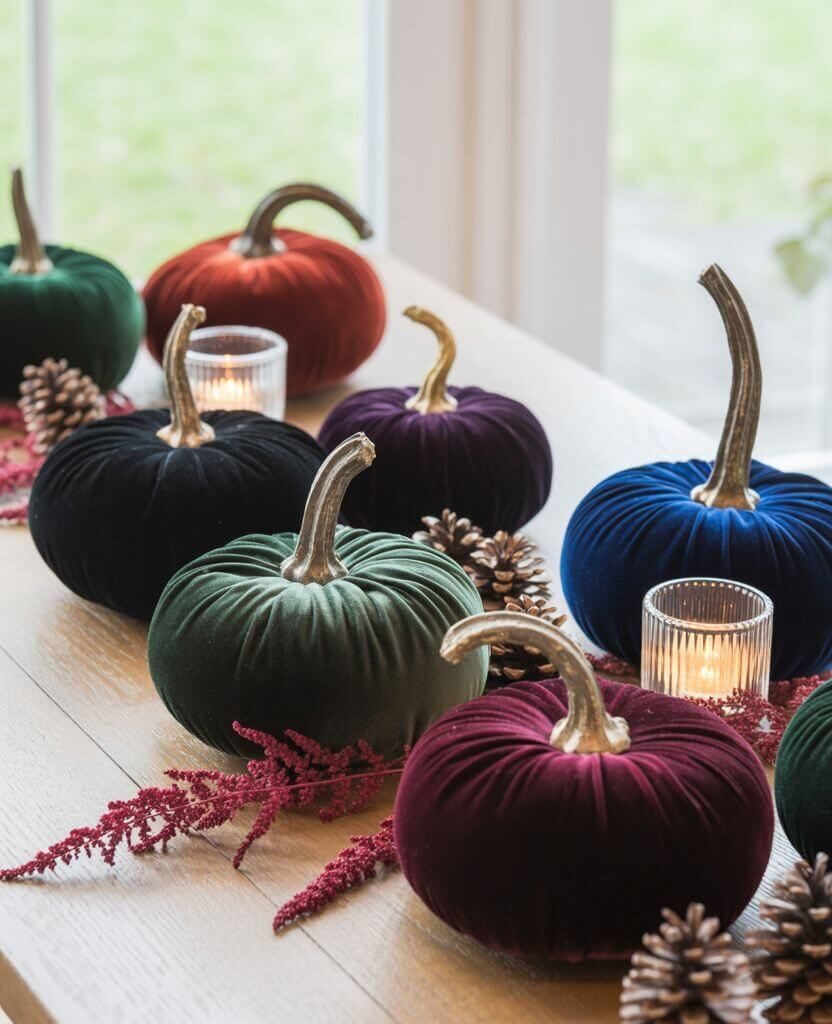
Soft, moody, and totally elegant — velvet pumpkins make any surface feel styled and cozy.
How to do it
- Choose a round or rectangular tray in dark wood or brass.
Arrange 3–5 velvet pumpkins in various sizes and tones — mustard, rust, forest green.
Add dried leaves, pecans, and small candles to fill empty spaces. - If you want to go elegant, sprinkle faux berries or metallic accents between them.
It’s the perfect low-effort idea for instant fall charm.
Tip
Mix sizes and textures — imperfection makes it beautiful.
15. I Spy Printable Placemats – A Kid-Friendly Thanksgiving Table Idea
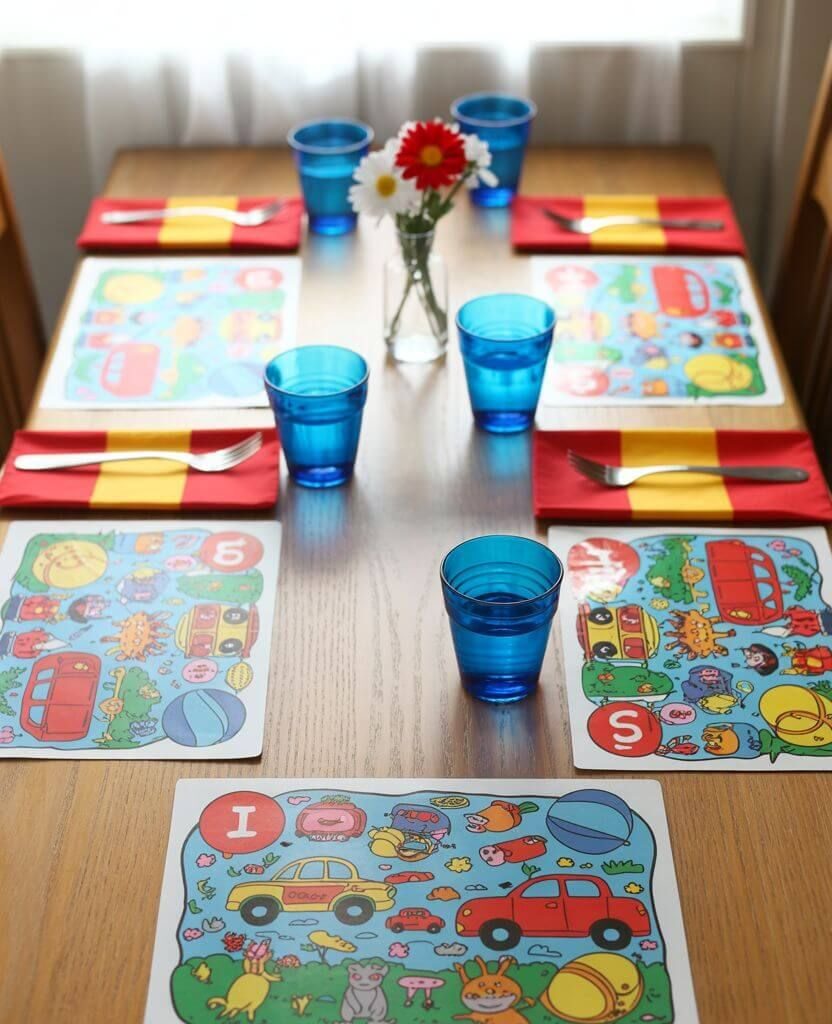
How to do it
- Download a Thanksgiving-themed “I Spy” printable (there are plenty of free ones on Etsy or Canva).
Print on thick paper or laminate it for reuse.
Set up coloured pencils or dry-erase markers in a small jar next to each placemat. - Place them at a small kids’ table — ideally near the main dining area so they feel included.
This small detail keeps little hands busy and grown-ups happy.
My little one spends ages hunting tiny pumpkins on the page — and it buys us enough time to enjoy dessert in peace!
Final Thoughts – Make Your Home Feel Warm, Personal, and Joyful
See? Fall decorating doesn’t have to be complicated or costly.
It’s about those cozy, personal details that make your home feel alive — the scent of cinnamon, the warmth of candlelight, the laughter of family. Check BHG too.
If your time (or budget) is limited, that’s okay. You can still create beauty with what you have — a few pumpkins, some twine, and a grateful heart. More ideas on Stylicia.
Because home isn’t about perfection — it’s about the feeling you create inside it.
If you love decorating seasonally but your schedule (or your wallet) says otherwise, you’re in the right place.
And if you’re craving even more cozy inspiration, don’t miss my post on 10 Elegant Fall Home Decor Ideas That Will Warm Your Soul — it’s full of timeless, easy-to-adapt looks for every home.

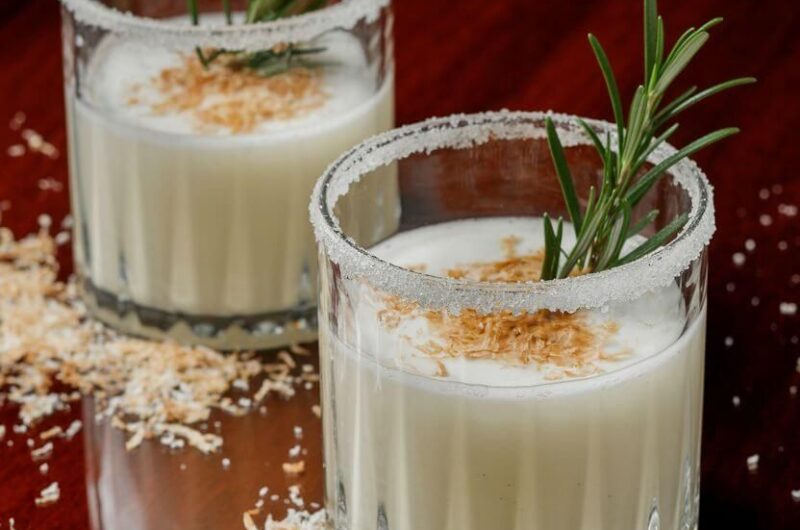
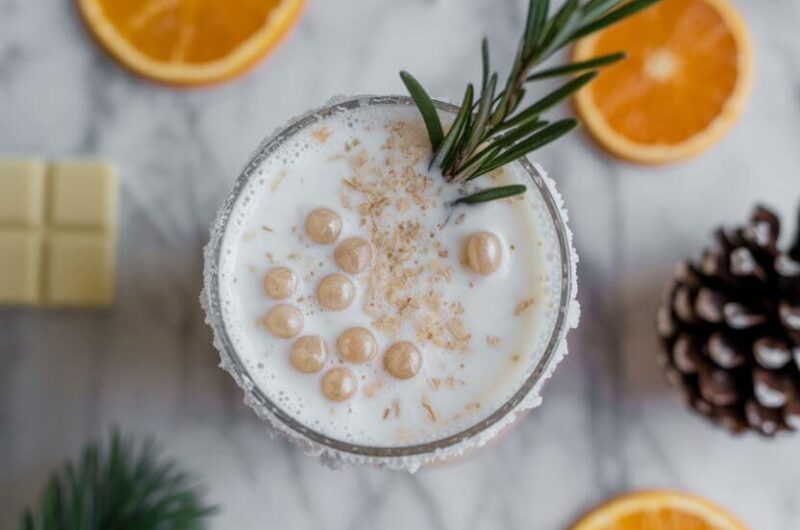
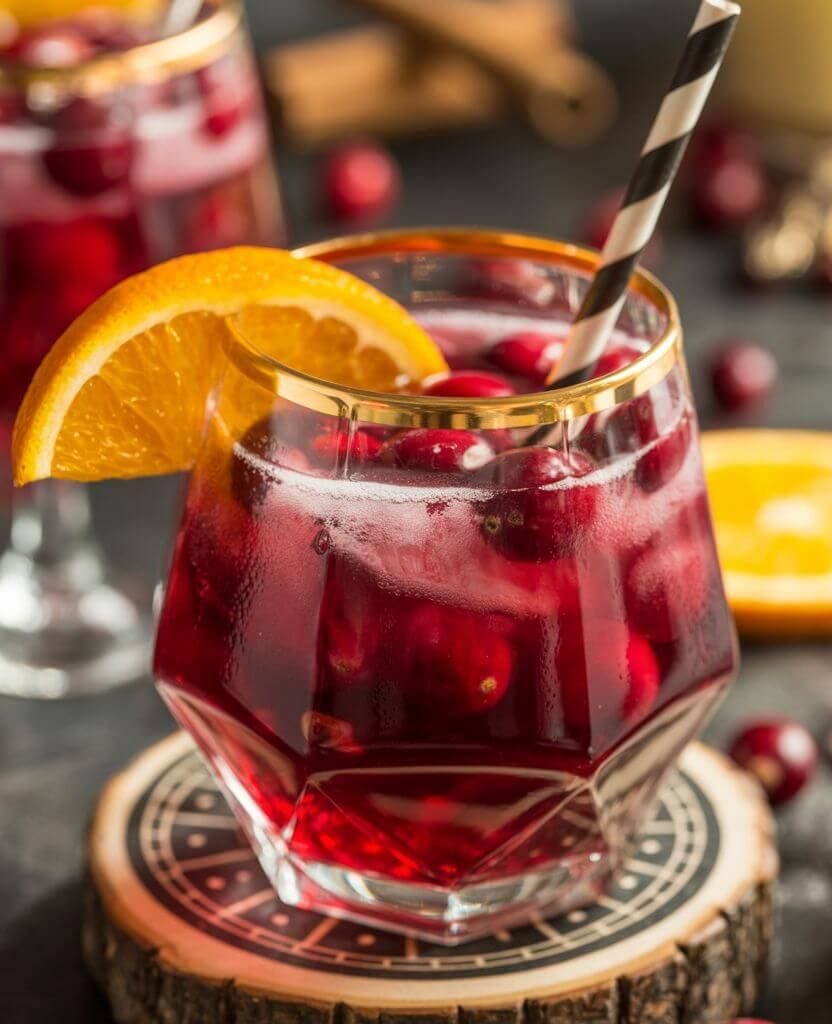
This winter mocktail is stunning and delicious. The holiday season always feels like magic: twinkling lights, cosy evenings by the fireplace, and tables filled with delicious treats. But one thing often missing from the holiday menu is a truly festive, non-alcoholic drink that looks just as glamorous as a cocktail. That’s where this Winter Wonderland Mocktail recipe comes in — a snowy white, creamy, fizzy, citrusy drink that feels like sipping a glass of holiday cheer.
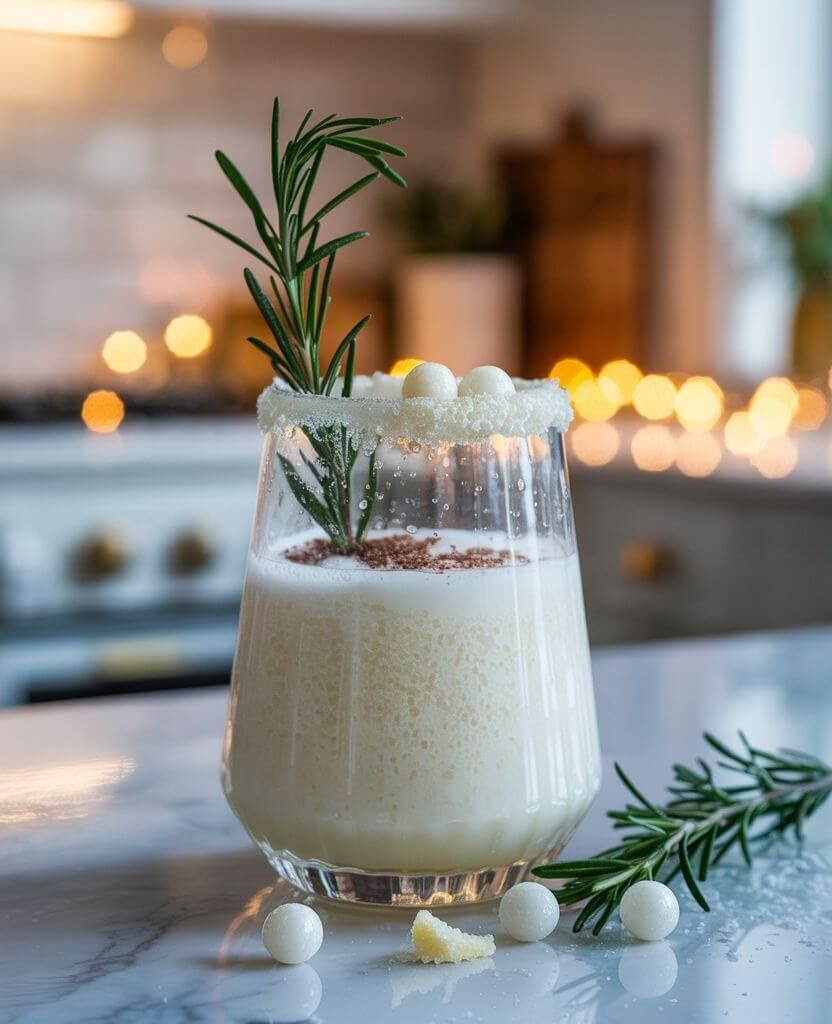
Whether you’re hosting a Christmas party, ringing in New Year’s Eve, or just want to surprise your family with something special, this Christmas mocktail recipe (non-alcoholic) will impress. It’s simple to make, easy to customise, and has that Pinterest-perfect look that will sparkle on your holiday table.
Why You’ll Love This Winter Wonderland Mocktail
There are so many reasons why this recipe will become your go-to festive drink:
- Festive and elegant – With its snowy white look, rosemary sprig garnish, and sparkle of edible glitter, it looks straight out of a holiday fairytale.
- Family-friendly – It’s 100% alcohol-free, so everyone, from kids to grandparents, can enjoy it.
- Holiday table décor – This snowy white mocktail doubles as a centrepiece. Place it on your table and watch guests lean in for photos.
- Fresh and flavourful – The combination of citrus juice, white cranberry, and coconut cream creates a creamy yet refreshing balance.
- Pinterest-worthy – With the right styling, this drink can be the star of your holiday food board.
This isn’t just a beverage — it’s an experience. A snowy white mocktail that adds a touch of magic to your celebrations.
Winter Wonderland Mocktail Ingredients (With Substitutions)
Here’s everything you’ll need to make this festive holiday mocktail drink at home. Don’t worry, I’ll also share easy substitutions if you can’t find something at your local store. This winter mocktail is perfect for parties. This winter wonderland mocktail is a crowd-pleaser.
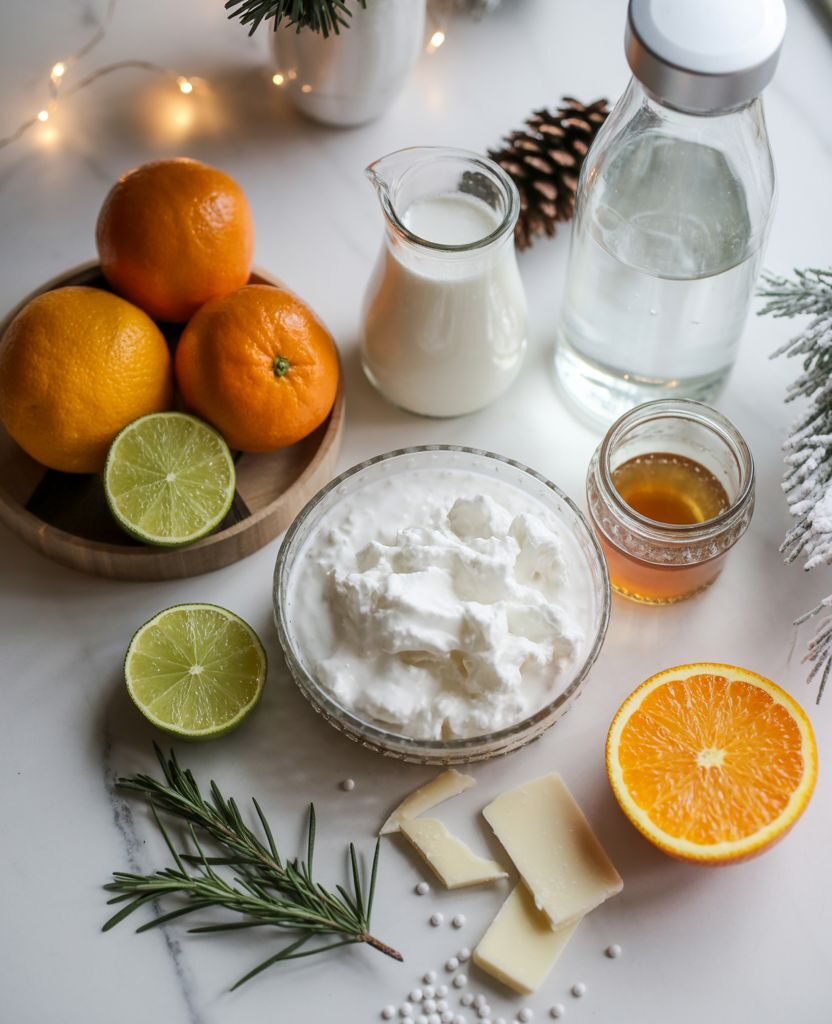
Ingredients
2 cups fresh orange juice – Brings sweetness and brightness. Substitute with mandarin juice if you like a softer flavour.
½ cup lime juice – Adds a zesty punch. Lemon juice works too, but lime keeps the flavour sharper.
1 cup white cranberry juice – Essential for that frosty winter flavour and snowy colour. If you can’t find it, use apple-cranberry for a similar effect.
½ cup coconut cream – The magic ingredient that creates a snowy, creamy look. Substitute with coconut milk for a lighter version.
¼ cup simple syrup, honey, or maple syrup – Adjust sweetness to taste. For a healthier version, try monk fruit or stevia.
1 cup sparkling water – Adds fizz and freshness. Club soda or tonic can also work.
Optional garnishes – Fresh rosemary sprigs, sugar pearls, white chocolate shavings, or edible glitter for a true snowy white Christmas mocktail.
Tip: Always taste as you go! Depending on your juices, the sweetness and tartness can vary. This winter mocktail is perfect for parties. This winter wonderland mocktail is a crowd-pleaser.
Step-by-Step Instructions – How to Make This Festive Holiday Mocktail
Making this non-alcoholic holiday drink recipe is as easy as mixing, chilling, and serving with style. Here’s how: This winter mocktail is perfect for parties. This winter wonderland mocktail is a crowd-pleaser.
1. Mix the citrus base – In a large jug, combine the orange juice, lime juice, and white cranberry juice. Stir well.
2. Add the coconut cream – Slowly whisk in the coconut cream until smooth and evenly combined. This is what gives the drink its snowy white look.
3. Sweeten it up – Stir in your simple syrup, honey, or maple syrup. Taste and adjust depending on how sweet your guests prefer.
4. Chill before fizz – Place the mixture in the fridge for at least 30 minutes. This ensures the sparkling water stays bubbly when added.
5. Add sparkle – Just before serving, gently stir in the sparkling water. Don’t do this too early, or the fizz will fade.
6. Pour and garnish – Serve over ice in clear glasses, and finish with rosemary sprigs, sugar pearls, or white chocolate shavings.
Your Winter Wonderland Mocktail is ready — creamy, fizzy, and perfectly festive.
Need a cozy drink to sip while watching the snow fall? Try this Iced Apple Crisp Chai Latte (Dairy-Free) — it’s creamy, lightly spiced, and tastes just like winter in a glass.
Tips & Tricks for the Best Christmas Mocktail Recipe
Making the perfect holiday mocktail is simple, but a few tricks can take it from “good” to “unforgettable”:
- Keep everything cold – Use chilled juices and cream. Warm ingredients will flatten the fizz.
- Don’t over-sweeten – Start with less sweetener and build up. Remember, garnishes like sugar pearls add extra sweetness.
- Add sparkling water last – This keeps the bubbles alive for your party guests.
- Blend if needed – If your coconut cream is too thick, blend the drink briefly for a smooth texture.
- Double the batch for parties – This recipe scales easily. Make a big punch bowl version for Christmas gatherings.
Serving Ideas & Garnish Inspiration
Half the fun of this snowy white Christmas mocktail is in the presentation. Here are some festive serving ideas:
Rosemary sprigs – They look like tiny Christmas trees in each glass.
White chocolate shavings – Sprinkle on top for a “snowfall” effect.
Sugar pearls or edible glitter – Perfect for that magical snowy sparkle.
Fancy glassware – Use coupe glasses for elegance or mason jars for a rustic winter feel.
Icy touch – Freeze cranberries or rosemary sprigs in ice cubes for a festive surprise.
Tip: Photograph your mocktail in natural light with a snowy or neutral background. Perfect for Pinterest and Instagram!
Variations of the Winter Wonderland Mocktail
Even though this is already a showstopper, here are a few fun twists:
- Low-sugar version – Use stevia or monk fruit instead of syrup.
- Dairy-free creamy mocktail – Mix coconut milk with oat milk for a lighter alternative.
- Spiced holiday mocktail – Add a cinnamon stick or cloves while mixing the juice for a warm, Christmas spice flavour.
- Adults-only version – Though it’s designed as a non-alcoholic drink, you can add a splash of vodka or white rum for grown-up gatherings.
Make Ahead & Storage Tips for Holiday Mocktails
Hosting can be stressful — the good news is this mocktail can be partly prepared ahead.
- Mix in advance – Combine all juices and coconut cream up to 12 hours before serving. Store in the fridge.
- Add fizz later – Wait until right before serving to add sparkling water.
- Storing leftovers – Keep in an airtight container in the fridge for up to 24 hours. It will lose fizz but still taste delicious.
FAQ – Holiday Mocktail Questions Answered
Can kids drink this Winter Wonderland Mocktail?
Absolutely! It’s alcohol-free and perfect for all ages.
How many servings does this recipe make?
This recipe makes about 6–8 servings, but it’s easy to scale up.
Can I make this Christmas mocktail sugar-free?
Yes — use monk fruit, stevia, or sugar-free syrups.
How do I keep it fizzy for a party?
Keep sparkling water chilled and only add it right before serving.
Winter Wonderland Mocktail for Pinterest & Holiday Parties
One of the best parts of this snowy white mocktail is how perfectly it fits into the holiday season. Imagine serving it at your Christmas dinner, placing a tray of frosty glasses on the table as your guests arrive, or toasting with it on New Year’s Eve while fireworks sparkle outside.
- Christmas Eve gatherings – A beautiful alcohol-free drink that both kids and adults can enjoy together.
- Holiday parties – Its creamy, snowy look and rosemary garnish make it the ultimate festive centrepiece.
- New Year’s Eve – Sparkling, frosty and elegant, this mocktail is perfect for raising a glass at midnight.
- Cosy winter nights – Even when it’s just your family by the fireplace, this drink makes the evening feel special.
This festive non-alcoholic holiday drink isn’t just a recipe — it’s a way to add a touch of magic to every celebration.
Final Thoughts – The Perfect Festive Non-Alcoholic Holiday Drink
This Winter Wonderland Mocktail isn’t just a recipe — it’s a celebration in a glass. Snowy white, creamy, fizzy, and full of festive spirit, it’s the drink your guests will talk about long after the party.
Whether you’re sipping it by the tree, serving it at a holiday dinner, or pinning it for your followers, this festive holiday mocktail drink deserves a spot on your Christmas menu.
So go ahead — try it, pin it, share it, and make your holidays sparkle with a snowy white mocktail moment.
If you’re looking for another crowd-pleasing holiday drink, don’t miss our Best Non-Alcoholic Easy Punch Recipe.
It’s fruity, refreshing, and perfect for big gatherings — a wonderful companion to this snowy white Winter Wonderland Mocktail. More drinks on Stylicia.

Winter is the season where I feel the freest to express myself. I live for the sparkle, the festive colors, and the chance to try bold new nail looks. Honestly, I often want to paint every finger a different shade. But wait—who says we shouldn’t? Winter nails are about experimenting, layering textures, and showing off a little holiday magic.
If you’re searching for winter nails 2025 coffin nail shape ideas, you’re in the right place. In this guide, we’ll explore the most stylish designs—from frosty snowflakes and glam metallics to festive burgundy coffin nails and luxurious marble. For each trend, I’ll share who it suits best (yes, including tips for fat fingers), what to avoid, and how to style it.
1. Christmas Coffin Nails 2025 – Festive Ideas You’ll Love
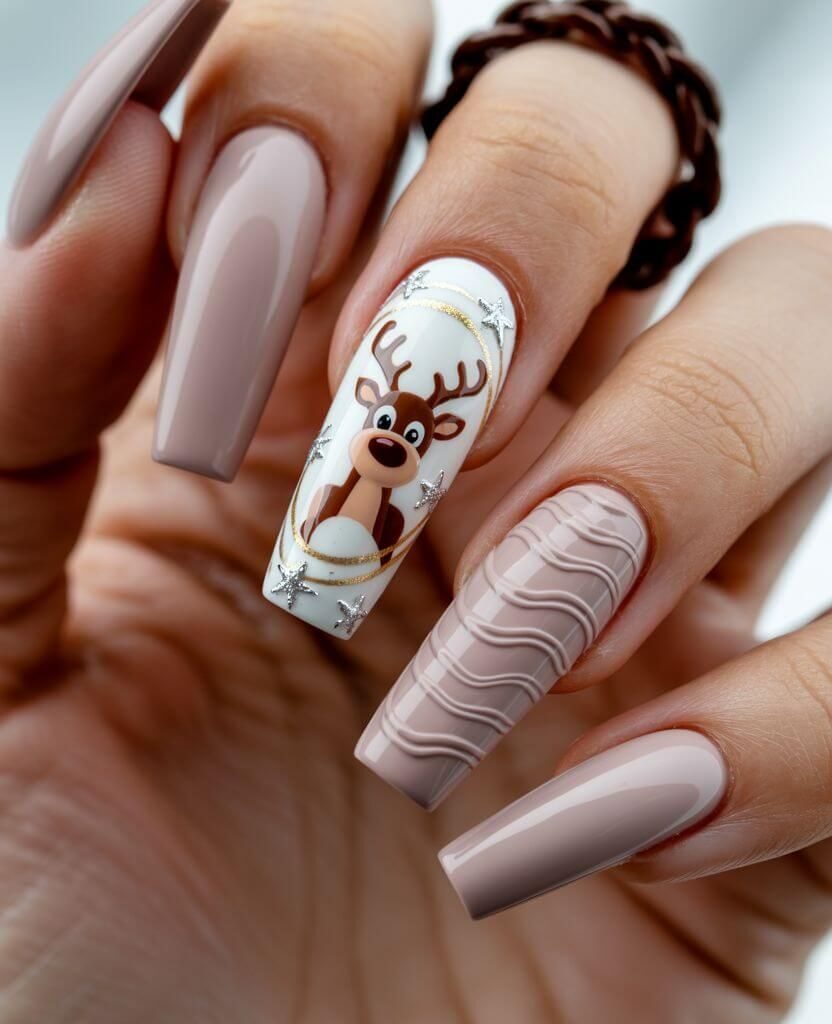

When it comes to Christmas, nails become part of the celebration. Coffin nail shapes are perfect for festive designs, because they give you enough space to play with details like snowflakes, reindeer, glitter, and cozy sweater textures. Whether you want glam or playful, here are the Christmas coffin nail trends for 2025 you’ll adore.
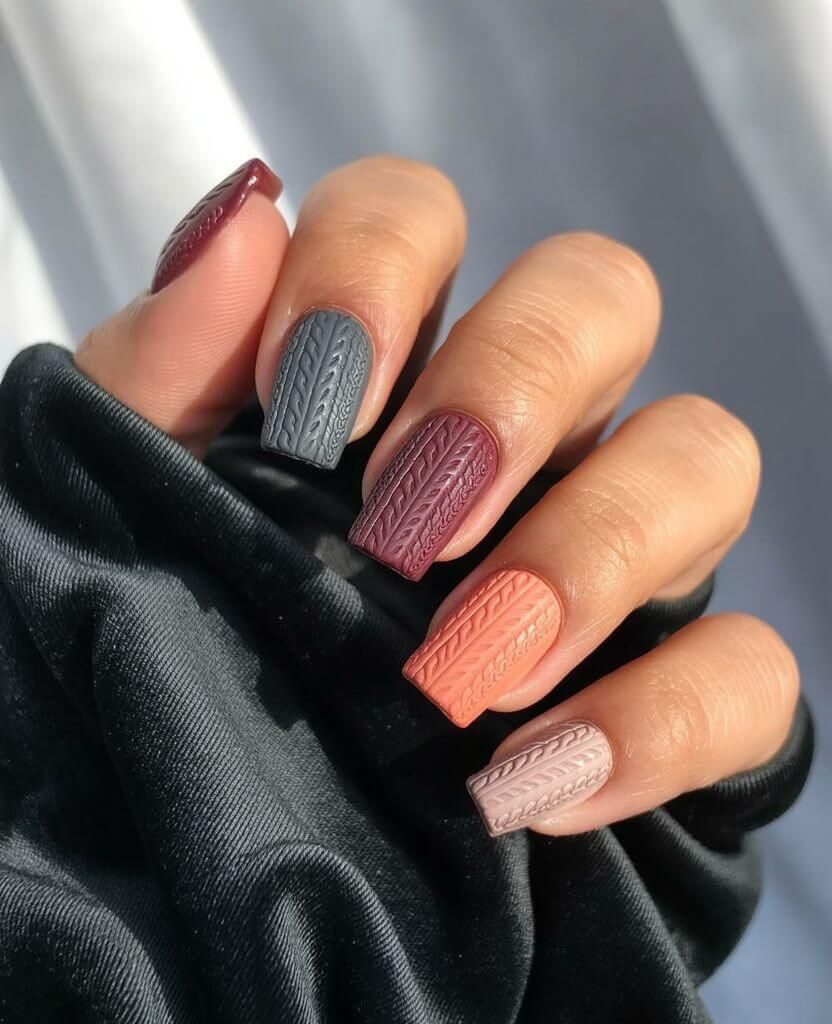
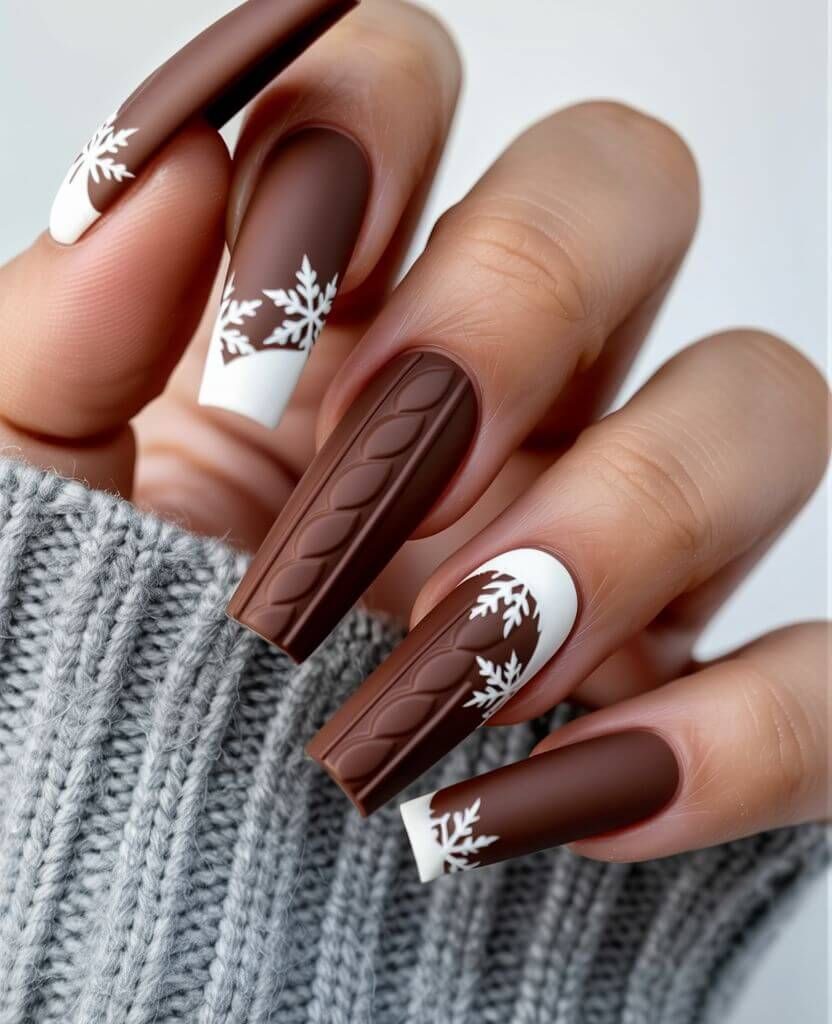
- Cozy Cocoa Nails

Chocolate brown nails with knitted sweater texture instantly give that winter-chic vibe. Add snowflake accents or white French tips for a festive upgrade. These winter nails are trending this season.
Who it’s best for: Perfect if you have fair or medium skin tone, as the warm shade pops beautifully. Fat fingers? The vertical sweater texture helps elongate. These winter nails are trending this season.
Pro tip: Match them with your favourite cozy jumper for ultimate winter aesthetics. These winter nails are trending this season.
- Green & Gold Christmas Nails
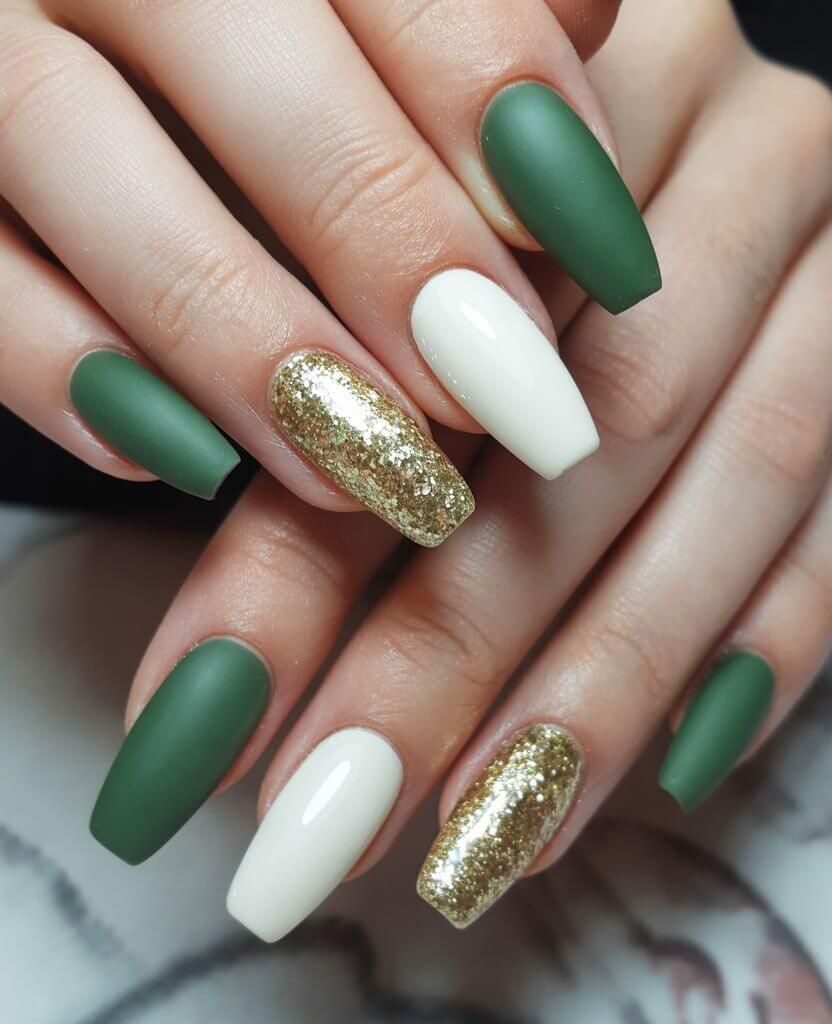
Green and gold are the ultimate Christmas colour duo. Combine matte green with gold glitter and creamy white for a glam, timeless look.
Who it’s best for: Universally flattering – the green slims the nail, while the gold glitter draws attention to the festive accent nail.
Pro tip: This style looks incredible with gold jewellery for Christmas parties.
- Glam Mixed Print Nails
Why settle for one design when you can mix them all? Combine snowflakes, glitter tips, metallic lines, and festive colours across each nail.
Who it’s best for: Perfect for those who can’t choose just one style – and yes, this is amazing if you want your nails to be the centre of attention.
Pro tip: Stick to a limited colour palette (like red, green, gold, and nude) so the look stays cohesive.
2. Black & Gold Winter Coffin Nails – A Festive Classic
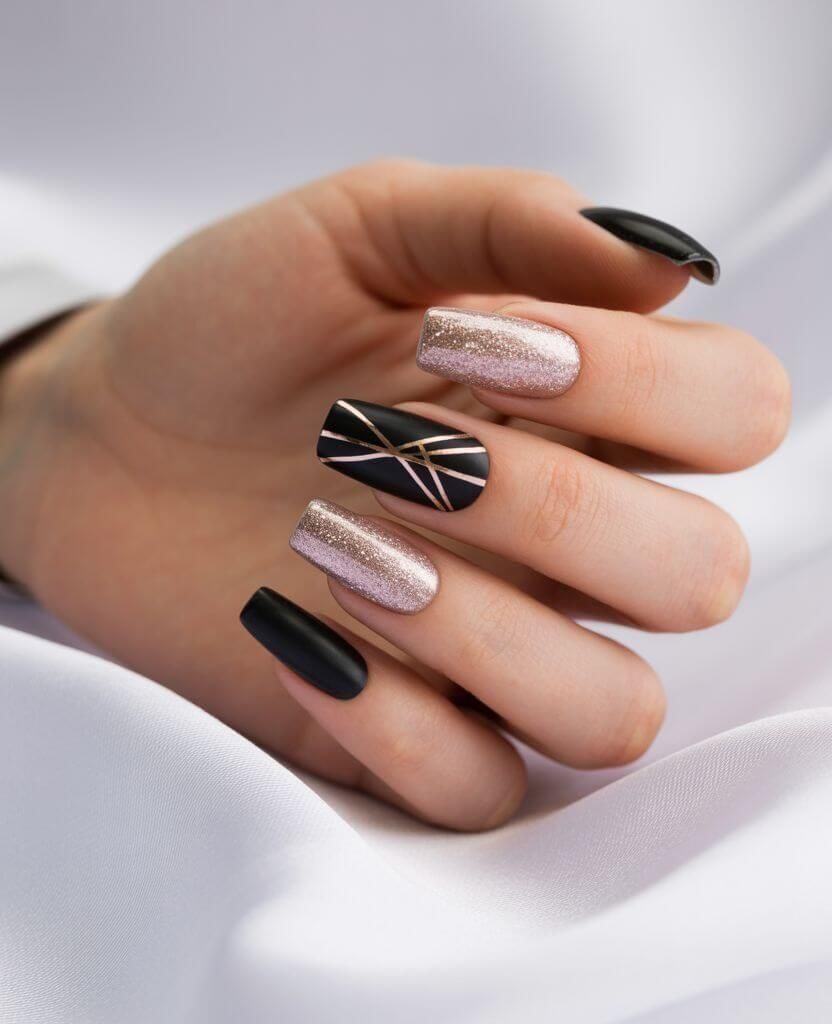

There’s something timeless about black and gold winter nails—they’re chic, elegant, and instantly festive. Paired with a coffin shape, they elongate your fingers while adding that luxurious holiday sparkle. This look works beautifully for winter nails 2025 because it combines the drama of black with the warmth of gold, making it perfect for both Christmas and New Year celebrations.
Who Should Try This Look?
If you have chubby fingers, this style is especially flattering. The coffin shape slims down your hands, while the vertical gold accents draw the eye along the nail, making fingers appear longer. Avoid overcrowding the design with too much glitter—sometimes less is more to keep the look balanced.
Pro Tip: For an extra-glam touch, try a black matte base with glossy gold foil details. It’s one of the trendiest takes on glam metallic winter nails and looks amazing in photos.
Pin this Black & Gold Coffin Winter Nails idea for later
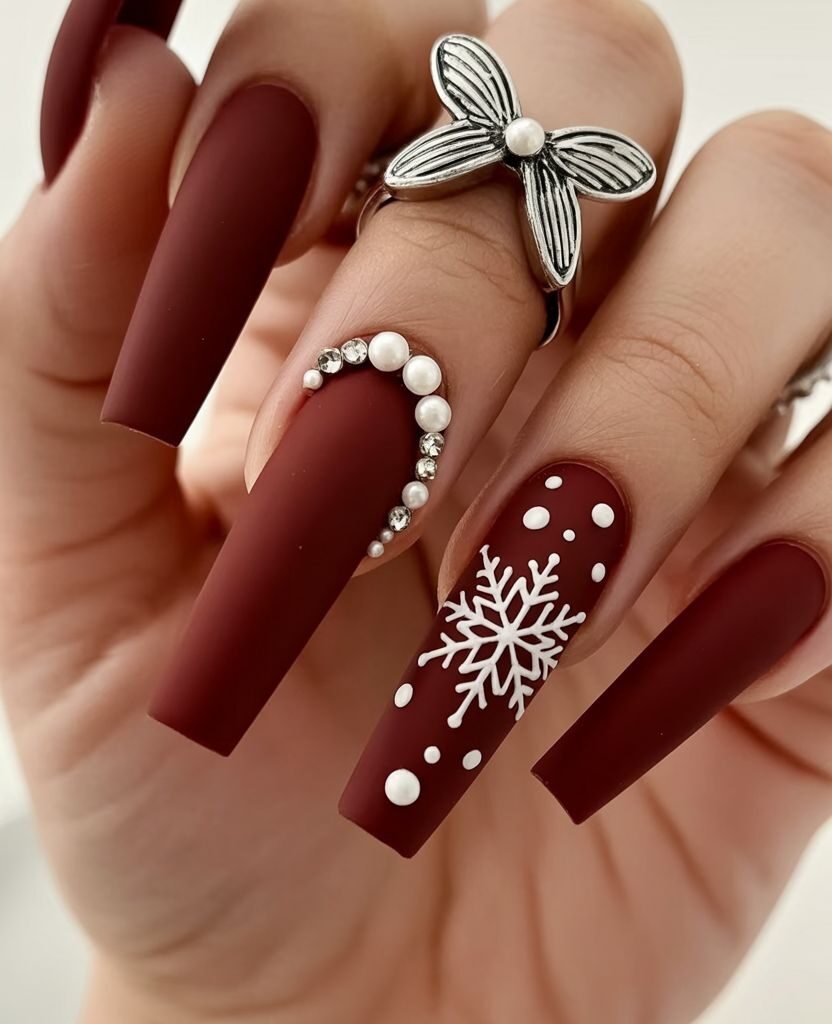
3. Snowflake Winter Nails – Frosty Elegance
Snowflake nails are the ultimate winter classic. A matte grey base with delicate white snowflakes instantly sets the tone for the season. It’s simple, chic, and gives that frosty elegance we all crave.
Who should try this look?
- Perfect for those with wider fingers, since the coffin nail shape elongates and slims the hand.
- Ideal if you love minimalistic winter vibes but still want a festive touch.
What to avoid:
- Too many snowflake patterns can feel overcrowded. Stick to 2–3 accent nails.
- On shorter nails, use finer lines to avoid making nails look chunky.
Pro Tip: If you want your snowflake nails to look even more wintery, try a glossy topcoat with a subtle shimmer. It makes the snowflake design pop while keeping the look delicate and frosty.
Pin this Snowflake Winter Nails idea for later – perfect for cozy sweater weather!
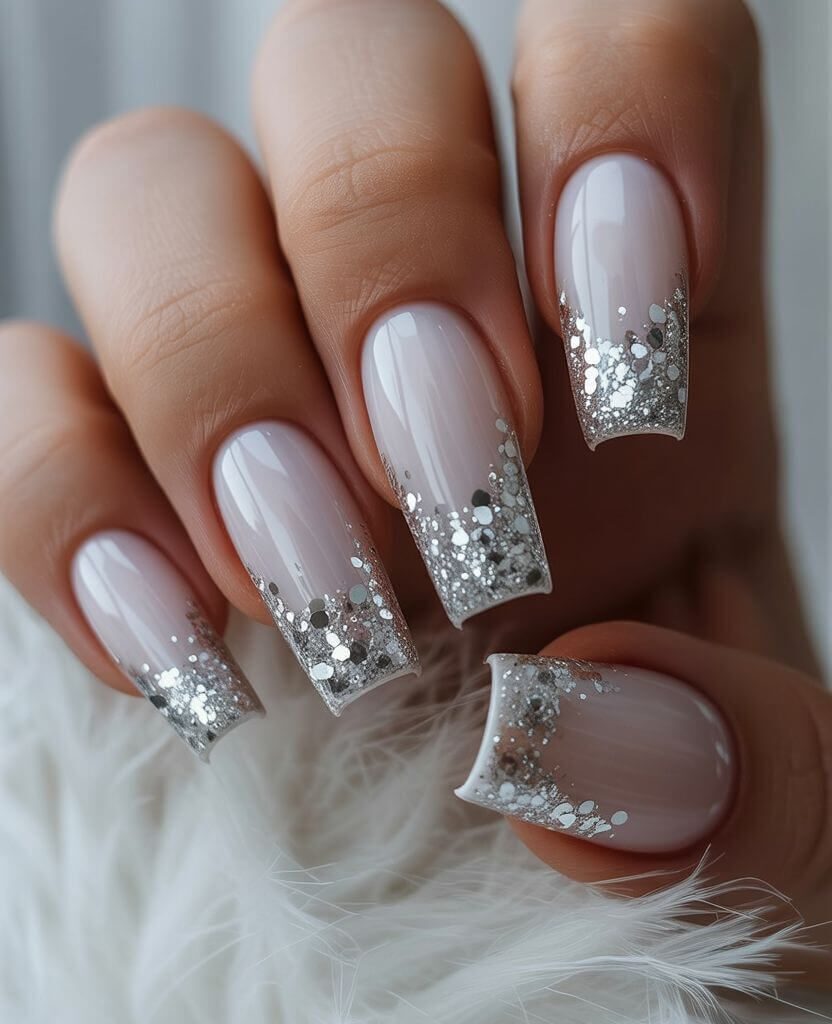
4. Grey Metallic Winter Nails – Sleek & Futuristic
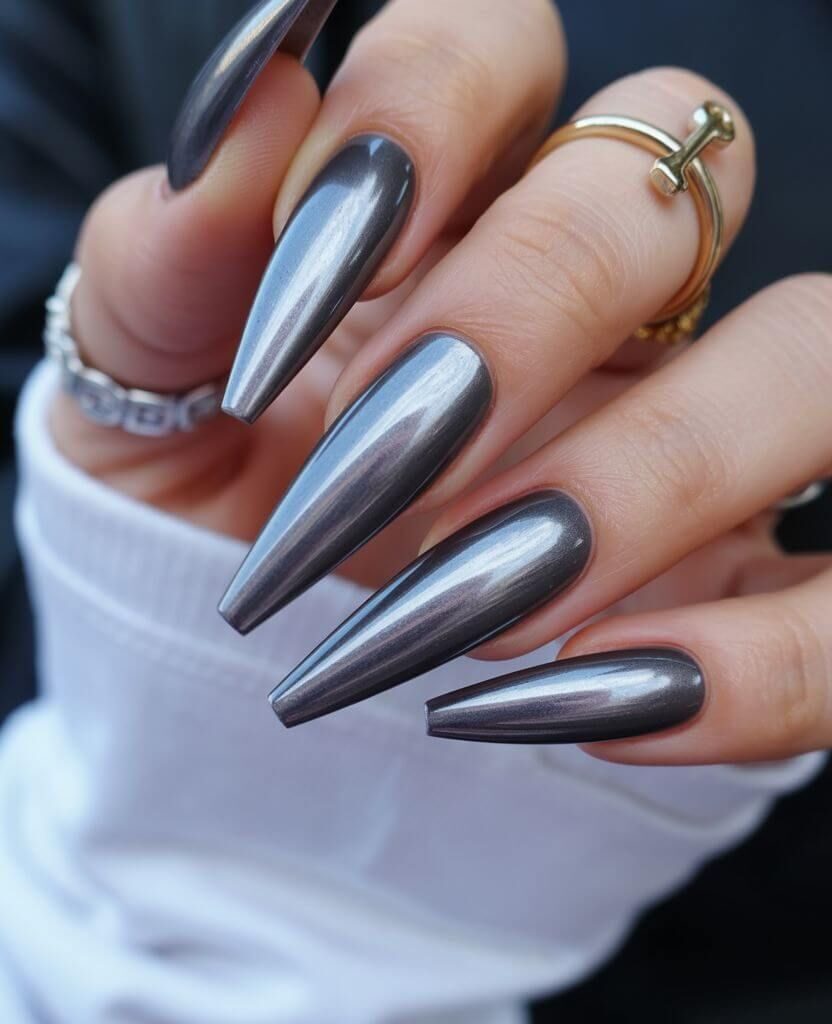
If you’re looking for glam metallic winter nails, chrome grey is one of the biggest 2025 nail trends. These reflective coffin nails are bold, futuristic, and surprisingly versatile.
Who should try this look?
- If you love bold statement nails that double as accessories.
- Works beautifully if you often wear silver jewelry.
What to avoid:
- On very short nails, too much chrome can feel heavy—try chrome accents instead.
- Avoid adding too many competing glitters; metallics shine best alone.
Pro Tip: Grey chrome pairs beautifully with accent nails. Try one matte grey nail with a silver glitter stripe for contrast—perfect for a unique take on glam metallic winter nails.
Save this Glam Metallic Winter Nails design to your Pinterest board for holiday party inspo!
5. Marble & Gold Winter Nails – Luxury at Your Fingertips

Marble designs have become a year-round favorite, but winter is when they truly shine—especially with a touch of gold. A soft white or grey marble base accented with gold foil looks elegant and expensive.
Who should try this look?
- Best for long coffin nails where the marble veining has space to flow.
- Perfect if you like neutral tones with a chic twist.
What to avoid:
- Too many colors in one marble design can look messy. Stick to 1–2 accents.
- Skip matte topcoats here; glossy makes the marble pop.
Pro Tip: If you’re new to marble designs, start with just one or two marble accent nails and keep the rest a solid shade like nude or white. This keeps the look balanced and elegant.
Pin this Marble and Gold Winter Nails idea – a classy choice for long coffin shapes.
6. Silver Chrome Nails – Party-Ready Shine

Looking for coffin nail shape ideas winter that scream celebration? Silver chrome nails are like jewelry for your fingertips. Reflective, bold, and guaranteed to turn heads—this is the perfect pick for Christmas parties or New Year’s Eve.
Who should try this look?
- Perfect if you love statement nails.
- Great for anyone attending holiday events.
What to avoid:
- Chrome can chip if not sealed—always use a gel topcoat.
- Avoid clashing shades like rose gold or bronze in the same set.
Save this Silver Chrome Coffin Nails look for a party-ready Pinterest pin!
7. Burgundy Nails – The Timeless Winter Shade
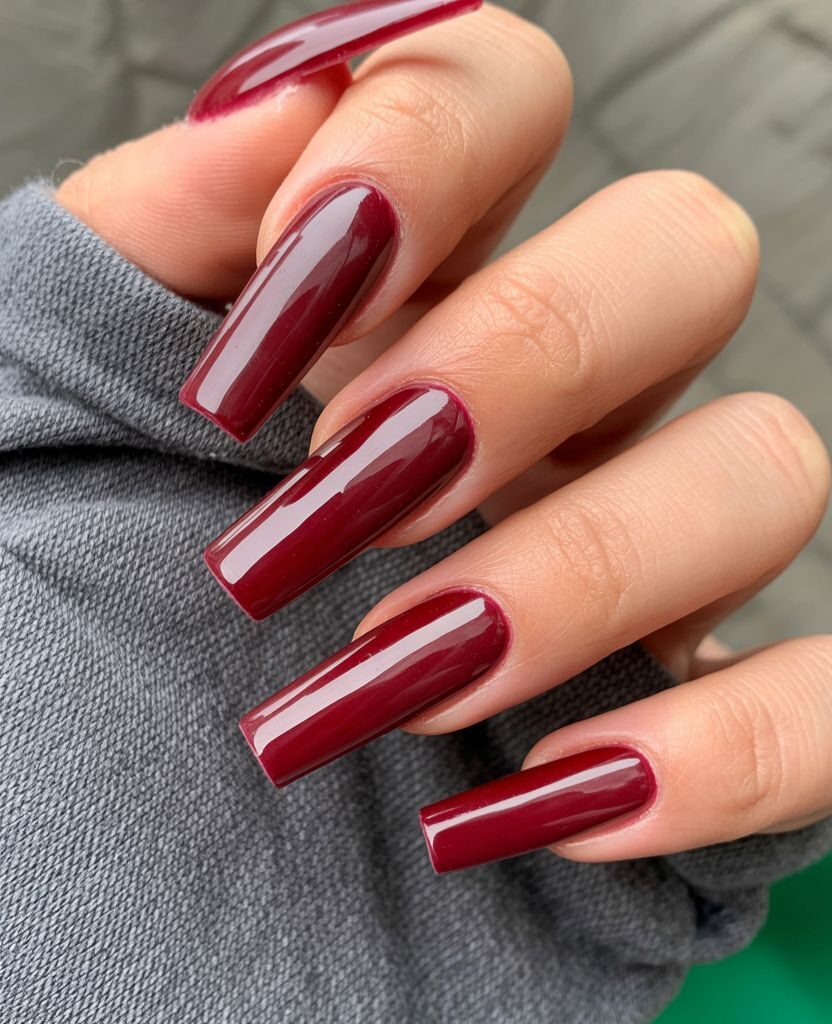
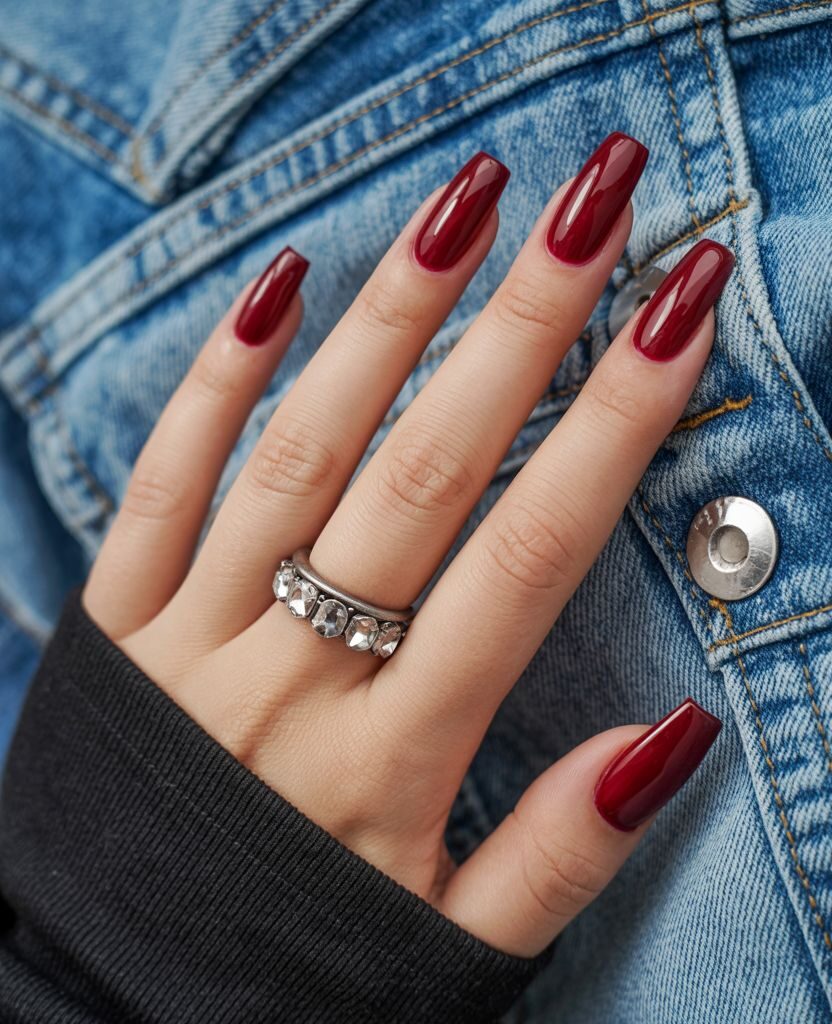
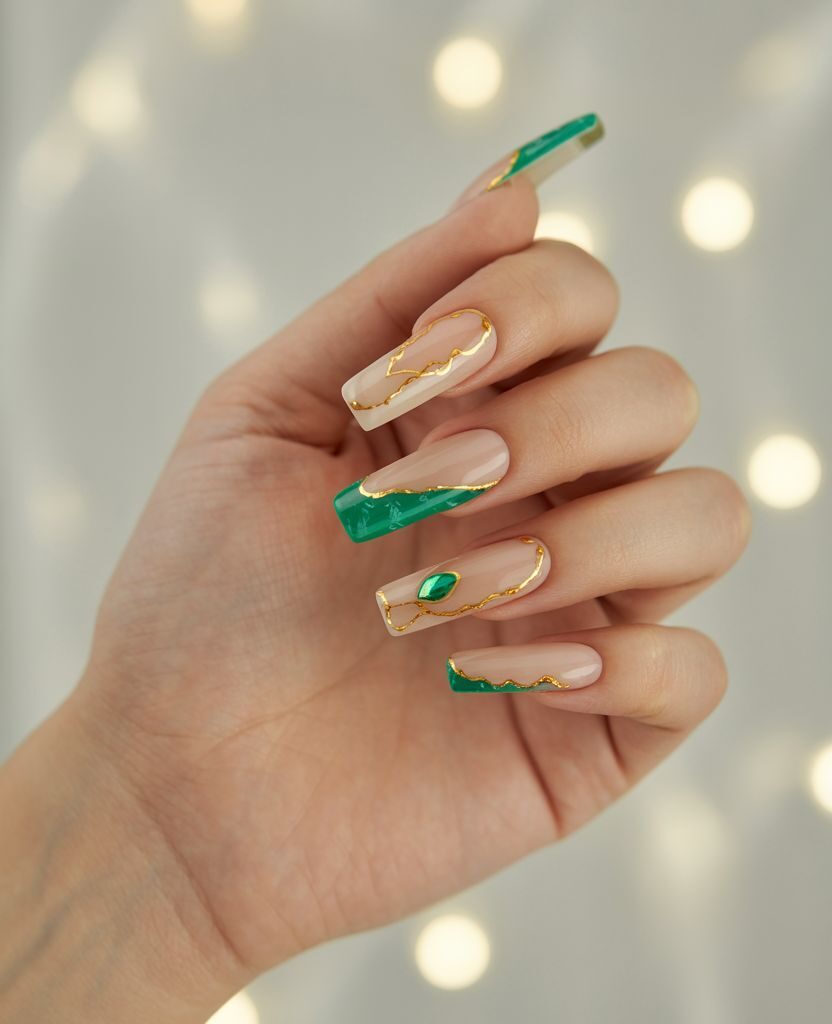
No list of winter nails 2025 is complete without burgundy. Whether matte or glossy, it’s classy, elegant, and festive. This shade never goes out of style.
Who should try this look?
- Works for both short and long coffin nails.
- Ideal for winter nails for fat fingers 2025, since darker tones slim the look of the hand.
What to avoid:
- Matte burgundy chips faster without a strong topcoat.
- Avoid mixing too many glitter overlays; burgundy is powerful enough on its own.
Pro Tip: For a twist on festive burgundy coffin nails, add a gold foil stripe on one accent nail. It’s subtle, but instantly gives that Christmas glam vibe.
Pin this Festive Burgundy Coffin Nails idea for the holidays – timeless and elegant!
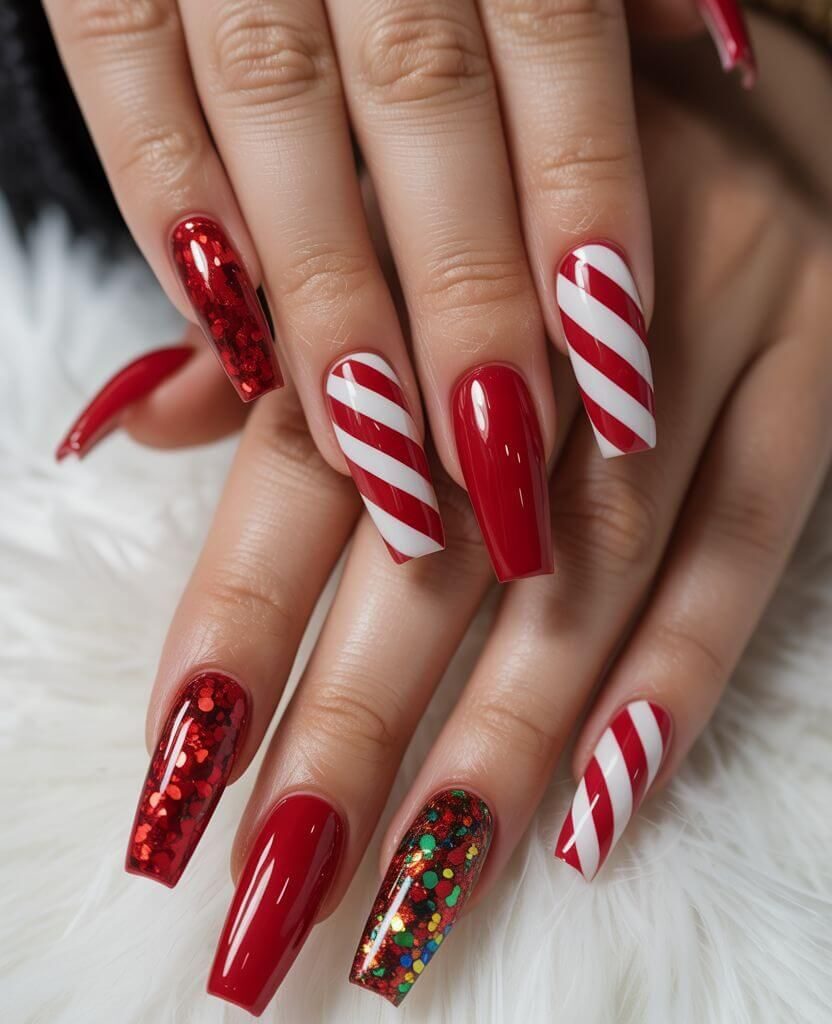
8. Festive Mixed Print Designs – Plaid, Polka Dots & More

Why settle for one look when you can mix and match? Festive nails can include plaid patterns, polka dots, reindeer, and snowflakes—all in one playful set.
Who should try this look?
- Perfect if you want a fun, bold, Instagram-worthy manicure.
- Great for those who can’t decide on just one color.
What to avoid:
- Don’t overload every nail with heavy designs—pick 2–3 accents.
- If you’re new to nail art, start with simple shapes.
Pin this Mixed Print Winter Nails idea for a playful festive vibe!
9. Red Coffin Nails – Bold & Classic
Red nails are like the little black dress of manicures. Glossy red coffin nails are bold, chic, and instantly give you confidence.
Who should try this look?
- Perfect if you want a striking but simple manicure.
- Great for date nights, family gatherings, or Christmas parties.
What to avoid:
- Bright reds can highlight nail ridges—buff nails before polish.
- Avoid mixing clashing red tones in one manicure.
Pro Tip: If glossy red feels too bold, try a matte finish with a single glitter accent nail. This makes red nails more wearable while still festive.
Save this Glossy Red Winter Nails look for a classic, Pinterest-ready holiday pin!
Conclusion – Find Your Perfect Winter Coffin Nails
Winter nails don’t have to follow strict rules. Whether you choose snowflake elegance, glam metallics, festive burgundy coffin nails, or luxurious marble, this is the season to shine.
And remember: the coffin nail shape is the best for fat fingers, since it elongates and slims your hand, making every design look chic. Visit Nails Magazine.
So go ahead—mix colors, add glitter, experiment with finishes. Because winter is the time to sparkle. More ideas on Stylicia.
Looking for more ideas? While winter nails 2025 coffin shape ideas sparkle with festive glam, fall was all about cozy tones. You can explore more in my guide to Top 10 Fall Nail Ideas.”
FAQ – Winter Nails 2025 & Coffin Shape
1. Why are coffin nails flattering for fat fingers?
Their tapered shape elongates the hand, making fingers look slimmer.
2. What are the best winter nail colors for 2025?
Burgundy, metallic silver, grey marble, emerald green, and glossy red.
3. Can short nails be shaped into coffin nails?
Yes, but the effect is subtler than on long nails.
4. Are coffin nails good for everyday wear?
Yes, if kept at a practical length.
5. How often should I refill coffin nails?
Every 2–3 weeks for a polished look.
6. Can I DIY snowflake or plaid designs?
Yes, with nail art tools or stickers—though pros give the cleanest finish.
7. Do metallic nails chip easily?
They can without proper sealing—always use a gel or UV topcoat.
8. Can I mix burgundy and snowflake nails?
Absolutely—accent nails are a great way to combine trends.

When autumn rolls around, it always feels like life slows down a little. The days get shorter, sweaters come out, and somehow even the weekends feel cosier. For me, that’s when I pull out my punch bowl. Why? Because nothing brings people together like a big, colourful drink everyone can enjoy—especially a non-alcoholic, easy punch recipe that tastes as festive as it looks.
Now, I know what you’re thinking. Punch bowls are for holidays like Thanksgiving or Christmas, right? Wrong! Around here, this fruity fall punch makes an appearance at birthday parties, Sunday dinners, and even on lazy afternoons when we decide to binge-watch family movies.
There’s something magical about filling a glass with fizzy, jewel-toned punch topped with cranberries and orange slices—it makes any moment feel like a celebration.
Whether you’re planning a big Thanksgiving feast, a cosy fall get-together, or you just want something fun and refreshing to sip on, this easy fall punch recipe is going to become a family favourite.
Why You’ll Love This Punch
- Non-alcoholic & family-friendly: Perfect for kids, adults, and everyone in between.
- Seasonal goodness: Apple cider, cranberry, and warm spices scream autumn.
- Quick & easy: This really is an easy punch recipe—just pour, stir, garnish, done!
- Festive look: That deep burgundy colour and floating garnishes make it Instagram-worthy.
- Thanksgiving-approved: This doubles as the perfect non-alcoholic Thanksgiving punch.
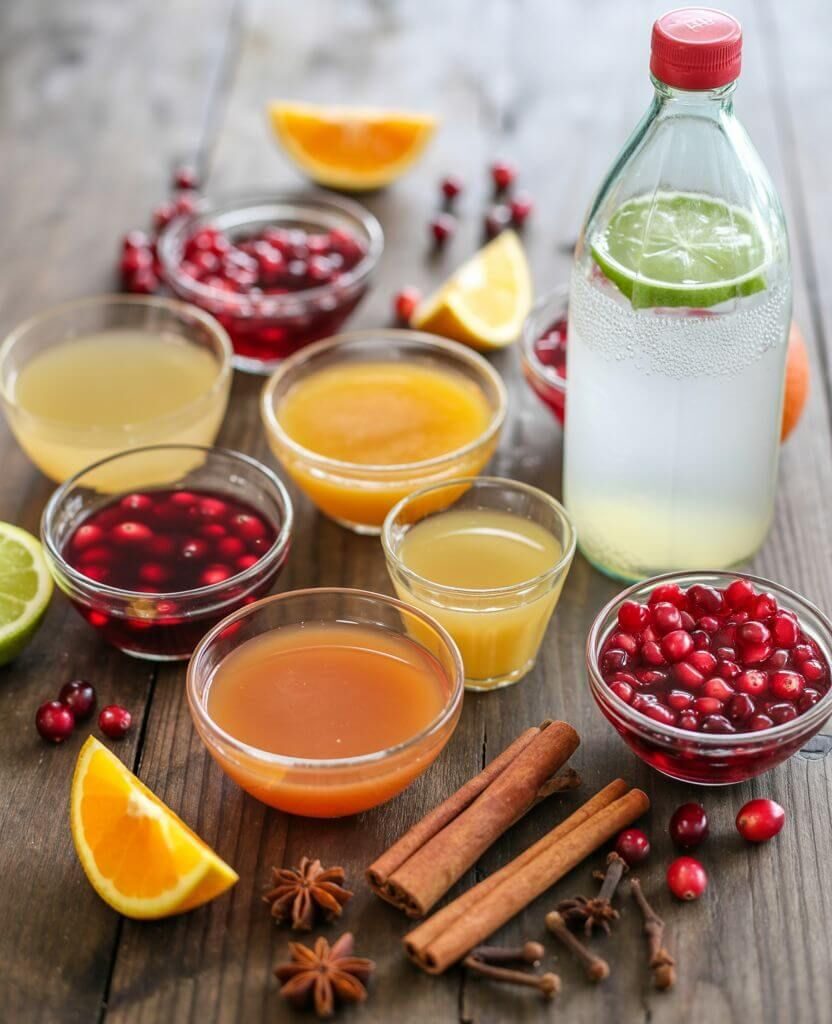
Ingredients for This Easy Fall Punch Recipe
Here’s everything you need to create this flavour-packed, family-friendly punch:
- 3 cups apple cider (fresh from the orchard if possible)
- 2 cups cranberry juice
- 2 cups orange juice
- 1 ½ cups pomegranate juice
- 1 ½ cups pineapple juice
- 2 cups lemon-lime soda (Sprite, 7Up, or ginger ale)
- 3 cinnamon sticks
- 5 allspice berries
- 3 whole cloves
- 1 orange, sliced for garnish
- 1 cup fresh cranberries, for garnish
Step-by-Step Instructions
Making this non-alcoholic, easy punch recipe is almost laughably simple—but the results look like you’ve spent hours preparing. Here’s how to make it (plus some of my personal little rituals that make the process even more fun).
Step 1: Gather Your Ingredients
This is your mise en place moment. Pull everything out before you start mixing. Trust me, nothing kills a party vibe faster than digging through cupboards for cloves while guests are already dipping into the punch bowl.
Pro tip: Set out your juices in matching glass bottles if you’re entertaining. It makes the prep feel festive right from the start.
Step 2: Add the Spices
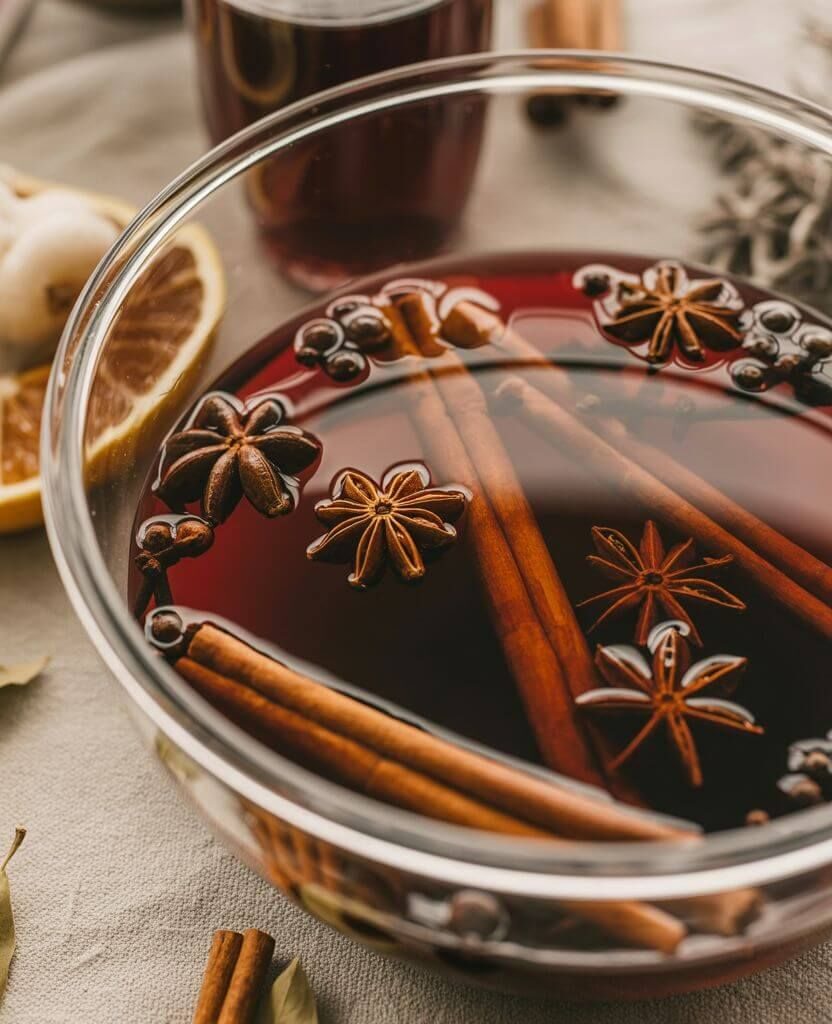
Toss your cinnamon sticks, allspice berries, and cloves straight into the punch bowl. These are the soul of your drink. They’ll infuse every sip with warm, cosy fall flavours that make it taste like a hug in liquid form.
Personal confession? I always take a second to breathe in the cinnamon before I add it. It instantly transports me back to apple-picking trips and Thanksgiving mornings in my childhood kitchen.
Step 3: Pour in the Juices
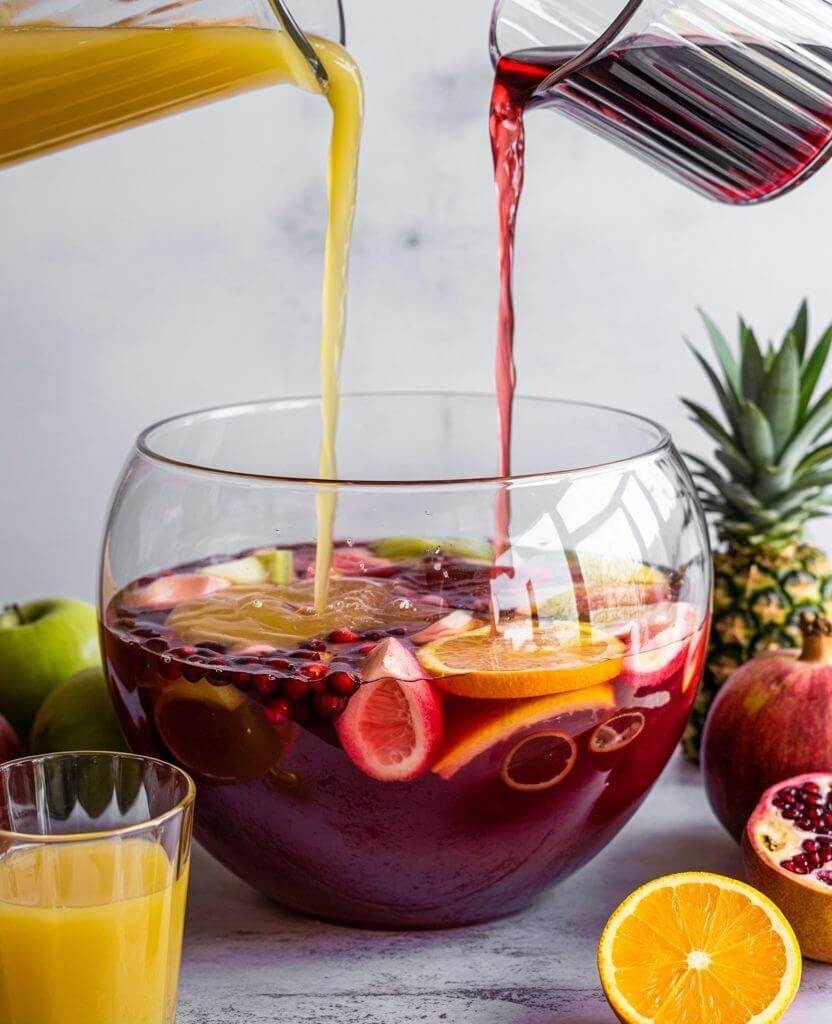
Now comes the fun part—layering the flavours:
- Apple cider → your base and the heart of this apple cider punch recipe.
- Cranberry juice → tart, bright, and very fall.
- Orange juice → brings a fresh citrus zing.
- Pomegranate juice → rich colour + depth.
- Pineapple juice → a tropical surprise that balances the tartness with sweetness.
Watching the colours swirl together is like autumn in a bowl.
Step 4: Chill and Infuse (Optional)
If you have time, let the juices and spices hang out in the fridge for 2–3 hours. This step takes your punch from “really good” to “wow, what’s in this?!” because the spices infuse more deeply.
Shortcut host hack: No time? No problem! It’s still delicious if you serve right away.
Step 5: Add the Fizz
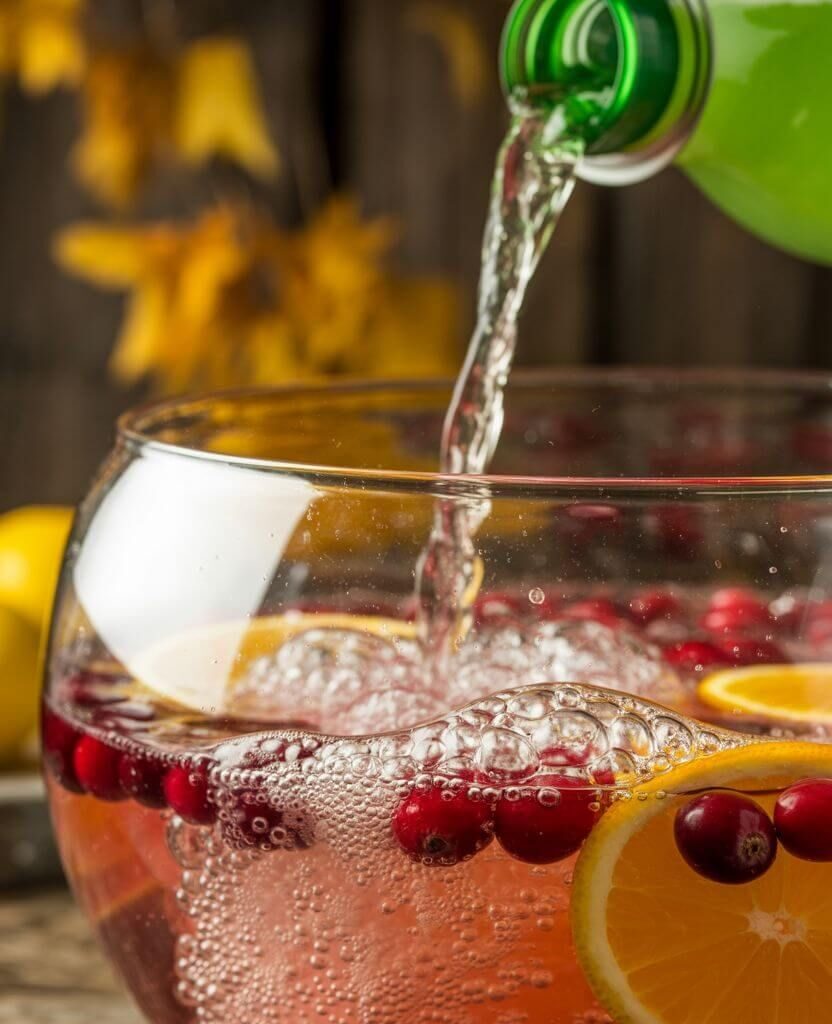
Just before serving, gently pour in the lemon-lime soda. The bubbles bring the punch to life, and suddenly your non-alcoholic fall punch recipe feels like a party in a glass.
Pour slowly along the side of the bowl to avoid foaming over.
Step 6: Garnish Like You Mean It
Top with sliced oranges and fresh cranberries. They don’t just look pretty—they float like little jewels on the surface, making your family-friendly punch irresistible.
Extra points if you freeze cranberries into ice cubes ahead of time.
Step 7: Serve and Enjoy
Ladle over ice, hand a glass to someone you love, and watch the smiles spread. This easy party punch recipe disappears faster than you’d believe.
Printable Recipe: Easy Punch for Thanksgiving and Beyond

The Best Non-Alcoholic, Easy Punch Recipe
Difficulty: EasyServings
1
servingsCooking time
5
minutesCalories
120
kcalIngredients
3 cups apple cider (fresh from the orchard if possible)
2 cups cranberry juice
2 cups orange juice
1 ½ cups pomegranate juice
1 ½ cups pineapple juice
2 cups lemon-lime soda (Sprite, 7Up, or ginger ale)
3 cinnamon sticks
5 allspice berries
3 whole cloves
1 orange, sliced (for garnish)
1 cup fresh cranberries (for garnish)
Directions
- Gather Ingredients
Line up all your juices, check your spices, and prep garnishes. - Add Spices
In a large punch bowl, place cinnamon sticks, allspice berries, and cloves. - Pour Juices
Add apple cider, cranberry juice, orange juice, pomegranate juice, and pineapple juice. - Chill (Optional)
Refrigerate for 2 hours with spices for stronger flavour. - Add Fizz
Just before serving, pour in lemon-lime soda. - Garnish & Serve
Top with orange slices and cranberries. Ladle over ice and enjoy!
Notes
- To keep the punch fizzy, add the soda just before serving.
- For a lighter, sugar-free version, swap soda for sparkling water and use unsweetened juices.
Want to make it a cocktail? Add a splash of rum or bourbon for an adult twist. - Use fresh apple cider from a local orchard for the richest flavour.
Garnish with cranberries, orange slices, or even star anise for a festive look.
Tips & Tricks for the Best Punch
Over the years, I’ve made this punch for Thanksgiving dinners, Halloween parties, and even just rainy afternoons. Here’s what I’ve learned:
1. Choose Good Apple Cider – If you can get fresh cider from a local orchard, do it! It makes this apple cider punch recipe shine. Store-bought works fine too, but orchard cider has a special richness.
2. Chill Everything in Advance – Nobody wants lukewarm punch. Put all your juices and soda in the fridge ahead of time so you don’t have to drown it in ice cubes.
3. Garnish Smart – Cranberries, orange slices, and cinnamon sticks are the classics—but don’t be afraid to get creative. Star anise looks gorgeous. Pomegranate seeds sparkle like edible jewels.
4. Serving Style – A big, clear punch bowl shows off the garnishes beautifully. If you don’t have one, a glass pitcher works too.
Fun idea: For Halloween, serve it in a cauldron with a little dry ice for a spooky vibe!
5. Adjust the Spice – Want more spice? Let the mixture sit with the spices for 2–3 hours. Want it milder? Strain them out earlier. You’re in control of your non-alcoholic, easy punch recipe.
Mix the juices and spices the night before, refrigerate, then add soda and garnishes just before serving. It’s a lifesaver during Thanksgiving prep.
Want to turn this into an autumn cocktail? Add rum, bourbon, or a spiced liqueur. Suddenly your non-alcoholic fall punch becomes an autumn rum punch.
If you expect leftovers (rare in my house), only add soda to individual glasses instead of the whole bowl. That way, the base punch stays fizzy longer.
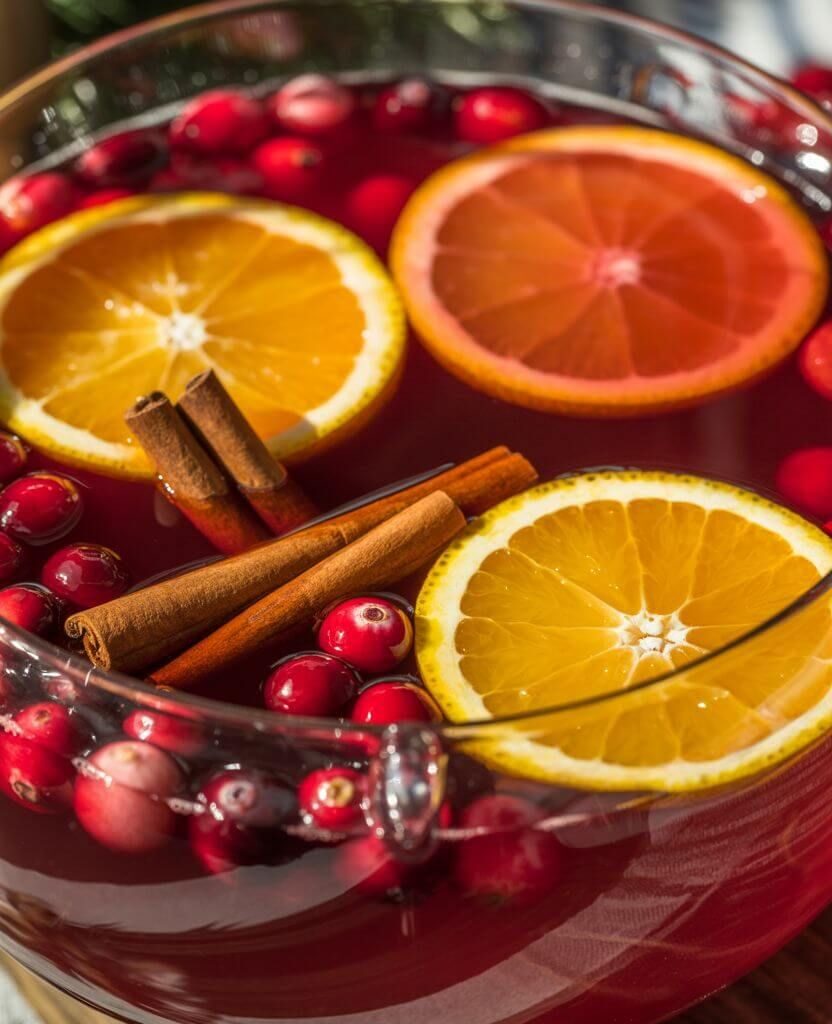
How to Make This Punch for Christmas
Turn this into a non-alcoholic Christmas punch recipe by swapping the pineapple juice for cranberry juice and adding sprigs of rosemary or star anise as garnish. The deep red colour with green herbs gives it that classic holiday vibe.
How to Turn This into a Cocktail
If you’re hosting adults and want to spike your easy fall punch recipe, add a splash of rum, bourbon, or even prosecco. For a lighter twist, keep the base non-alcoholic and set out a few bottles of liquor so guests can mix their own version.
Sugar-Free or Low-Sugar Version
Want to make this family-friendly punch recipe lighter? Use unsweetened cranberry and pomegranate juice, skip the soda, and top with sparkling water instead. It’s just as refreshing, with fewer calories and less sugar—perfect if you’re serving kids before bedtime!
Spring or Summer Twist
Don’t limit this punch to just fall and Thanksgiving! Swap apple cider for lemonade, use fresh berries as garnish, and suddenly this becomes a non-alcoholic summer punch recipe for BBQs and picnics.
Frozen Punch Slush
Pour your prepared punch into a freezer-safe container, freeze overnight, then scrape with a fork to create a slushy texture. It’s like a frozen mocktail—kids absolutely love it, and it’s a fun way to serve punch at outdoor gatherings.
FAQ – Non-Alcoholic, Easy Punch Recipe
1. Can I make this punch ahead of time?
Yes! Mix the juices and spices in advance, refrigerate, then add soda before serving.
2. How many servings does it make?
About 12 cups, but you can double it for big gatherings like Thanksgiving.
3. Can kids drink this punch?
Absolutely! That’s the beauty of a non-alcoholic, easy punch recipe—everyone can enjoy it.
4. What’s the best soda to use?
Sprite, 7Up, or ginger ale all work well. Each gives a slightly different flavour.
5. Can I use bottled juices?
Yes! Fresh is great, but bottled works perfectly in this easy fall punch recipe.
6. How do I keep the punch cold?
Chill juices beforehand, or freeze cranberries and orange slices into ice cubes.
7. Can I add alcohol for adults?
Sure! Rum or bourbon turns this into a cosy autumn cocktail.
8. How long do leftovers last?
Up to 2 days in the fridge, but the soda will lose fizz over time.
9. Can I serve this at Christmas too?
Yes! It doubles as a non-alcoholic holiday punch recipe with festive garnishes.
10. Is this really an easy punch recipe?
Yes—it takes just 5 minutes to put together. That’s why it’s one of my favourite family-friendly punch recipes.
Cheers to the Perfect Non-Alcoholic Punch!
This non-alcoholic, easy punch recipe proves you don’t need alcohol—or hours of prep—to create a festive, crowd-pleasing drink. With simple ingredients, gorgeous garnishes, and flavours that taste like fall in a glass, it’s perfect for Thanksgiving, family dinners, or even just a Saturday movie night.
So grab your punch bowl, gather your juices, and make this the drink that brings everyone together this season.
Let’s Connect!
If you’ve tried this easy non-alcoholic punch recipe, I’d love to hear how it turned out for you!

There’s something magical about a steaming mug of orange hot chocolate on a cold winter night. The rich taste of cocoa mixed with the brightness of orange feels both indulgent and refreshing—like Christmas captured in a cup. Unlike plain cocoa, this version adds a festive twist that makes it a perfect Christmas hot drink to share with family and friends during the holiday season.
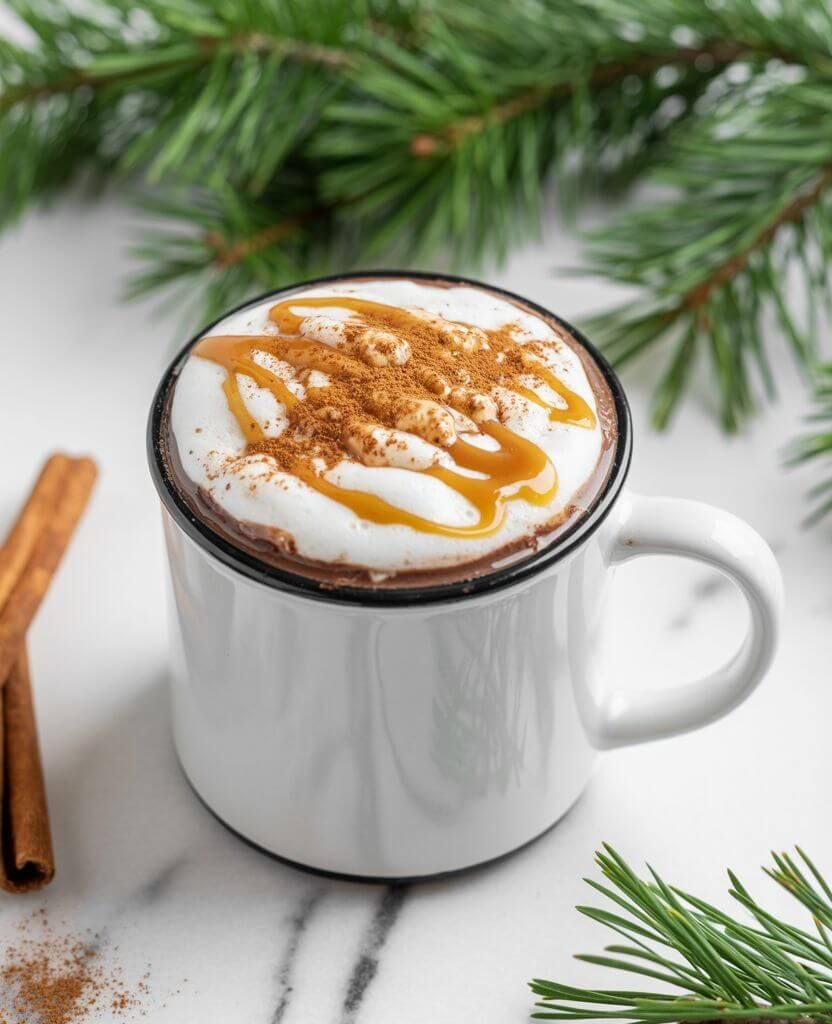
I’ve always loved the harmony of citrus and chocolate, so creating a homemade spiced hot cocoa with orange was only natural. What makes this recipe even better is that it’s a non-dairy hot chocolate, made with plant-based milk, fresh orange juice, and warming spices like cinnamon and ginger. The result is a cozy, velvety drink that’s not just delicious but also wholesome enough to enjoy all winter long.
The Story Behind Spiced Orange Hot Cocoa
Each year, when the holidays arrive, I look forward to cozy winter drinks. Peppermint mochas and gingerbread lattes are everywhere, but I wanted to serve something different at our Christmas gathering—something festive yet unexpected.
That’s when I remembered a childhood favourite: a chocolate-orange bar I once received as a gift. The zesty citrus cutting through the rich chocolate felt magical, and I knew I had to bring that memory to life in a cup.
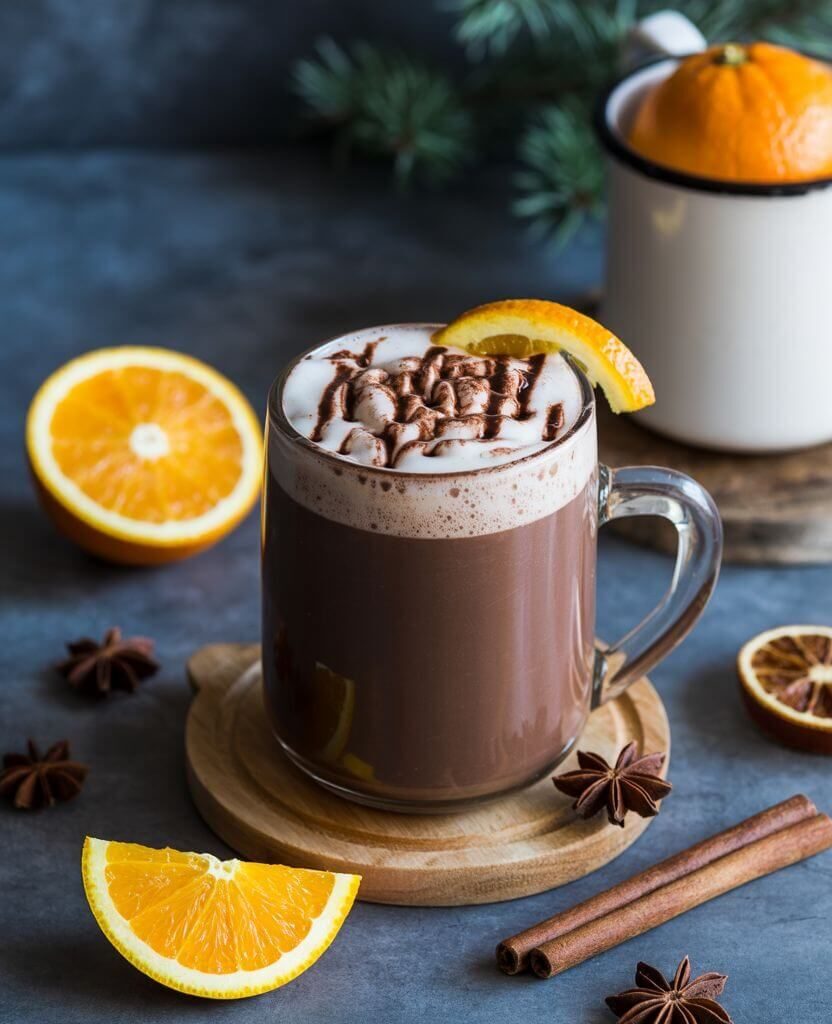
So, one December afternoon, I reached for what I had at home—non-dairy milk, cocoa powder, and a splash of orange juice. I added cinnamon and ginger, letting the mixture slowly warm on the stove. Soon, the kitchen filled with the scent of chocolate, spice, and citrus.
The first sip was everything I hoped for: smooth, velvety, and perfectly festive. That simple experiment became more than just a recipe—it turned into a new family tradition. Now, this spiced orange hot chocolate is our go-to cozy drink every Christmas.
Ingredients You’ll Need
The beauty of this recipe is that it requires only simple, everyday ingredients—yet the result tastes gourmet.
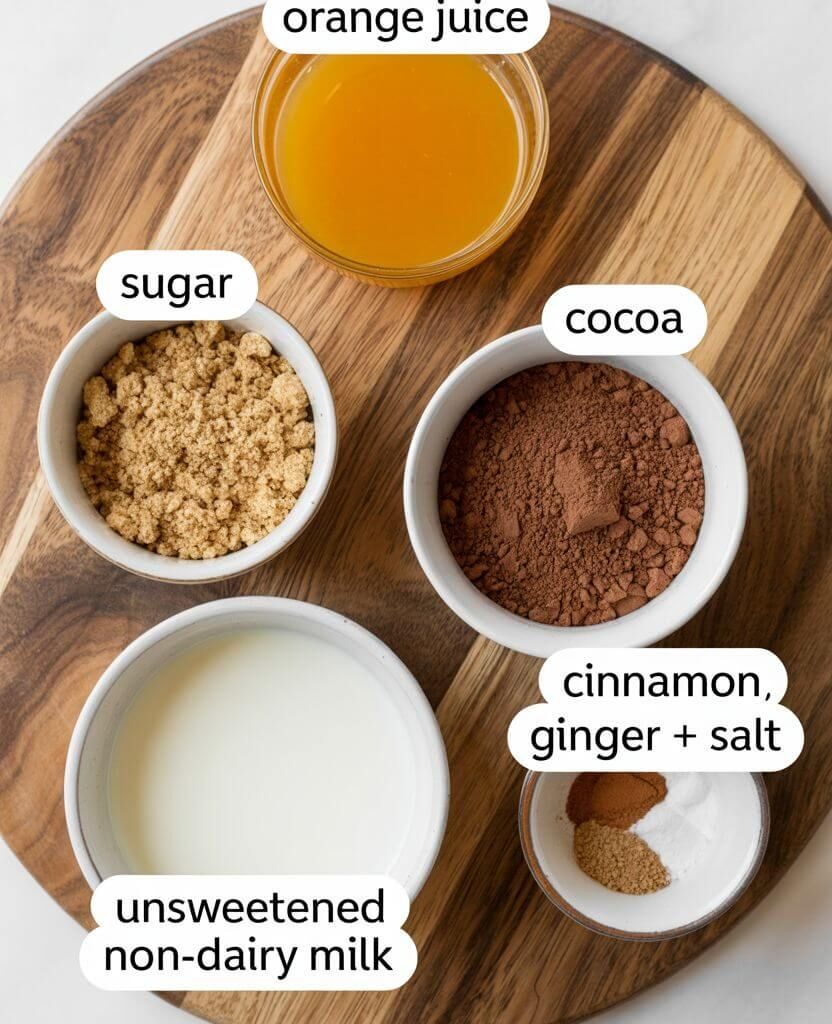
- Unsweetened non-dairy milk – Almond, oat, soy, or cashew milk all work beautifully. For an even creamier base, try unsweetened vanilla plant milk or a splash of vegan cream.
- 100% pure orange juice – Fresh-squeezed or bottled, with or without pulp. This adds brightness and a natural vitamin C boost.
- Unsweetened cocoa powder – A good-quality baking cocoa or raw cacao powder makes all the difference in depth of flavour.
- Sweetener – Maple syrup, raw sugar, or coconut sugar all balance the richness with a touch of sweetness.
- Cinnamon – Essential for warmth and festive charm.
- Ginger – Adds depth and gentle spice; optional but recommended.
- Cayenne pepper (optional) – Just a dash for a subtle heat.
- Pinch of salt – Enhances and rounds out all the flavours.
Step-by-Step Instructions: How to Make Orange Hot Chocolate
Step 1: Warm the Base
In a medium saucepan, combine the non-dairy milk and orange juice. Heat gently over medium-low, stirring occasionally, until warm but not boiling.
Step 2: Add Cocoa and Sweetener
Whisk in the cocoa powder, sweetener of your choice, and a pinch of salt. Keep stirring until the cocoa fully dissolves and the mixture becomes smooth.
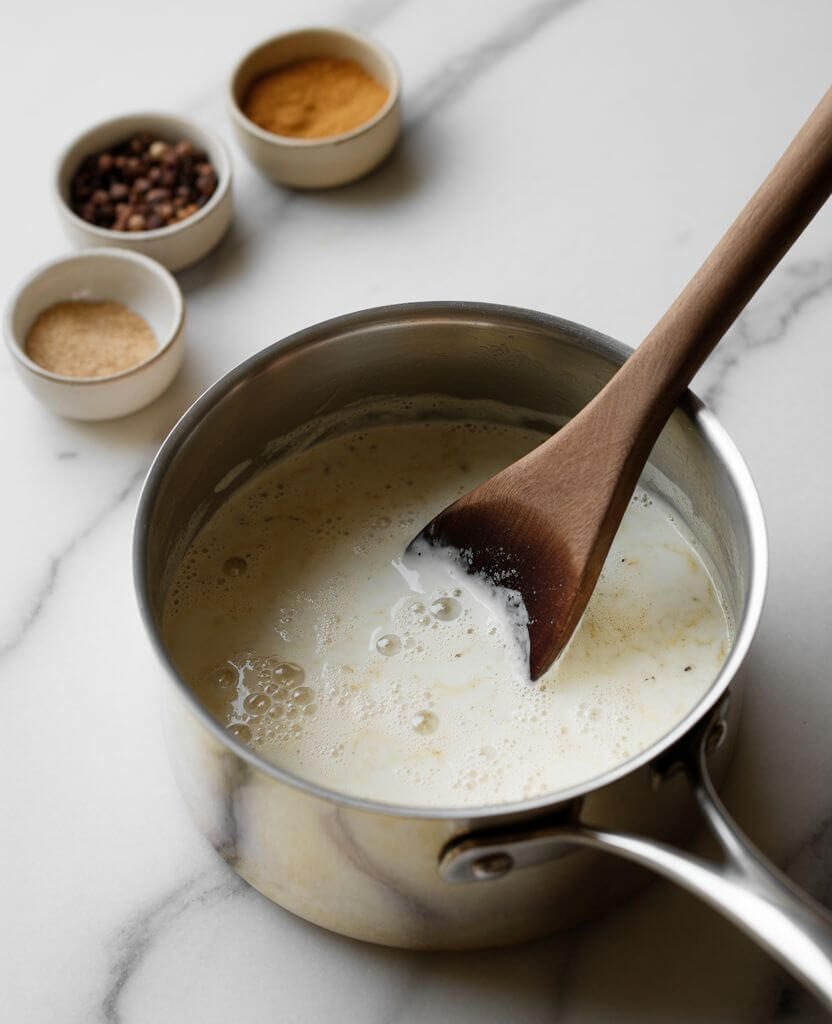
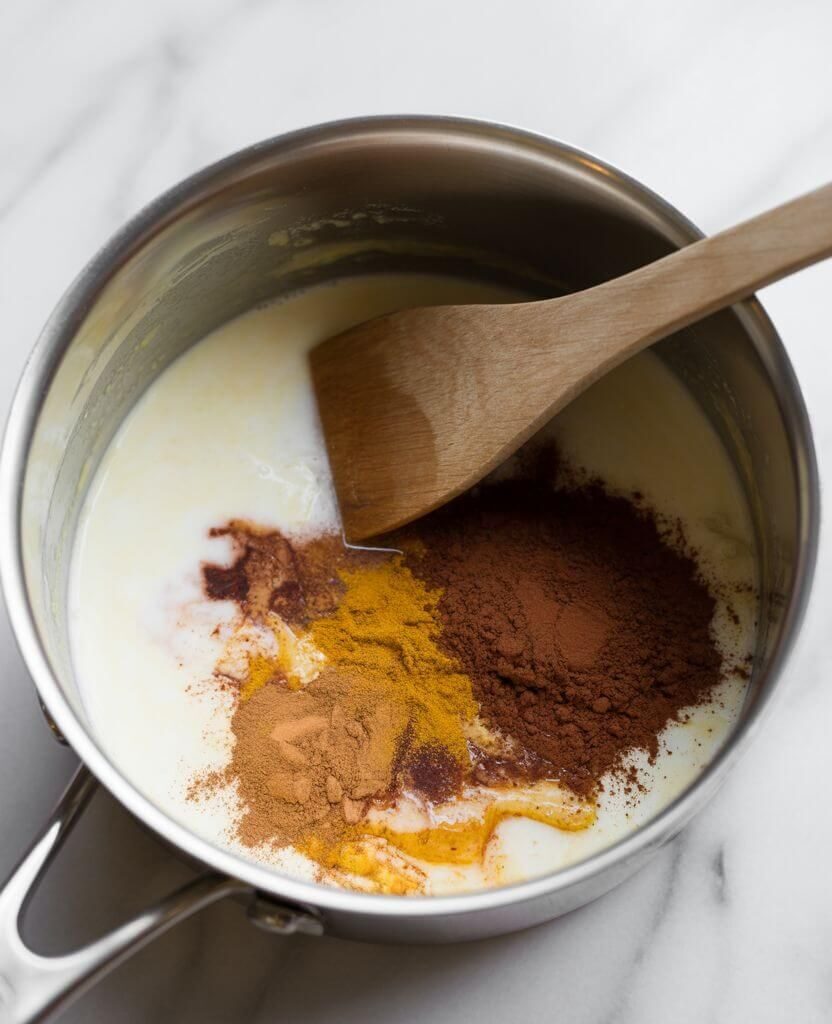
Step 3: Spice It Up
Add cinnamon, ginger, and if desired, a tiny pinch of cayenne. Stir slowly to let the flavours mingle. The kitchen will fill with the aroma of chocolate and spice.
Step 4: Keep It Cozy
Turn the heat down to low to keep the cocoa warm until you’re ready to serve. This allows the spices to infuse even more flavour.
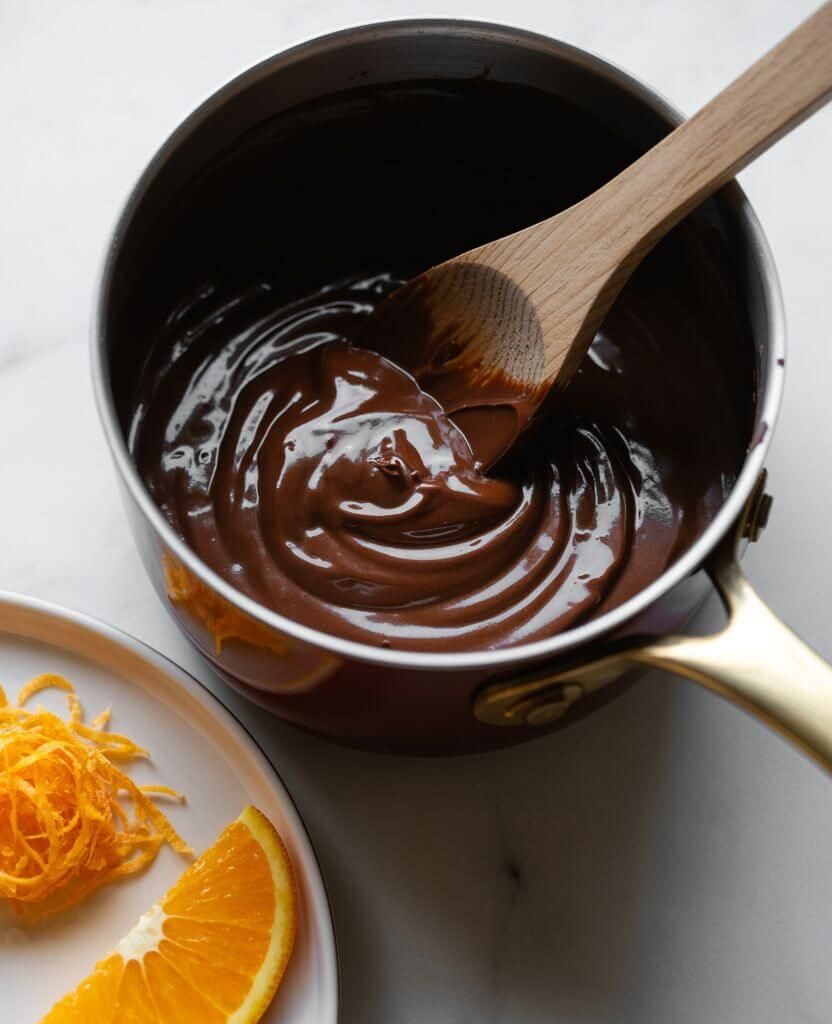
Step 5: Pour and Garnish
Serve the hot cocoa in your favourite mugs, and don’t forget the toppings (see ideas below).
Delicious Topping Ideas
No cozy drink is complete without toppings. Here are a few festive favourites:
- Coconut whipped cream – Dairy-free, fluffy, and indulgent.
- Shaved dark chocolate – Adds richness and looks café-style.
- Vegan marshmallows – A holiday classic that makes kids happy.
- Candied orange peel – Elegant and perfectly on theme.
- Cinnamon stick stirrers – Add charm and subtle spice.
Hosting a party? Create a DIY hot chocolate bar with bowls of toppings—guests will love customising their own mugs.
Perfect Occasions for Orange Hot Chocolate
This isn’t just any drink—it’s one you’ll want to bring out for special moments. Some of my favourites include:
- Christmas Eve – After dinner, while the lights glow and gifts wait under the tree.
- Family movie nights – A fun surprise that kids and adults both enjoy.
- Holiday brunch – A lighter alternative to eggnog.
- Self-care evenings – Light a candle, grab a blanket, and sip slowly.
- Snowy afternoons – Warm up after playing outside or coming in from the cold.
Why You’ll Love This Recipe
- Dairy-free & vegan-friendly – Perfect for everyone, including guests with dietary needs.
- Rich yet refreshing – Chocolate indulgence balanced with citrus brightness.
- Simple ingredients – You likely have most of them at home already.
- Quick & easy – Ready in about 10 minutes.
- Festive & cozy – A unique alternative to classic hot cocoa.
Variations to Try
The best part of homemade hot cocoa is how versatile it can be. Here are a few ideas to make it your own:
- Mocha Orange Hot Chocolate – Add a shot of espresso for a citrusy mocha kick.
- Spiked Version – Stir in a splash of orange liqueur or Baileys for an adults-only Christmas drink.
- Extra Spiced – Add cloves or nutmeg for a bolder spice profile.
- Kid-Friendly Fun – Top with chocolate syrup, sprinkles, or marshmallow snowmen.
- Sugar-Free Option – Swap sweeteners for monk fruit or stevia.

Spiced Orange Hot Chocolate Recipe
Course: EgyébServings
1
servingsPrep time
5
minutesCooking time
5
minutesCalories
250
kcalIngredients
1 cup unsweetened non-dairy milk (almond, oat, soy, or cashew)
¼ cup 100% pure orange juice (fresh or bottled, with or without pulp)
1 tbsp unsweetened cocoa powder
2 tsp sweetener (raw sugar, maple syrup, or coconut sugar)
¼ tsp ground cinnamon
⅛ tsp ground ginger (optional but recommended)
1 small pinch cayenne pepper (optional)
1 small pinch of salt
Directions
- In a small saucepan, add the non-dairy milk, orange juice, cocoa powder, sweetener, cinnamon, ginger, and salt.
- Heat over medium-low, whisking until the cocoa powder dissolves and the mixture is smooth.
- Reduce heat to low and keep warm until ready to serve.
- Taste and adjust sweetness or spices if needed.
- Pour into a mug and enjoy.
- Optional: Garnish with whipped coconut cream, a sprinkle of cinnamon, or vegan chocolate shavings.
Notes
- For the best flavour, always use fresh orange juice and high-quality unsweetened cocoa powder.
- This spiced orange hot chocolate is naturally dairy-free and vegan, making it a cozy winter drink that everyone can enjoy.
If you loved this spiced orange version, don’t miss our creamy pumpkin hot chocolate recipe for a cozy autumn treat.
FAQs About Orange Hot Chocolate
Can I make it ahead of time?
Yes! Prepare the cocoa, let it cool, and store it in the fridge. Reheat gently before serving.
Can I make it without orange juice?
If you don’t have orange juice, try orange extract (just a drop or two) for a similar effect.
What’s the best non-dairy milk to use?
Oat milk makes it extra creamy, while almond milk adds a nutty note. Choose your favourite!
Can I use dark chocolate instead of cocoa powder?
Absolutely—melt a few squares of high-quality dark chocolate into the mixture for a richer drink.
Is it suitable for kids?
Yes, the base recipe is completely kid-friendly. Just skip the cayenne and alcohol variations.
Wrapping Up: Your New Favourite Orange Hot Chocolate
This spiced orange hot chocolate is more than just a winter drink—it’s a holiday experience. With the richness of cocoa, the brightness of citrus, and the warmth of cinnamon and ginger, it brings festive comfort to every sip. Whether you make it for a Christmas hot drink with family, serve it at a holiday brunch, or enjoy it as a quiet cozy winter drink on your own, it’s guaranteed to become a tradition.
The best part? This recipe is quick, easy, and completely customisable. You can make it as a non-dairy hot chocolate, add extra spices for bold flavour, or top it with whipped cream and chocolate shavings for a café-style treat. However you enjoy it, this orange hot chocolate recipe is the perfect way to bring warmth and joy to the season.
So grab your favourite mug, light a candle, and let this festive drink wrap you in holiday cheer. One sip, and you’ll see why this cozy spiced cocoa deserves a place on your Christmas menu every year.

Last Updated: October 28, 2025
Fall is here, and with it comes cozy sweaters, pumpkin spice everything, and of course – brand-new fall nail designs 2025. This year’s autumn nail trends are all about mixing timeless neutrals with bold seasonal colors, textured finishes, and little details that make your manicure feel like part of your outfit.
Whether you’re heading to a rustic wedding, cozying up for Thanksgiving, or just want a chic everyday nail look, these ideas will inspire you to switch up your mani this season.
In this guide, we’ll explore 16 trending fall nail ideas, each with:
- A little story to set the vibe
- Why You’ll Love It (style + lifestyle benefits)
- How to Nail the Look (step-by-step guide)
- Variations to Try (color and design swaps)
- Pro Tips (extra insider advice)
- Let’s dive into the best autumn nail trends for 2025 and find your perfect seasonal style.
1. Nude & Neutral Fall Nails


Mini Story
Picture yourself on a crisp autumn morning, wrapping your hands around a steaming mug of chai latte. Your nails? A soft nude polish that goes with everything – from your chunky knit cardigan to your sleek work blazer. That’s the magic of neutral fall nails. These fall nail designs are perfect for the season.
Why You’ll Love It
Neutral tones are the unsung heroes of fall manicures. They’re polished but understated, giving you that “effortlessly chic” vibe. Plus, nude fall nails 2025 work for every occasion – Monday meetings, weekend brunch, or even a rustic wedding. Think of them as the little black dress of nail trends. These fall nail designs are perfect for the season.
How to Nail the Look
- Prep with a Base Coat: Protects your natural nails.
- Pick the Right Nude: Choose a beige, taupe, or blush shade that flatters your skin tone (best nude fall nails).
- Apply Two Thin Layers: Smooth, streak-free coverage is key.
- Optional Accent: Add a subtle shimmer or a rhinestone for a minimalist twist.
- Topcoat to Seal: Glossy for a polished look, or matte for a modern edge.
Variations to Try
- Mix beige and taupe on alternating nails.
- Add a French tip with burgundy or gold.
- Try a matte finish for a runway-inspired vibe.
Pro Tips
Nude nails elongate shorter fingers and look great on almond-shaped nails. They’re also a lifesaver if you want a manicure that grows out gracefully. These fall nail designs are perfect for the season.
2. Pumpkin Spice Nails
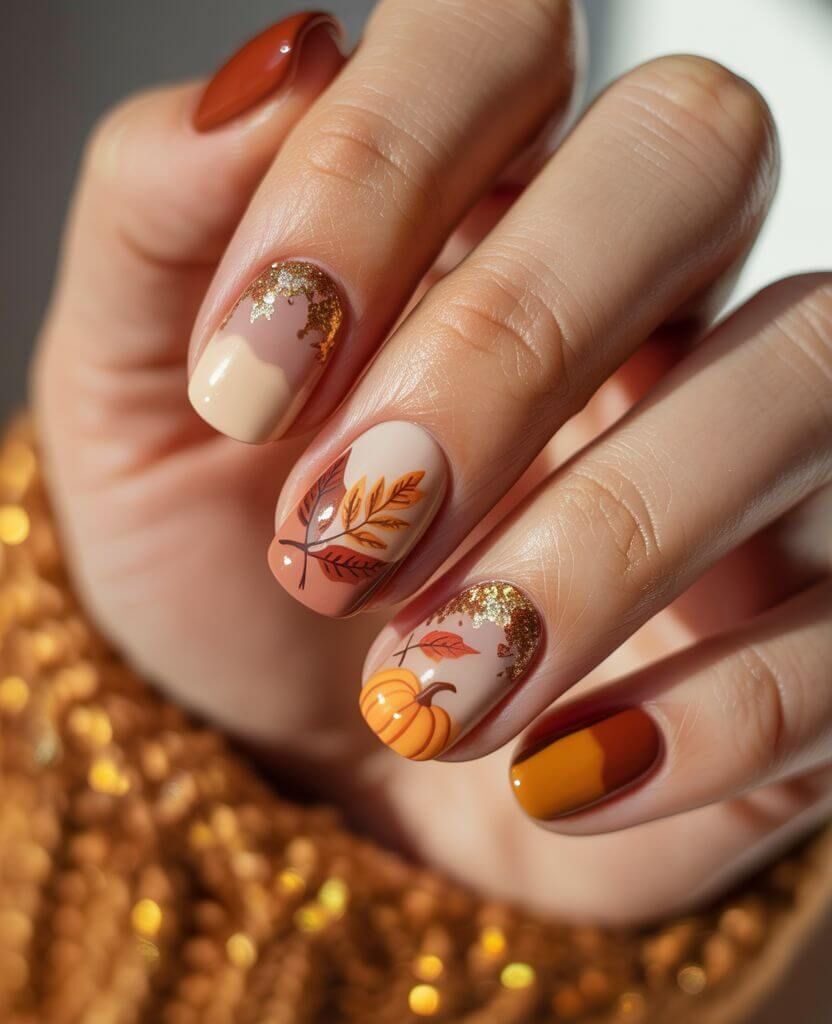
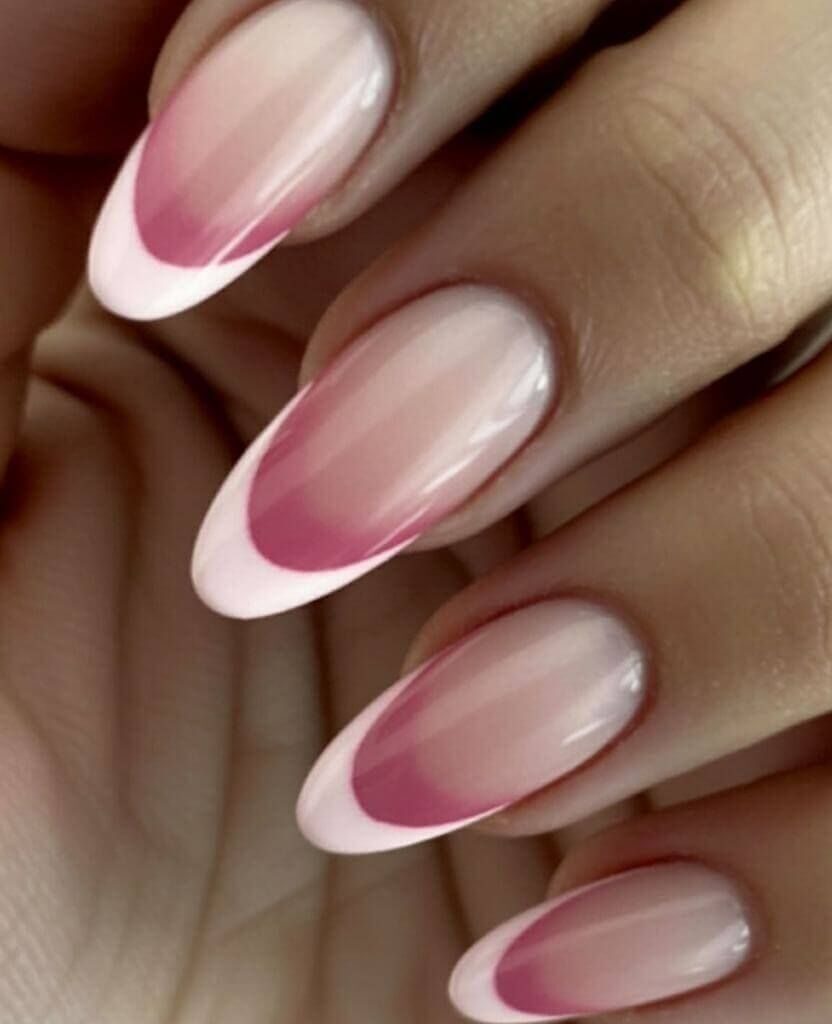
Mini Story
Nothing says fall like pumpkin spice. Imagine holding your pumpkin spice latte while your nails sparkle in warm orange and cinnamon shades – it’s an Instagram moment waiting to happen.
Why You’ll Love It
Pumpkin spice nails are cozy, festive, and scream fall. They’re playful enough for casual outfits but still chic enough for special occasions. Plus, they tie into one of the most searched seasonal trends: pumpkin fall nails 2025.
How to Nail the Look
- Neutral Base First: Start with beige or cream.
- Pumpkin Shades: Apply burnt orange, copper, or cinnamon tones (DIY pumpkin spice nails).
- Accent Nails: Add gold or bronze glitter for sparkle.
- Nail Stickers: Try pumpkins or fall leaves for easy nail art.
- Topcoat Finish: Glossy for festive shine or matte for cozy vibes.
Variations to Try
- Add a pumpkin-orange French tip.
- Ombre from orange to gold.
- Accent with leaf decals.
Pro Tips
Pair pumpkin nails with cozy sweaters and plaid scarves – they’ll pop in fall photos. Short nails? Pumpkin tones look even bolder on them.
3. Sweater Nails
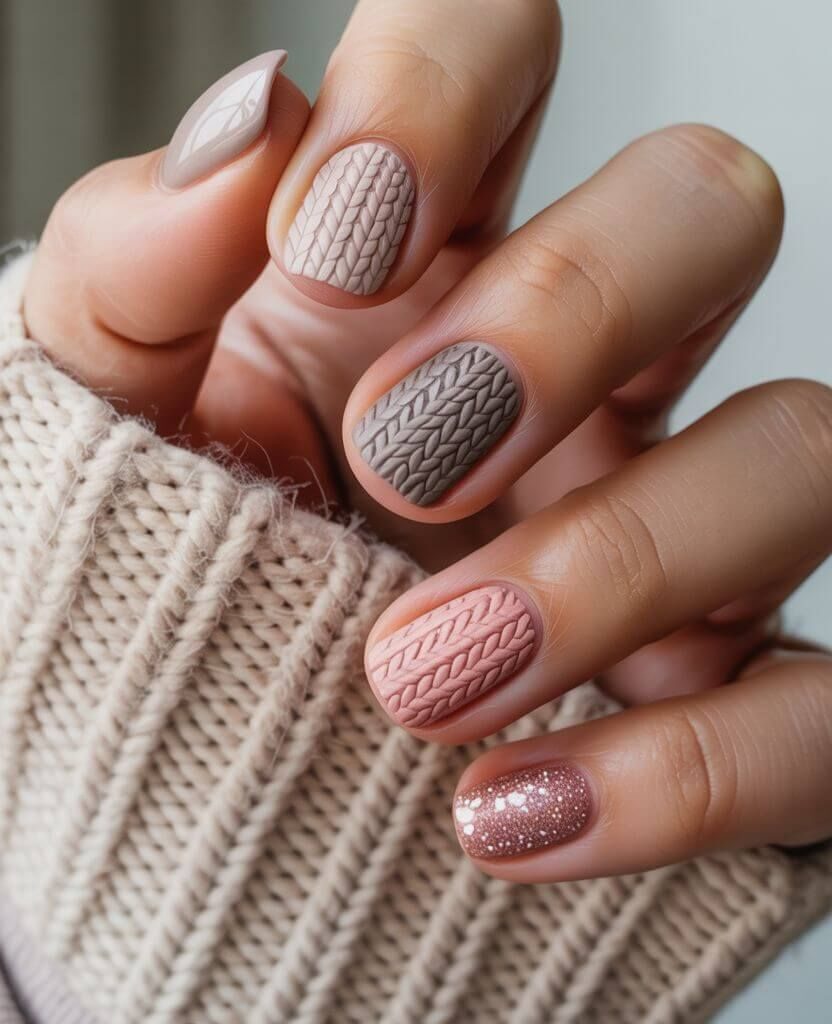
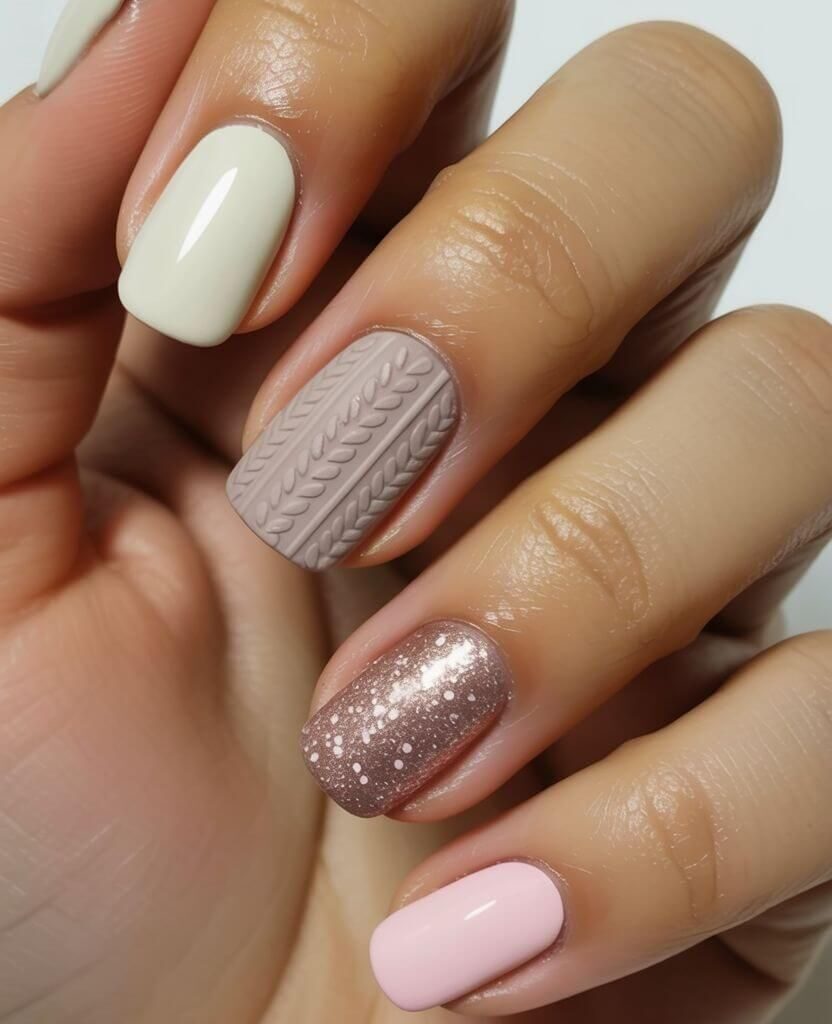
Mini Story
Think of your nails as your favorite fall sweater – textured, cozy, and oh-so-inviting. Sweater nails are like wearing a knit pattern right at your fingertips.
Why You’ll Love It
Sweater nails give you that cozy fall aesthetic everyone loves on Pinterest. They’re also perfect for chilly-weather selfies – coffee in one hand, phone in the other. These nails are conversation starters because people can’t resist the knit-like texture.
How to Nail the Look
- Matte Base Coat: Cream, taupe, or dusty rose work best.
- Add Cable-Knit Texture: Use a nail art brush or stamping plate.
- Mix Pastels & Neutrals: Soft greys and pinks mimic knitwear.
- Accent Finger: Add glitter to balance matte textures.
- Seal with Matte Topcoat: Keeps the pattern intact.
Variations to Try
- White sweater nails for a “snowy fall” vibe.
- Blush pink for a feminine touch.
- Add rhinestones to elevate the look.
Pro Tips
Sweater nails look especially flattering on short almond nails. Pair them with cozy outfits for maximum Pinterest vibes.
4. French Tip Fall Nails
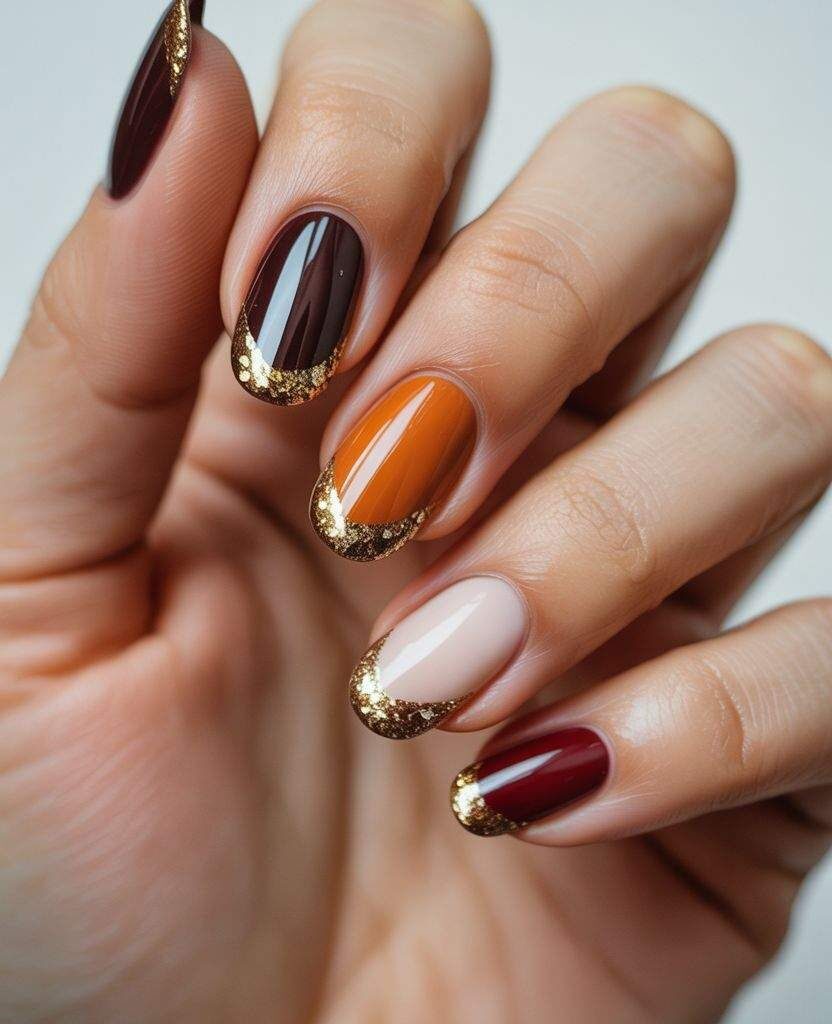
Mini Story
The French manicure is timeless, but fall gives it a makeover. Swap out white tips for autumn shades, and suddenly your nails are both classy and seasonal.
Why You’ll Love It
French tips are versatile – professional for the office, yet stylish for a night out. Fall colors like burgundy or chocolate brown make them fresh and on-trend for French tip fall nails 2025.
How to Nail the Look
- File Nails into Shape: Almond or square works best.
- Base Coat: Protects nails and smooths surface.
- Colored Tips: Use burgundy, burnt orange, or deep brown.
- Glitter Outline: Add gold glitter along the tips.
- Finish with Topcoat: Glossy or matte both look chic.
Variations to Try
- Double French tips in two fall shades.
- Glitter French for parties.
- Nude base + chocolate tips = classy.
Pro Tips
Great choice for short nails, since tips elongate fingers. Try it for weddings or holiday dinners.
5. Glitter Fall Nails
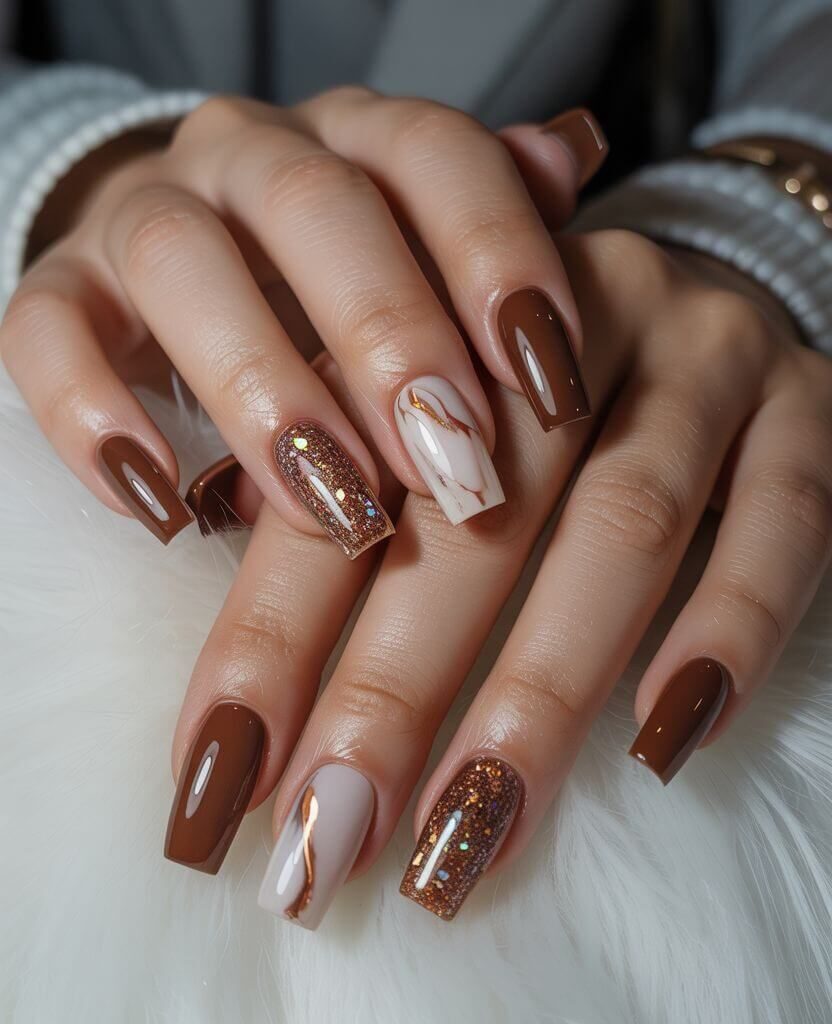
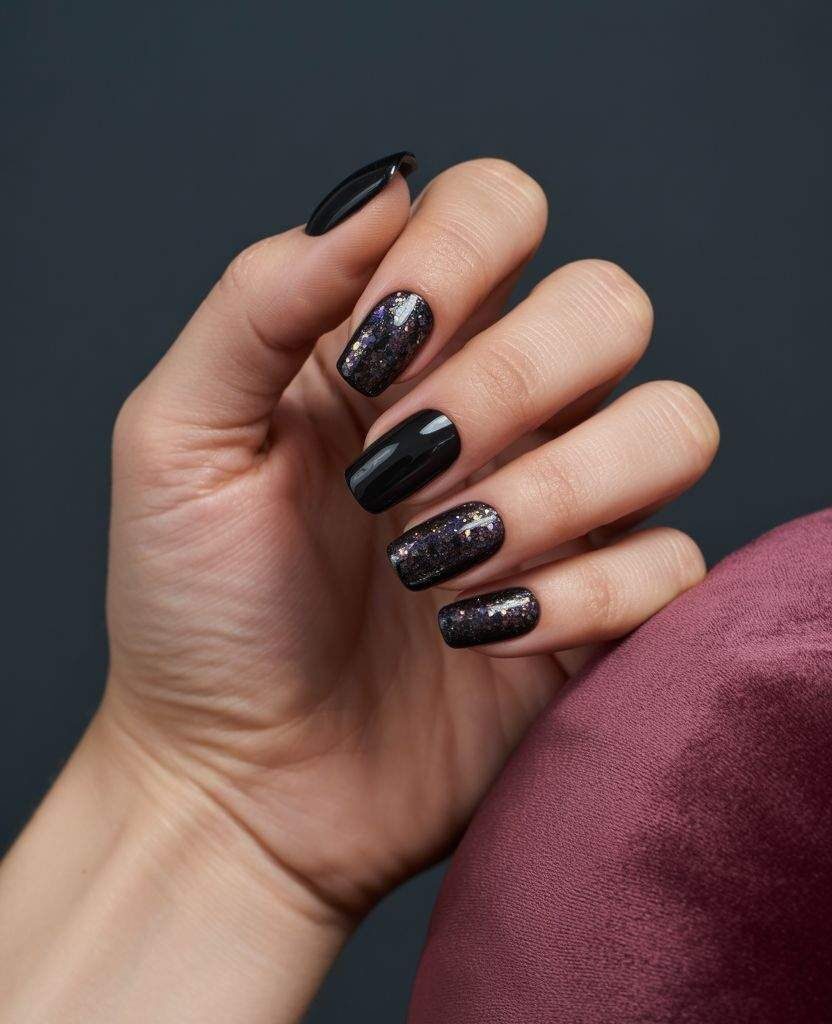
Mini Story
When the leaves sparkle in the sun, your nails should too. Glitter nails are the party-ready side of fall trends – perfect for nights out, weddings, or simply when you want a touch of glam.
Why You’ll Love It
Glitter nails never fail to catch the light and attention. This fall, glitter accents are trending on dark bases like burgundy and emerald, making them feel luxe and festive.
How to Nail the Look
- Dark Base Color: Burgundy, navy, or emerald.
- Glitter Polish: Apply chunky or fine shimmer.
- Accent Nails: Glitter only on the ring finger.
- Ombre Glitter: Blend from the cuticle down.
- Glossy Topcoat: Seals the sparkle.
Variations to Try
- Gold glitter on black nails.
- Rose gold shimmer on taupe.
- Silver sparkle on deep green.
Pro Tips
Keep glitter accents minimal for a classy fall nail design. Too much glitter can overwhelm short nails.
6. Burgundy Fall Nails
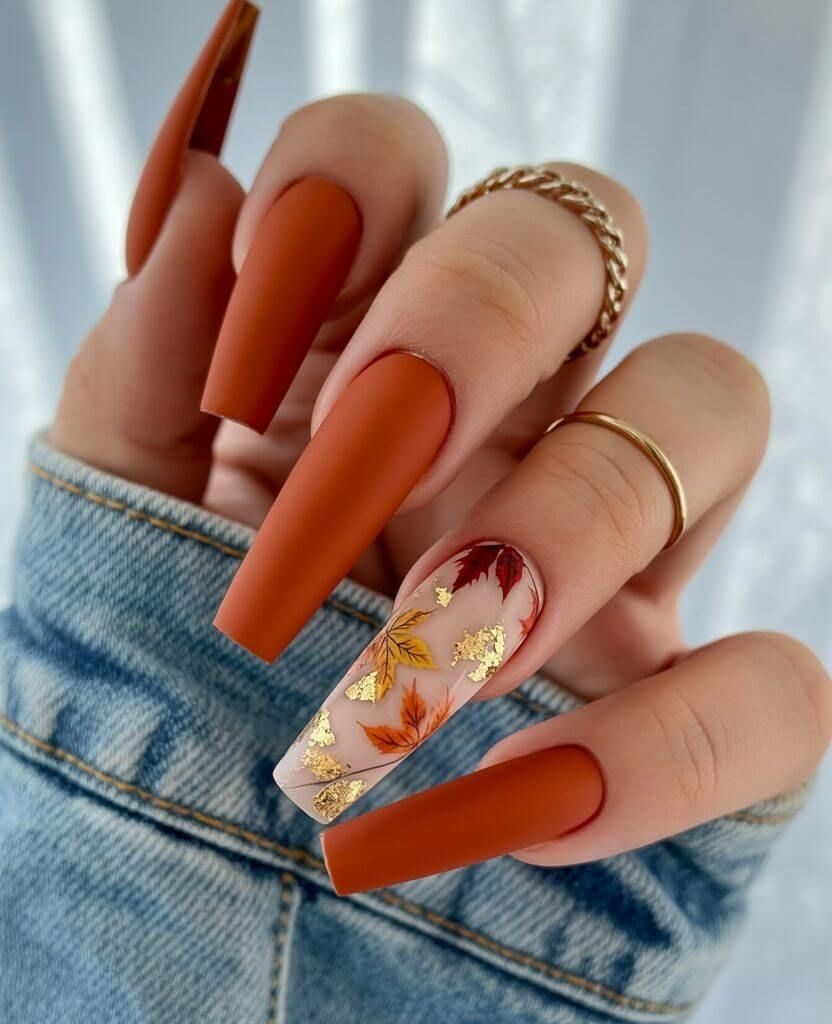
Mini Story
Burgundy nails are like a glass of red wine on a chilly evening – bold, elegant, and timeless.
Why You’ll Love It
Deep reds and burgundy shades are always trending in fall. They’re dramatic yet sophisticated, making them perfect for weddings, dates, or daily wear.
How to Nail the Look
- Base Coat First: Prevents staining.
- Choose Rich Burgundy: Maroon, wine, or oxblood.
- Accent with Gold: Add foil or stripes for flair.
- Matte Option: Try matte for high fashion vibes.
- Gloss for Classic Look: Shiny finish = timeless.
Variations to Try
- Burgundy ombre with black tips.
- Gold foil accents.
- Glitter burgundy nails for holidays.
Pro Tips
Burgundy nails flatter every skin tone and look stunning on almond or coffin shapes.
7. Rustic Fall Nails

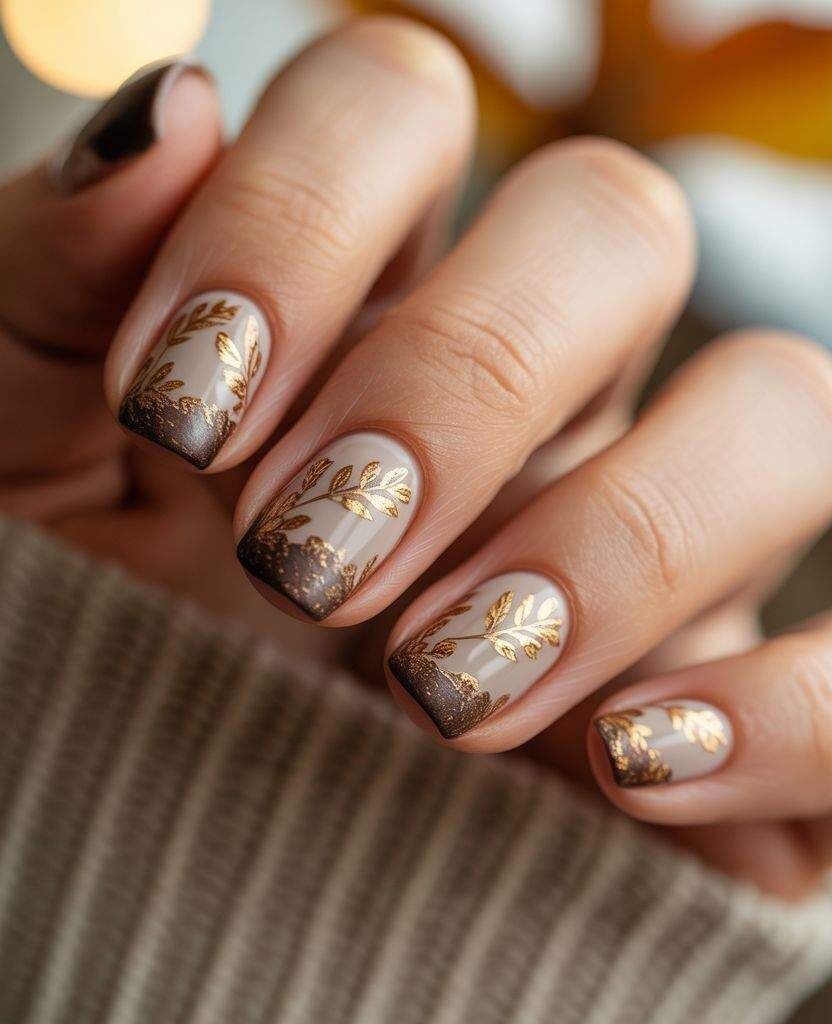
Mini Story
Rustic nails are inspired by nature – think earthy tones, greenery, and cozy fall weddings.
Why You’ll Love It
These nails are perfect if you’re attending a rustic wedding or love nature-inspired styles. They bring cozy, outdoorsy vibes straight to your manicure.
How to Nail the Look
- Neutral Base: Beige or taupe.
- Nature Accents: Add leaves or greenery stickers.
- Brown Polish: Mimics wood tones.
- Matte Finish: For earthy texture.
- Seal with Topcoat: Keeps it chip-free.
Variations to Try
- Olive green accents.
- White + greenery combo.
- Gold foil for rustic glam.
Pro Tips
Rustic nails look great for bridesmaids at fall weddings. Pair with neutral dresses for harmony.
If you’re looking for even more cozy inspiration, check out my post on Top 10 Fall Nail Ideas 2025 — from plaid patterns to pumpkin spice tones, these autumn nails are pure seasonal perfection.
8. Metallic Gold Fall Nails
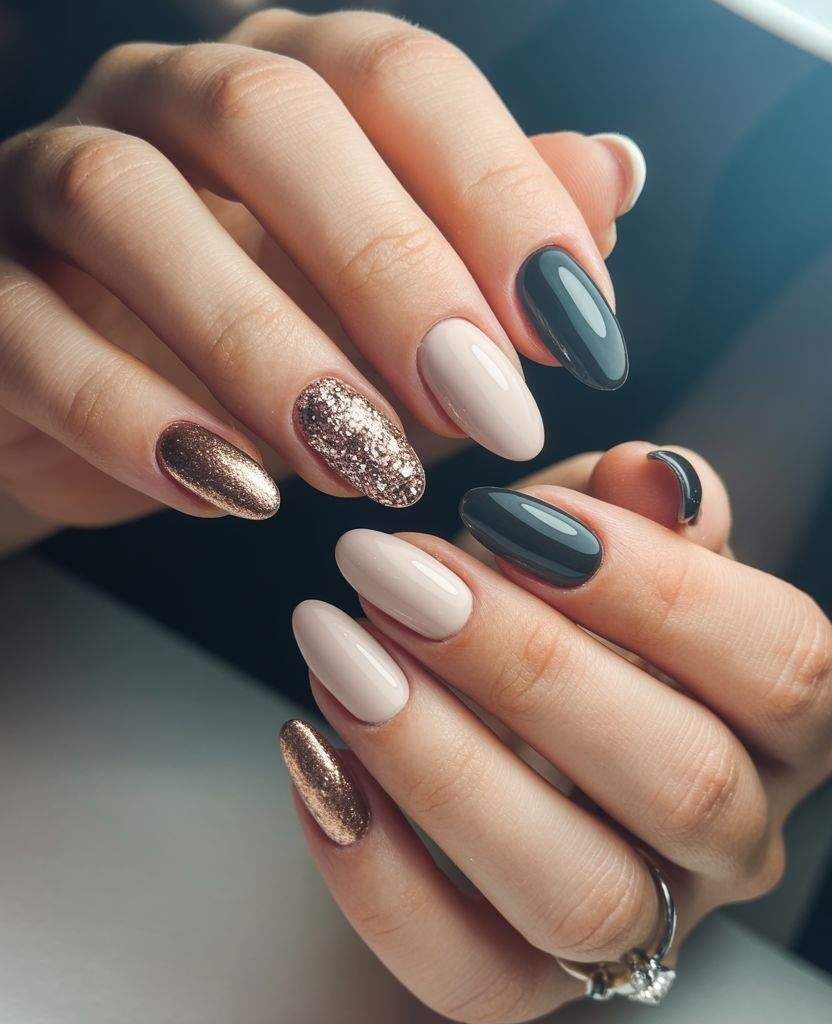
Mini Story
Metallic nails are like jewelry for your fingertips – glamorous, bold, and perfect for fall evenings.
Why You’ll Love It
Gold metallics instantly dress up any outfit. Whether you’re wearing jeans and a sweater or a cocktail dress, metallic fall nails 2025 elevate your look.
How to Nail the Look
- Choose Gold Tone: Champagne, rose gold, or foil gold.
- Accent Nails: Apply metallic polish only to a few fingers.
- Combine with Nude: Nude + gold = classy.
- Foil Application: Use nail foils for texture.
- Glossy Topcoat: Seals in shine.
Variations to Try
- Gold ombre tips.
- Rose gold accents.
- Mix metallics for a bold vibe.
Pro Tips
Metallics look stunning on short square nails – bold without being overwhelming.
9. Forest Green Nails – Deep and Earthy Elegance
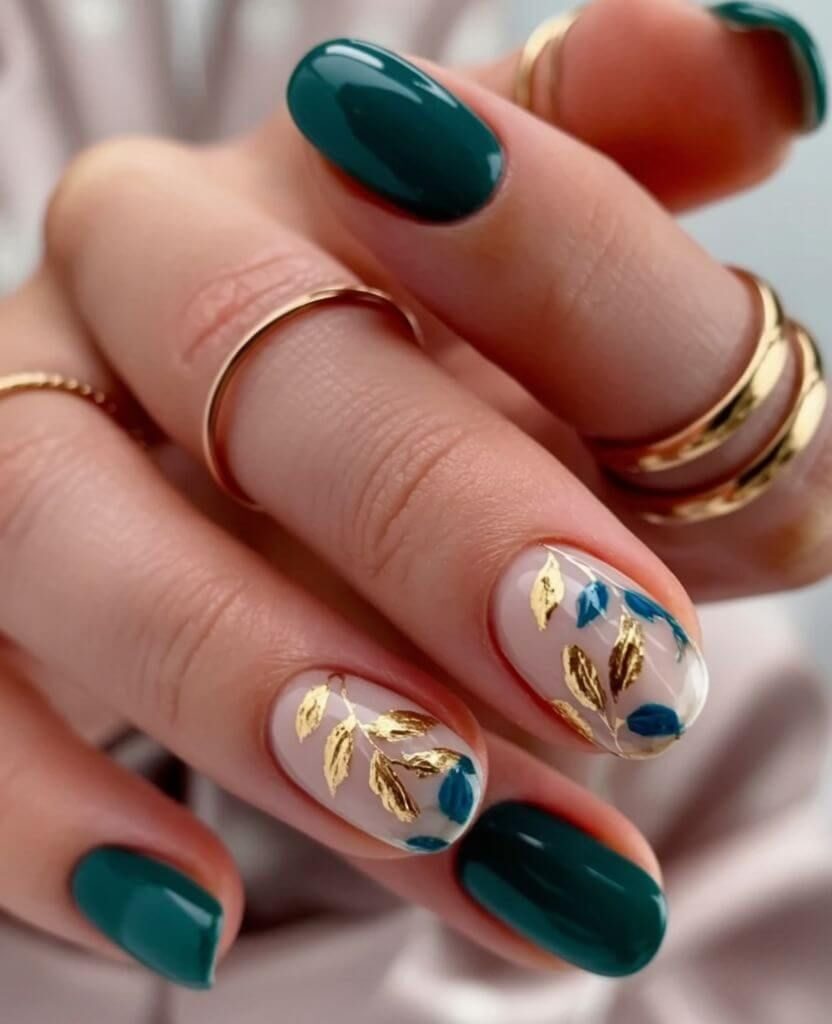
Mini Story
Picture yourself on a crisp autumn walk through the forest, leaves crunching under your boots, the air cool and grounding. Forest green nails bring that same earthy, calming energy to your look. They feel chic yet connected to nature, making them the perfect statement for fall.
Why You’ll Love It
- Green nails are unexpectedly versatile – they work with cozy sweaters, plaid scarves, and even elegant evening outfits.
- Forest green shades flatter both long almond nails and short natural nails, so you don’t need extreme length to make them look polished.
- This shade feels timeless yet trendy, a balance that keeps your manicure looking classy
How to Nail the Look
- Pick the Right Shade – Opt for a deep, jewel-toned forest green polish with a creamy or slightly glossy finish.
- Shape Your Nails – Almond and coffin shapes work beautifully, but even short square nails look chic in green.
- Layer for Depth – Apply two thin coats for a rich, opaque look.
- Add Subtle Details – Consider a matte topcoat, a gold foil accent, or even tiny leaf nail art to bring in the fall vibe.
- Seal the Color – Finish with a high-shine or matte topcoat depending on your mood.
Variations to Try
- Matte Forest Green Nails – Perfect for minimalists who want something bold yet understated.
- Green and Gold Foil Nails – Adds a luxe touch for holiday events.
- Green Ombre Nails – Blend darker tips into a lighter base for a fall sunset vibe.
Pro Tip:
If you love accessories, pair green nails with gold or rose gold rings – the contrast makes your manicure pop instantly.
10. Short Fall Nails – Small but Statement-Making
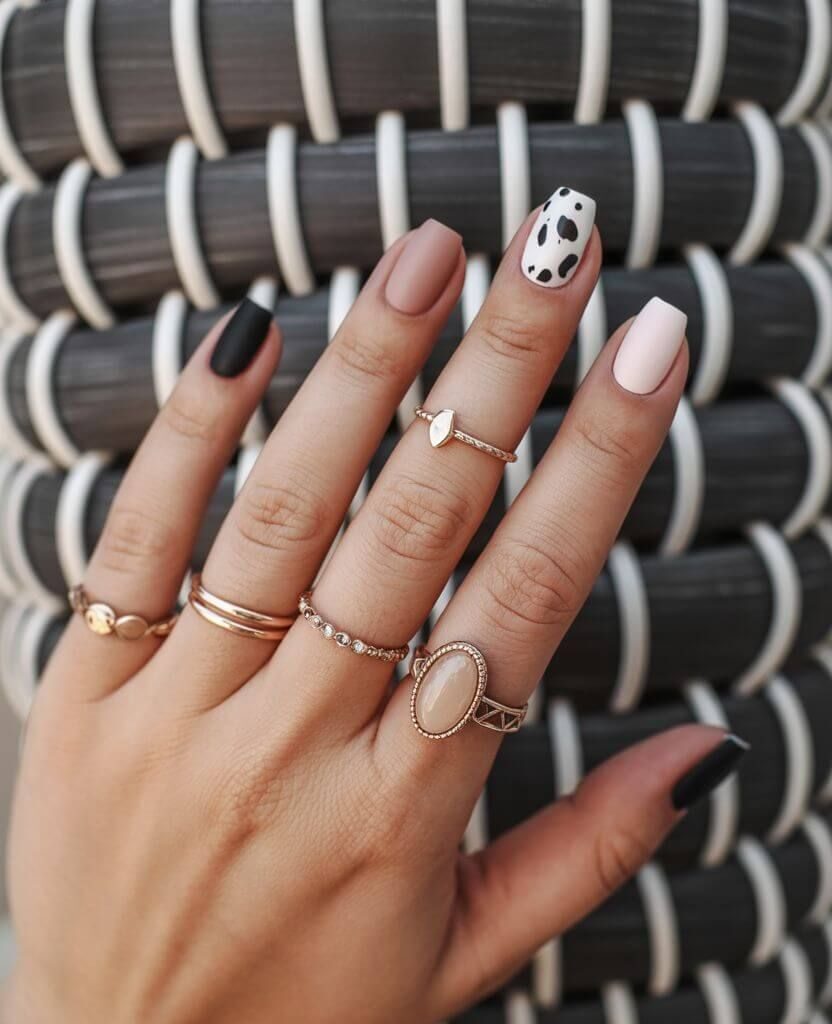
Mini Story
Who says short nails can’t be stylish? Picture yourself sipping a pumpkin spice latte, typing away on your laptop, or flipping through your favorite fall magazine. Short fall nails prove that you don’t need long claws to make a statement.
Why You’ll Love It
- Low-maintenance and practical for everyday wear.
- Short nails are less prone to breakage, yet can still look bold and trendy.
- Perfect canvas for minimalist fall nail art like stripes, dots, or tiny leaves.
How to Nail the Look
- Keep Nails Neat – File into a soft square or rounded shape for a polished base.
- Choose Bold Colors – Burgundy, emerald, or burnt orange pop beautifully on short nails (short fall nails 2025).
- Add Tiny Designs – Minimalist stripes, dots, or autumn leaf details keep them chic.
- Matte Finish – Works especially well for short nails, adding a modern twist.
- Glossy Topcoat for Shine – Enhances bold shades and prevents chips.
Variations to Try
- Minimalist Fall Nails – One accent nail with tiny dots or leaves.
- Bold Block Colors – Each nail painted a different fall shade.
- Matte Burgundy Short Nails – Timeless and classy.
Pro Tip:
Short nails look extra chic when paired with bold rings – it draws attention without overwhelming your hands.
11. Rhinestone Accent Nails – Sparkle for Fall Evenings


Mini Story
Imagine your nails catching the light at a candlelit dinner or sparkling while holding a glass at a holiday party. Rhinestone nails bring just the right amount of glam to fall.
Why You’ll Love It
- Adds instant luxury without being over the top.
- Perfect for fall wedding guests or Thanksgiving dinners.
- You can keep it subtle or go bold with rhinestone placements.
How to Nail the Look
- Neutral Base First – Nude or blush polish works best as a backdrop.
- Add Rhinestones – Place at cuticles or along tips (rhinestone fall nail ideas).
- Balance is Key – Limit gems to one or two nails to avoid overdoing it.
- Mix with Metallics – Gold or silver accents pair beautifully with rhinestones.
- Seal with Gel Topcoat – Keeps rhinestones from falling off.
Variations to Try
- Minimalist Rhinestones – Just one gem at the cuticle.
- Glitter + Rhinestones – Perfect for festive looks.
- Matte Base + Sparkle Accents – A chic contrast.
Pro Tip:
Use tweezers to place rhinestones precisely, and always seal with two layers of topcoat for longer wear.
12. Brown Fall Nails – Earthy and Cozy

Mini Story
Nothing says fall like warm, earthy tones. Brown nails are like wrapping your hands in a cozy caramel latte – simple, chic, and totally seasonal.
Why You’ll Love It
- Works beautifully with all skin tones.
- Pairs perfectly with sweaters, boots, and fall fashion.
- Brown nails are understated yet elegant – perfect for both work and play.
How to Nail the Look
- Pick a Shade of Brown – From chocolate to caramel (brown fall nails 2025).
- Solid Color or Mixed – Alternate shades for a chic look.
- Add Gold Lines – Thin metallic stripes elevate earthy tones.
- Matte Finish – Creates a warm, cozy vibe.
- Glossy Finish – More polished and elegant.
Variations to Try
- Chocolate Matte Nails – Rich and sophisticated.
- Caramel & Cream Combo – Cozy and soft.
- Brown with Gold Foil – Adds luxury to earthy shades.
Pro Tip:
Brown nails pair beautifully with gold jewelry – the tones complement each other perfectly.
13. Almond Fall Nails – Chic and Feminine
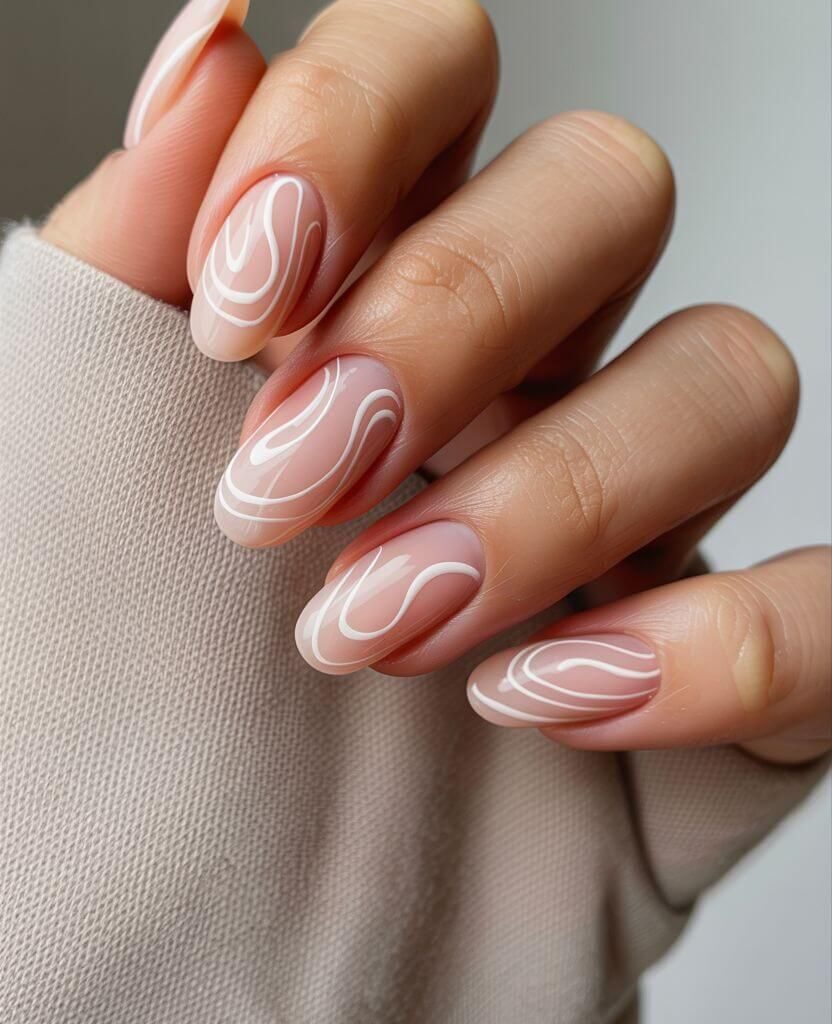
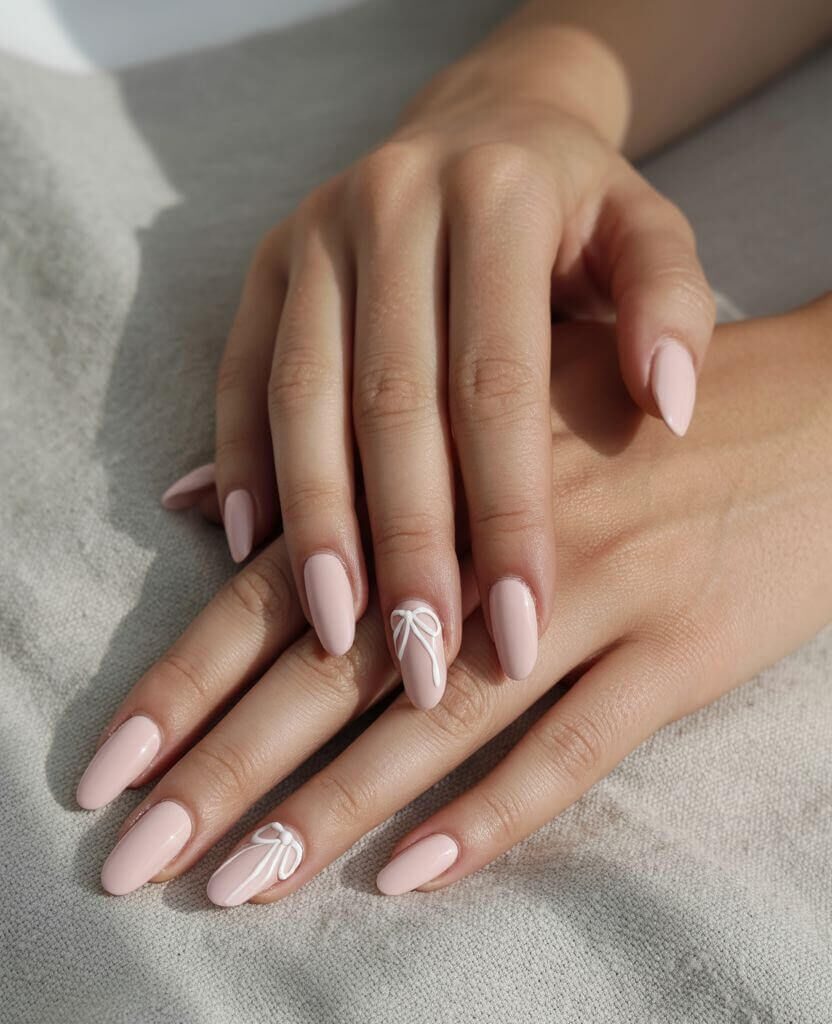
Mini Story
If fall nails had a runway shape, it would be almond. Slim, sleek, and elegant, almond nails are the go-to for a sophisticated autumn vibe.
Why You’ll Love It
- The almond shape elongates fingers, making them look elegant.
- Works with both bold and neutral fall colors.
- Great canvas for designs like French tips, glitter, or ombré.
How to Nail the Look
- Shape Nails into Almond – File sides gently to create a tapered tip.
- Neutral or Bold Polish – Almond nails flatter any fall shade (almond fall nails 2025).
- Add French Tips – Try colored tips for a modern twist.
- Accent with Glitter – Highlight one or two nails.
- Topcoat to Seal – Keeps the almond shape sleek and lasting.
Variations to Try
- Matte Almond Nails – Minimalist chic.
- French Almond Tips – A trendy upgrade to the classic French.
- Glitter Almond Accent – Adds sparkle without overwhelming.
Pro Tip:
Almond nails are fragile – use strengthening polish underneath to prevent breakage.
14. Floral Accent Fall Nails – A Touch of Romance
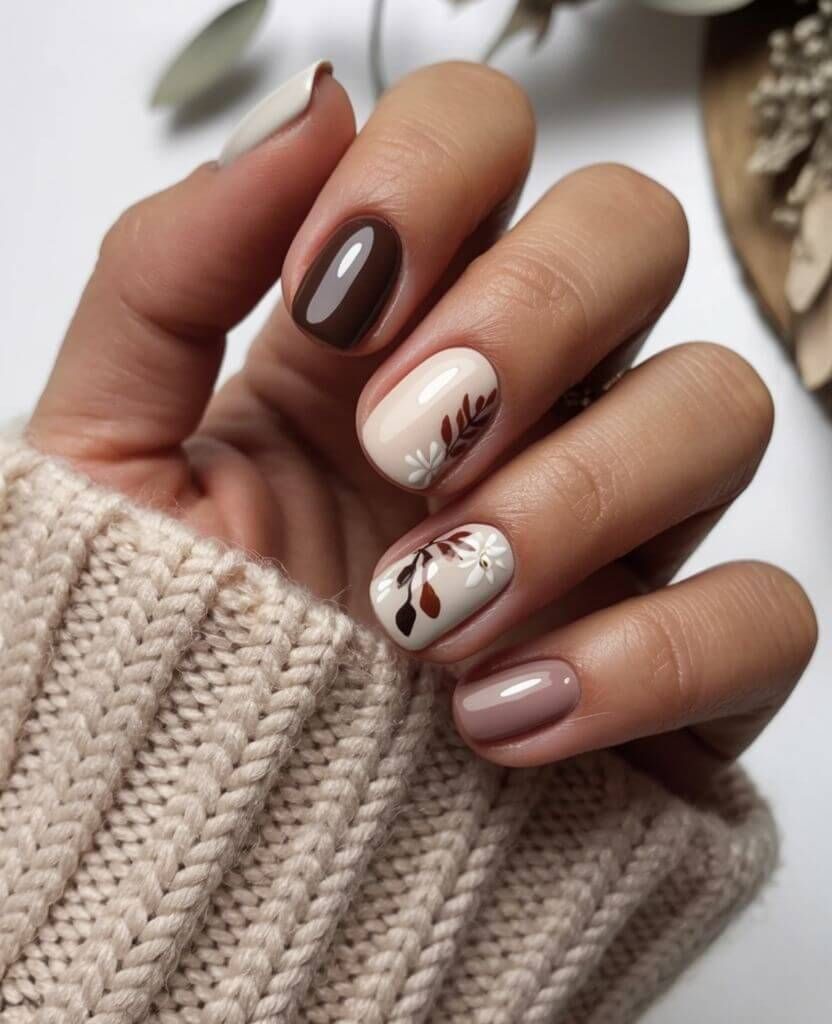
Mini Story
Fall may be all about earthy tones, but who says flowers are only for spring? Adding delicate floral accents brings a touch of romance to cozy autumn days.
Why You’ll Love It
- Feminine and soft, yet season-appropriate.
- Works well as an accent design without being overwhelming.
- Perfect for weddings, dates, or everyday wear.
How to Nail the Look
- Neutral Base First – Soft nude or blush polish.
- Add Floral Patterns – Tiny daisies, roses, or fall florals (floral fall nail ideas).
- Accent One Finger – Keep design minimal for a chic look.
- Mix with Rhinestones – Adds extra sparkle.
- Glossy Finish – Protects delicate floral art.
Variations to Try
- Muted Florals on Nude Base – Subtle and romantic.
- Floral Tips – Tiny flowers along the French tip line.
- Floral + Metallic Combo – Adds elegance.
Pro Tip:
Use nail stickers if freehand floral art feels intimidating – they look just as beautiful.
15. Taupe & Beige Fall Nails – Minimalist Chic

Mini Story
Sometimes less really is more. Taupe and beige nails are the “quiet luxury” of fall nail designs – subtle, timeless, and endlessly versatile.
Why You’ll Love It
- Matches effortlessly with any fall outfit.
- Neutral tones are perfect for professional settings.
- Looks polished without needing extra details.
How to Nail the Look
- Choose Taupe/Beige Shades – Perfect for minimalist fall nails 2025.
- Solid Application – Paint all nails in one shade for a clean vibe.
- Add Subtle Accents – Thin metallic stripes or dots.
- Mix Neutrals Together – Alternate taupe and beige.
- Matte Topcoat Finish – Modern and trendy.
Variations to Try
- Taupe Matte Nails – Minimalist perfection.
- Beige + Gold Accent – Adds warmth and class.
- Taupe & Beige Ombré – A chic gradient effect.
Pro Tip:These shades elongate short nails, making them look more elegant.
16. Glitter Ombre French Nails – Classic with a Twist
Mini Story
French tips are timeless, but with a little glitter, they transform into a festive fall masterpiece. Perfect for holiday gatherings, cozy evenings, and everything in between.
Why You’ll Love It
- Classic French design with a trendy twist.
- Glitter makes it perfect for parties and special occasions.
- Works beautifully on both short and long nails.
How to Nail the Look
- Start with French Tips – Classic base in nude + white.
- Add Glitter Ombre – Blend silver or gold glitter from tips downward (glitter French nails for fall).
- Accent with Rhinestones – Apply a gem at the cuticle of one nail.
- Mix Metallics – Gold or rose gold glitter for autumn vibes.
- Glossy Topcoat – Makes the glitter shine bright.
Variations to Try
- Rose Gold Ombre French – A modern take on the trend.
- Glitter Fade on Dark Base – Perfect for night events.
- Minimal Glitter French – For a softer, everyday vibe.
Pro Tip:
To avoid chunky glitter, use fine glitter polish – it blends more smoothly into the French tip.
For more ideas and trending shades, don’t miss my full guide: Autumn Nails 2025 – Stunning Fall Nail Trends and Colours.
Wrapping It Up
Fall nails are more than just a seasonal trend – they’re a way to express your personality, mood, and love for cozy autumn vibes.
From pumpkin spice nail designs to elegant almond nails for fall, every style tells its own story. Whether you prefer short fall nails, glittery ombre French tips, or floral accent nail art, the beauty of these looks is that they’re customizable to fit your vibe. See more at Nails Magazine.
The best part? Fall 2025 nail trends are all about balance: cozy yet chic, bold yet wearable, timeless yet fun. So grab your favorite sweater, a warm drink, and let your nails be your best autumn accessory. More nail ideas on Stylicia.
FAQ – Fall Nails 2025
1. What are the most popular fall nail colors for 2025?
Deep burgundy, emerald green, burnt orange, taupe, chocolate brown, and beige are the trending shades this season.
2. Are short nails trendy for fall 2025?
Yes! Short fall nails are in, especially with bold colors, minimalist stripes, or matte finishes that make them look chic and polished.
3. What nail shape is best for fall nails?
Almond nails remain a timeless choice, but short square and soft round shapes are also popular for cozy, practical autumn vibes.
4. What are some easy DIY fall nail designs?
Try pumpkin nail art, tiny floral accents, or taupe + beige minimalist nails. Even simple stripes or leaf designs can instantly add autumn vibes.
5. Are matte nails still in style for fall 2025?
Yes, matte nails are huge this season. Matte burgundy, matte forest green, and matte taupe are especially popular.
6. Which fall nail designs are best for weddings or formal events?
Opt for almond nails with glitter accents, nude + gold foil designs, or elegant floral nails. They’re timeless and chic for special occasions.
7. Are fall nail designs 2025 different from last year’s trends?
Yes! Fall nail designs 2025 focus on a mix of cozy neutrals, earthy tones, and bold accents like glitter ombre French tips and rhinestone nails. They’re more versatile than the 2024 trends, making them wearable for everyday looks and special occasions.
8. Which fall nail designs 2025 are best for short nails?
Short fall nails are trending this year, and fall nail designs 2025 make them chic with bold shades like emerald green, burnt orange, or minimalist stripe accents. Matte finishes also look stunning on short nails.
Leave a Reply