Top 10 Fall Nail Ideas

Is there anything better than sipping a pumpkin spice latte with a fresh fall manicure? Whether you love cozy sweater weather vibes, muted earthy tones, or bold statement nails, autumn is the perfect time to refresh your look — one fingertip at a time. And this year’s fall nail ideas are a beautiful blend of fun, classy, and totally wearable styles.
From warm shades of burnt orange and golden yellow to playful pumpkin nail art, leopard print, and shiny metallic details, these trendy autumn nails are all over Pinterest right now — and I’ve rounded up 10 of the best to inspire your next manicure.
1. Cute Pumpkin Nail Art
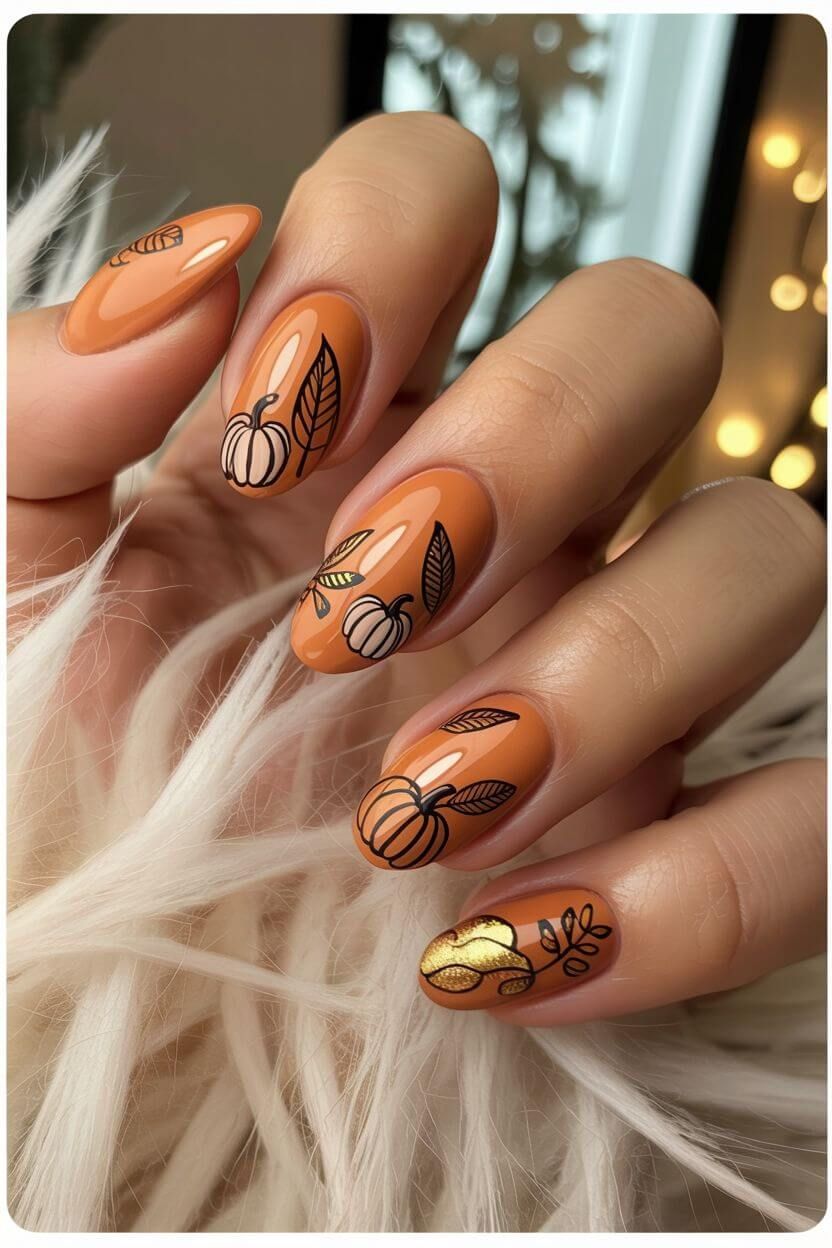
If you’re looking for the ultimate fall mood, pumpkin nail designs are a must. This look combines a warm cinnamon-orange base with delicate black leaf and pumpkin outlines, plus a hint of gold on the pinky finger for that extra seasonal sparkle. It’s playful and stylish — and surprisingly easy to recreate with stickers or stamping plates at home!
Try it if you love cozy fall vibes, pumpkin spice everything, or unique seasonal nail art.
2. Earthy Matte Tones & Leopard Accents
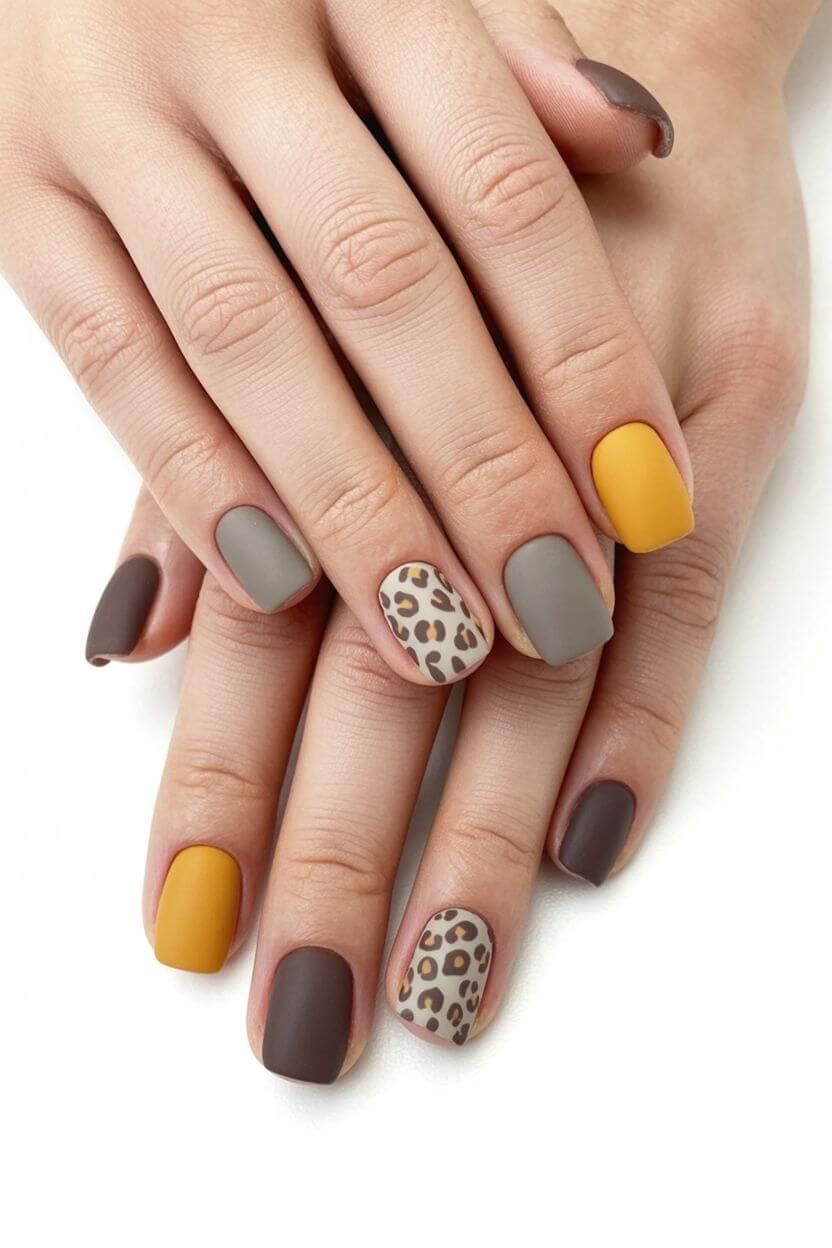
Want something classy with a twist? Mix cool-toned mattes like taupe, mustard, and greige with a leopard print accent nail. This design is perfect for shorter nails and looks amazing with chunky sweaters and neutral outfits.
It’s also great for those who want fall colours without going too bold.
3. Glazed and Glittered Fall Nails
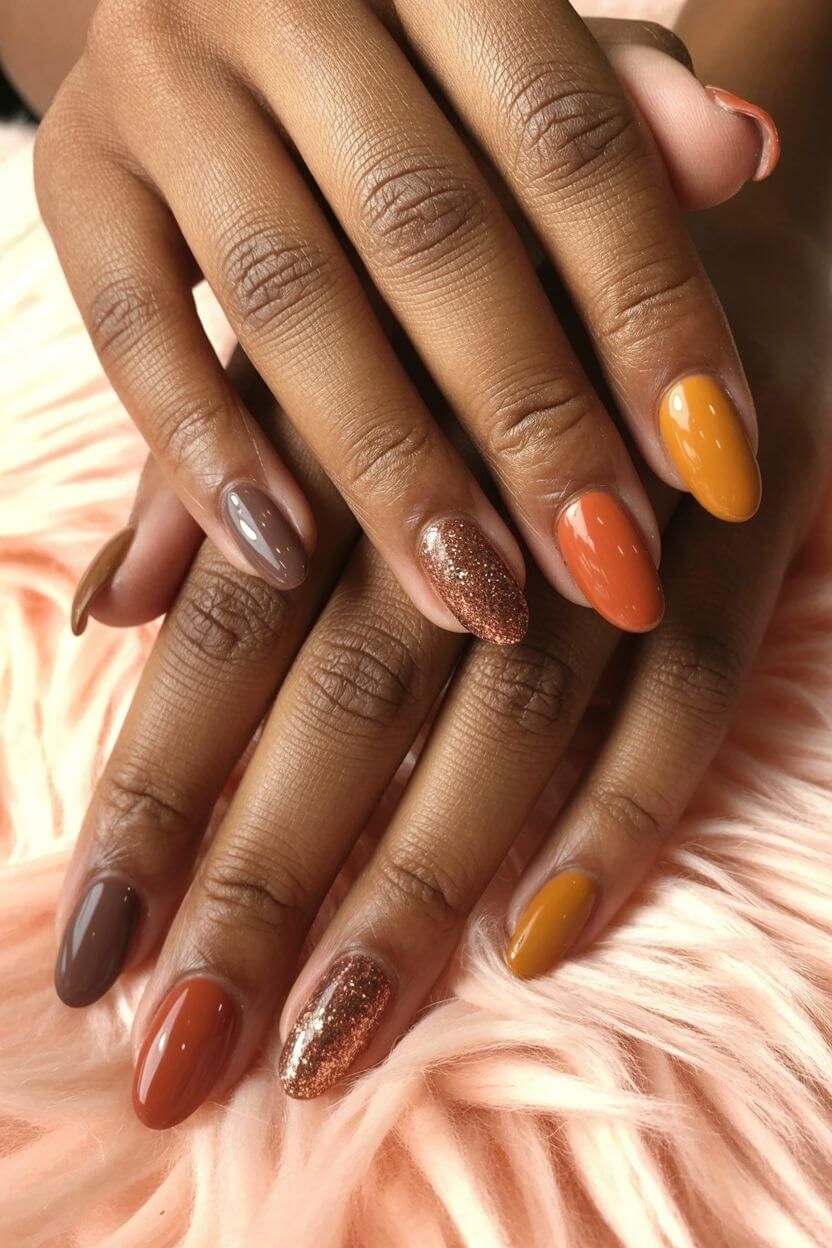
This one’s for the glam girls! Shiny chocolate brown, burnt orange, golden mustard, and a pop of bronze glitter come together in this stunning multi-color manicure. Perfect for Thanksgiving or a night out.
Mix and match glossy shades with one glitter nail for a bold, festive feel.
4. Blush Pink & Gold Foil Chic
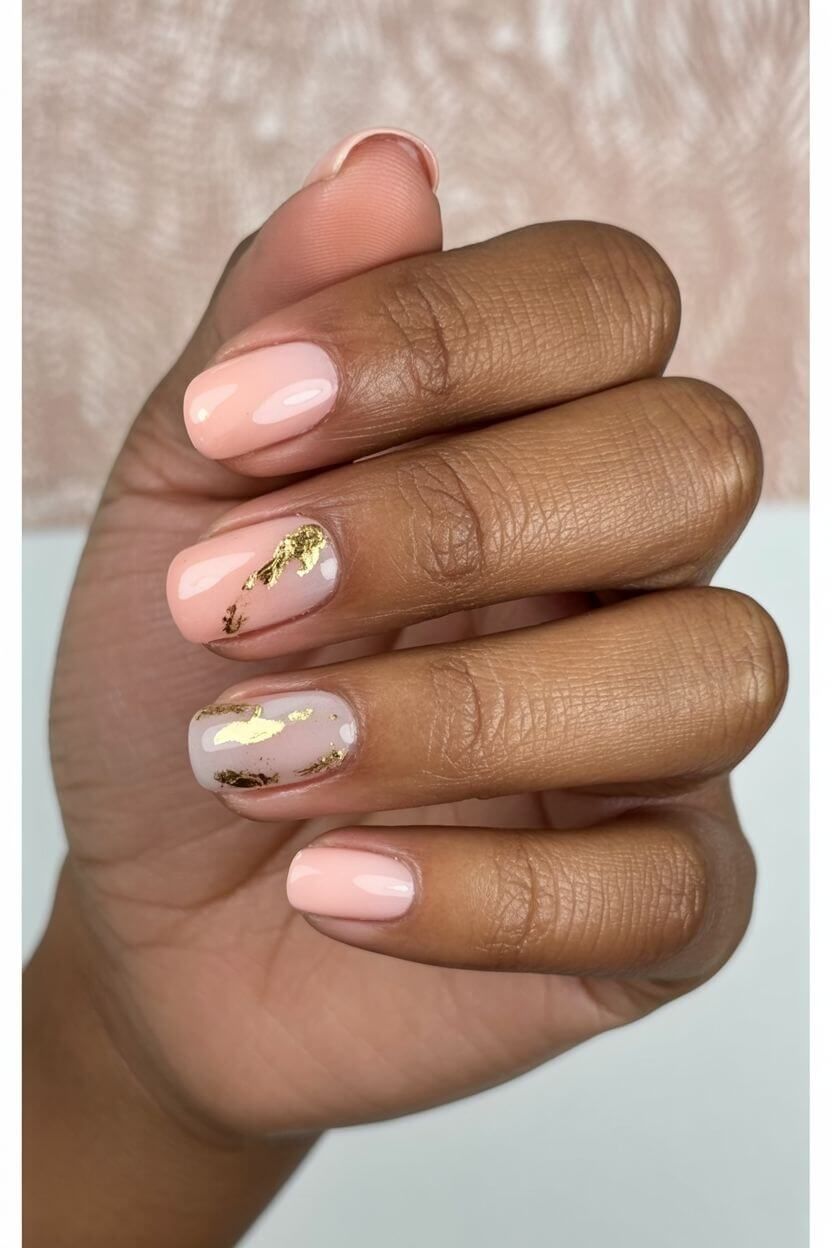
Not a fan of dark fall colours? Try a softer take with blush pink nails accented with clear polish and gold foil flakes. It’s subtle, elegant, and works beautifully for early autumn or even a fall wedding guest look.
Perfect if you want something classy with just a touch of sparkle.
5. Yellow & Glitter Leaf Foil Nails

Bold yet sophisticated, this mustard yellow and beige combo is made even better with leafy glitter foil on a few accent nails. The mix of colours is pure fall magic — it’s like wearing autumn leaves on your fingertips.
If you’re feeling bold, this design will brighten any grey fall day.
6. Forest Green & Mustard Combo
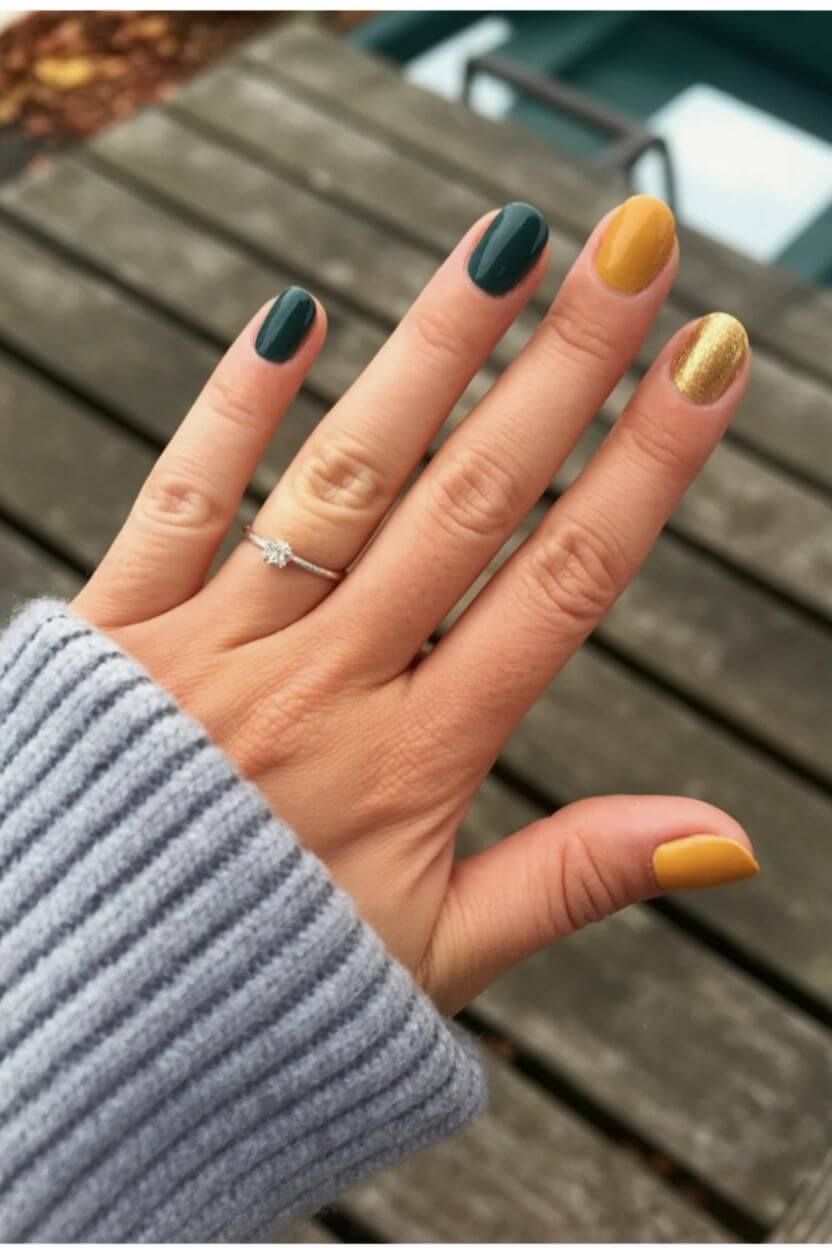
If you love deep fall tones with a modern twist, this combo is calling your name. Forest green nails paired with mustard yellow and a touch of gold shimmer bring serious autumn vibes. This mix of colours feels fresh, trendy, and a bit edgy — perfect for when you’re ready to switch things up.
This look screams fall foliage and pumpkin patch days!
7. Emerald & Mint Green Glam
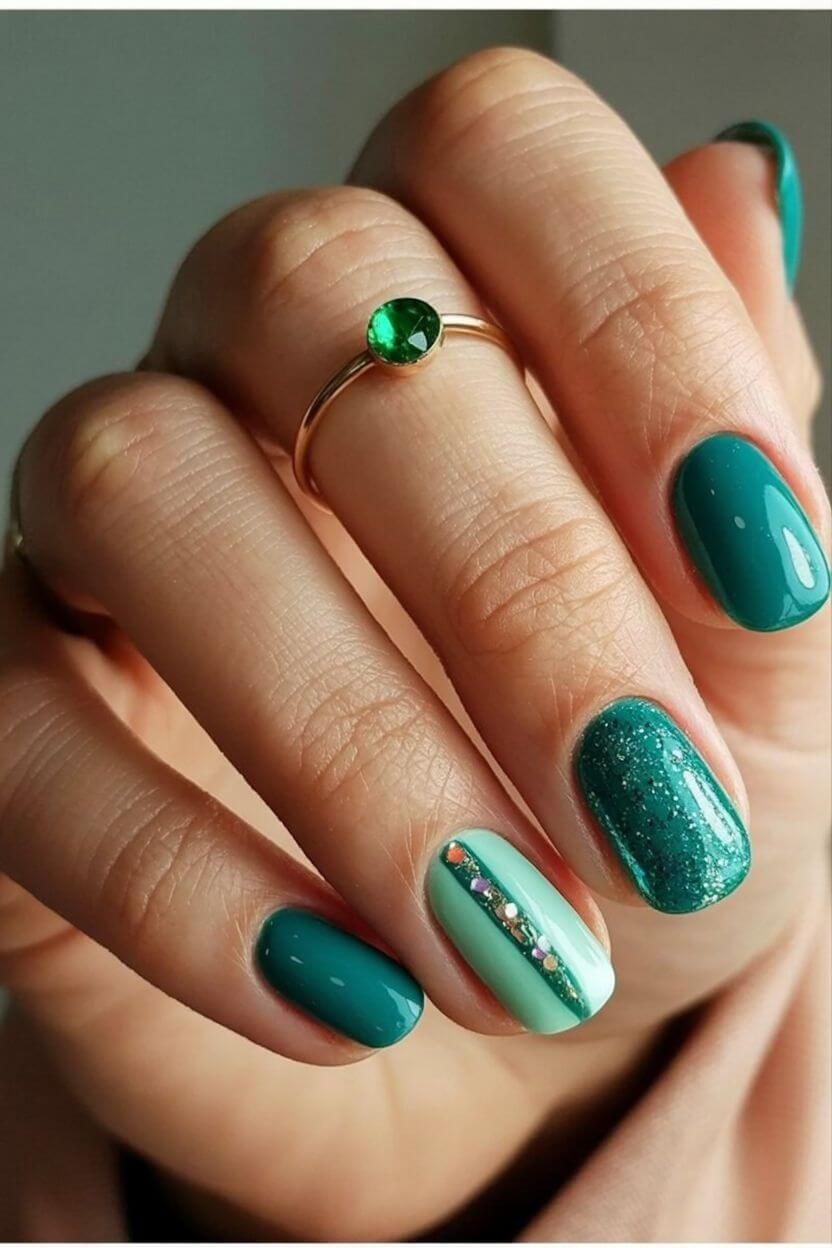
For those who love jewel tones, emerald green nails are a total win. Pair them with a soft mint green accent or a glittery design, and you’ve got yourself a fresh, modern fall nail idea. The gem-inspired shades feel luxurious and unique.
Add a little shimmer or rhinestones for an extra glam finish.
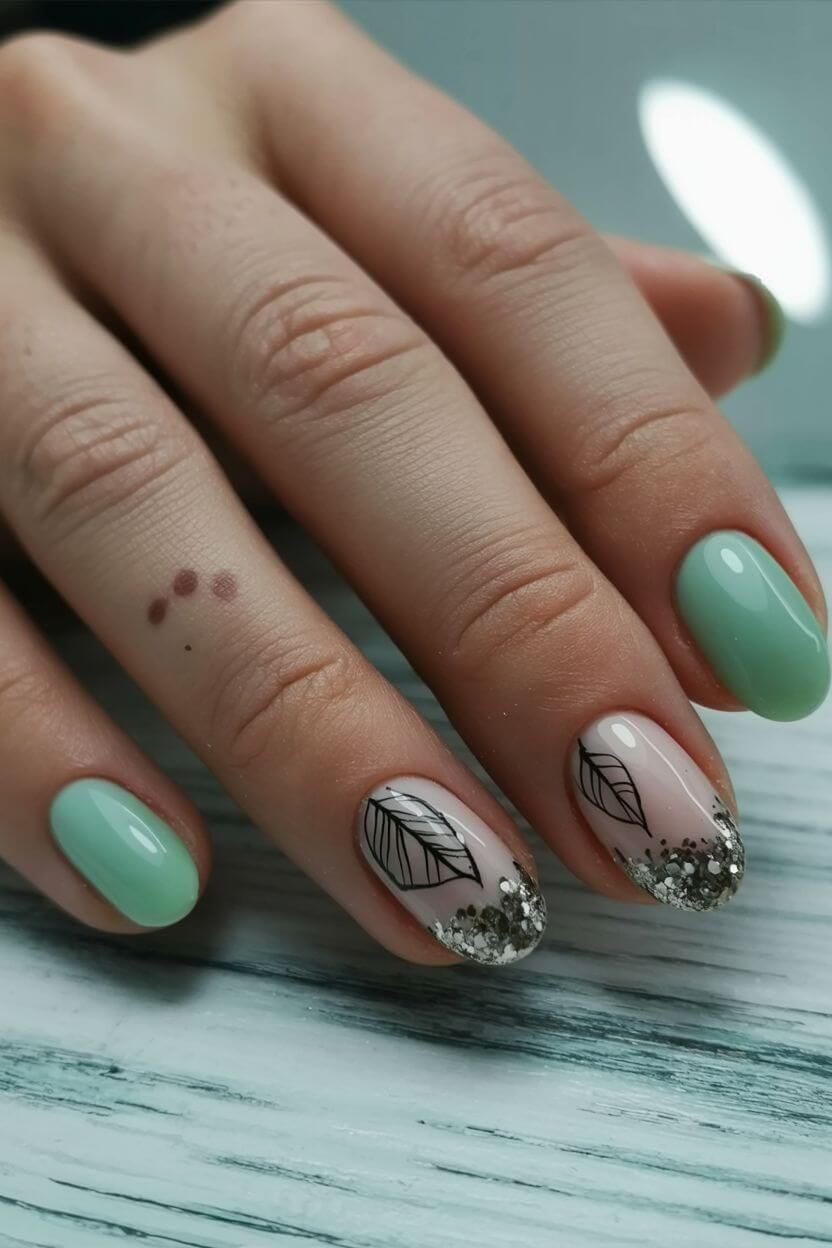
8. Sage & Leafy Glitter Tips
This sage green nail design is paired with neutral nails topped with black leaf outlines and sparkly glitter tips — giving you a balance of natural and glam. It’s a softer fall option that still feels seasonally appropriate.
Perfect for fans of botanical aesthetics and minimalist art.
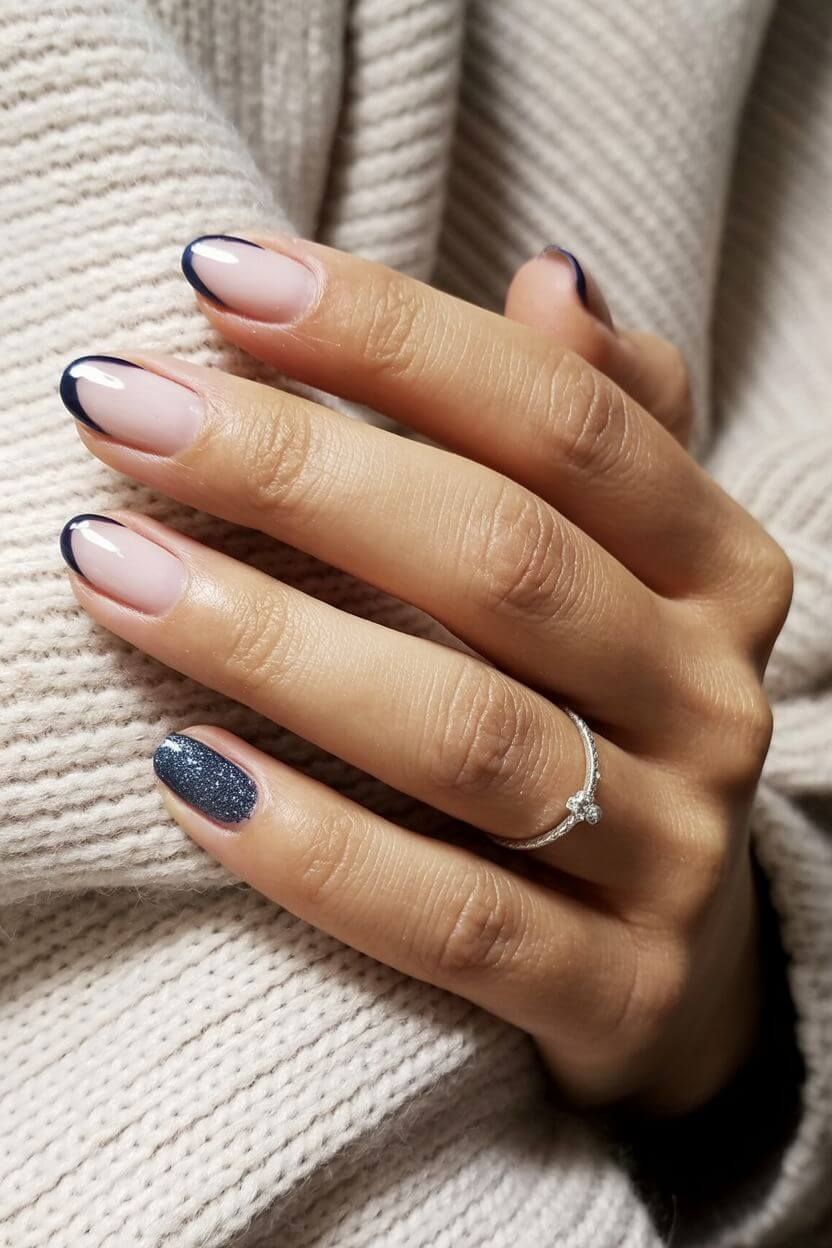
9. French Tips with a Dark Twist
A good French manicure never goes out of style — but this version swaps the classic white tips for deep navy and adds a full glitter nail for a cool contrast. It’s elegant, versatile, and totally on-trend this fall.
Wear this to work, a wedding, or a cozy weekend brunch — it fits everywhere.
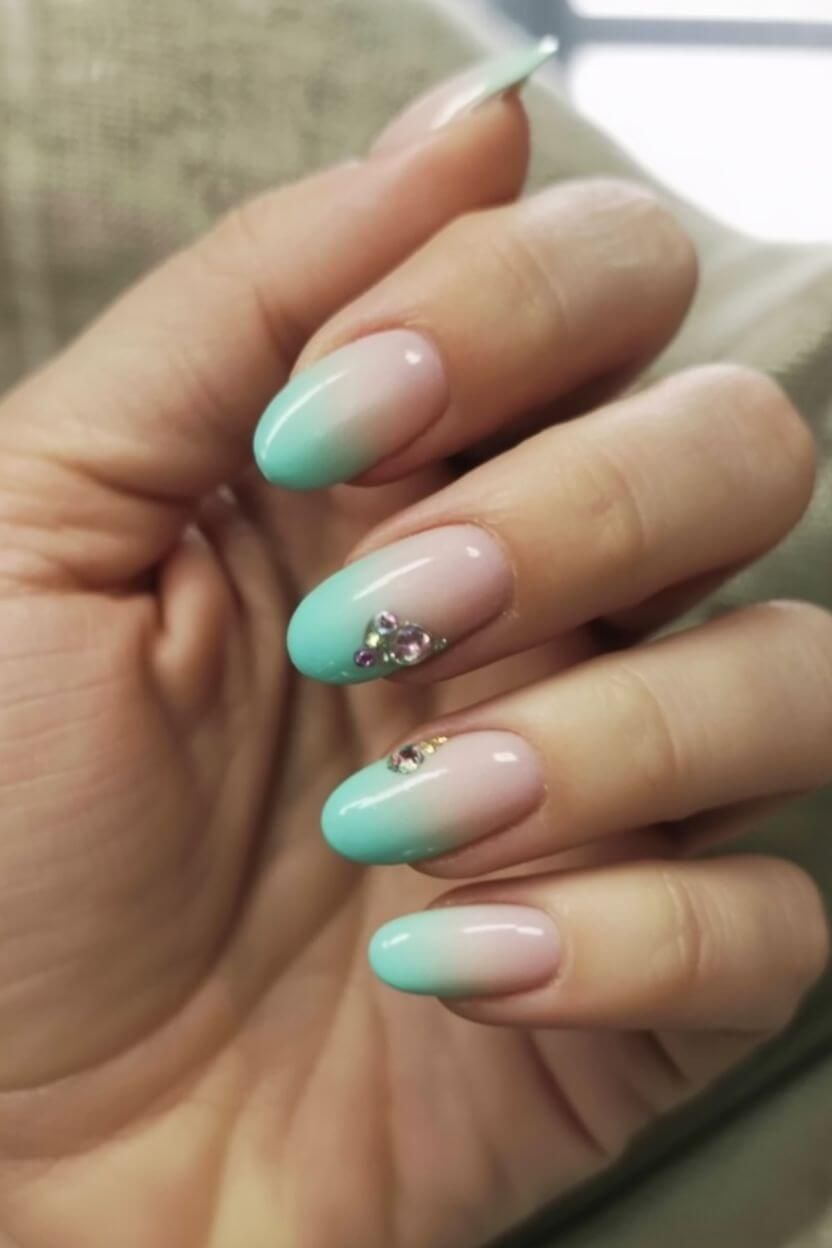
10. Ombre Blue & Crystal Details
Technically a cooler-toned look, this blue ombre nail design transitions beautifully into late fall. The subtle gradient from nude to blue, paired with delicate crystal embellishments, makes it ideal for those who love a soft but standout look.
It’s a dreamy choice for the in-between season — when fall starts feeling like winter.
Whether you’re into cozy pumpkin art, earthy mattes, or a hint of sparkle, there’s a fall nail design for every mood. You don’t need to be a pro to get the look — here are some easy fall nail ideas you can do at home:
Use nail stickers for pumpkins, leaves, or leopard spots. (Amazon has tons!)
Try press-on matte nails in fall colours like mustard, brown, or emerald.
Add glitter top coat on just one nail for a fun accent.
Use a makeup sponge to blend two shades into an ombre.
Paint just two accent nails in a contrasting colour — instant visual interest!
Fall is all about expressing your vibe, so go ahead — pick your favourite, grab your polish, and bring those cozy autumn feels right to your fingertips.
Fall Nail Ideas – Frequently Asked Questions
1. What are the most popular fall nail colours in 2025?
The top fall nail colours for 2025 include burnt orange, forest green, deep plum, cinnamon brown, and beige taupe. Metallic gold and copper accents are also trending this year, giving a warm and luxurious touch to any manicure. These autumn shades perfectly reflect the cosy and earthy tones of the season.
2. What nail shapes are trending for fall 2025?
This fall, almond and coffin-shaped nails are making a strong comeback. Almond nails give a soft and elegant look, while coffin shapes are perfect for showing off bold, rich autumn shades. Short squoval nails are also popular for a more natural and practical everyday style.
4. What are some easy DIY fall nail designs I can try at home?
If you’re doing your nails at home, start with simple yet stylish ideas like ombre nails, gold foil tips, or a single accent nail in a contrasting shade. You can also try minimalist leaf art or copper glitter lines. These designs are beginner-friendly but look effortlessly professional.
5. How can I make my fall manicure last longer?
To keep your fall nails flawless for longer, apply a strengthening base coat, seal your design with a long-lasting top coat, and use cuticle oil daily to prevent dryness. Avoid soaking your nails in hot water right after polishing and wear gloves when doing household chores.
6. What nail designs are best for short nails in fall?
Short nails look amazing with simple colour blocks, warm neutrals, and glossy caramel or espresso tones. You can add a touch of fall flair with a small gold line, a micro leaf design, or a matte finish. The key is balance — less is more when your nails are shorter.
7. Can I mix fall colours in one manicure?
Absolutely! Multi-colour manicures are trending this year. Try combining different shades of brown, beige, and burnt orange on each nail for a soft gradient look. You can even alternate matte and glossy finishes for added depth and texture.
")
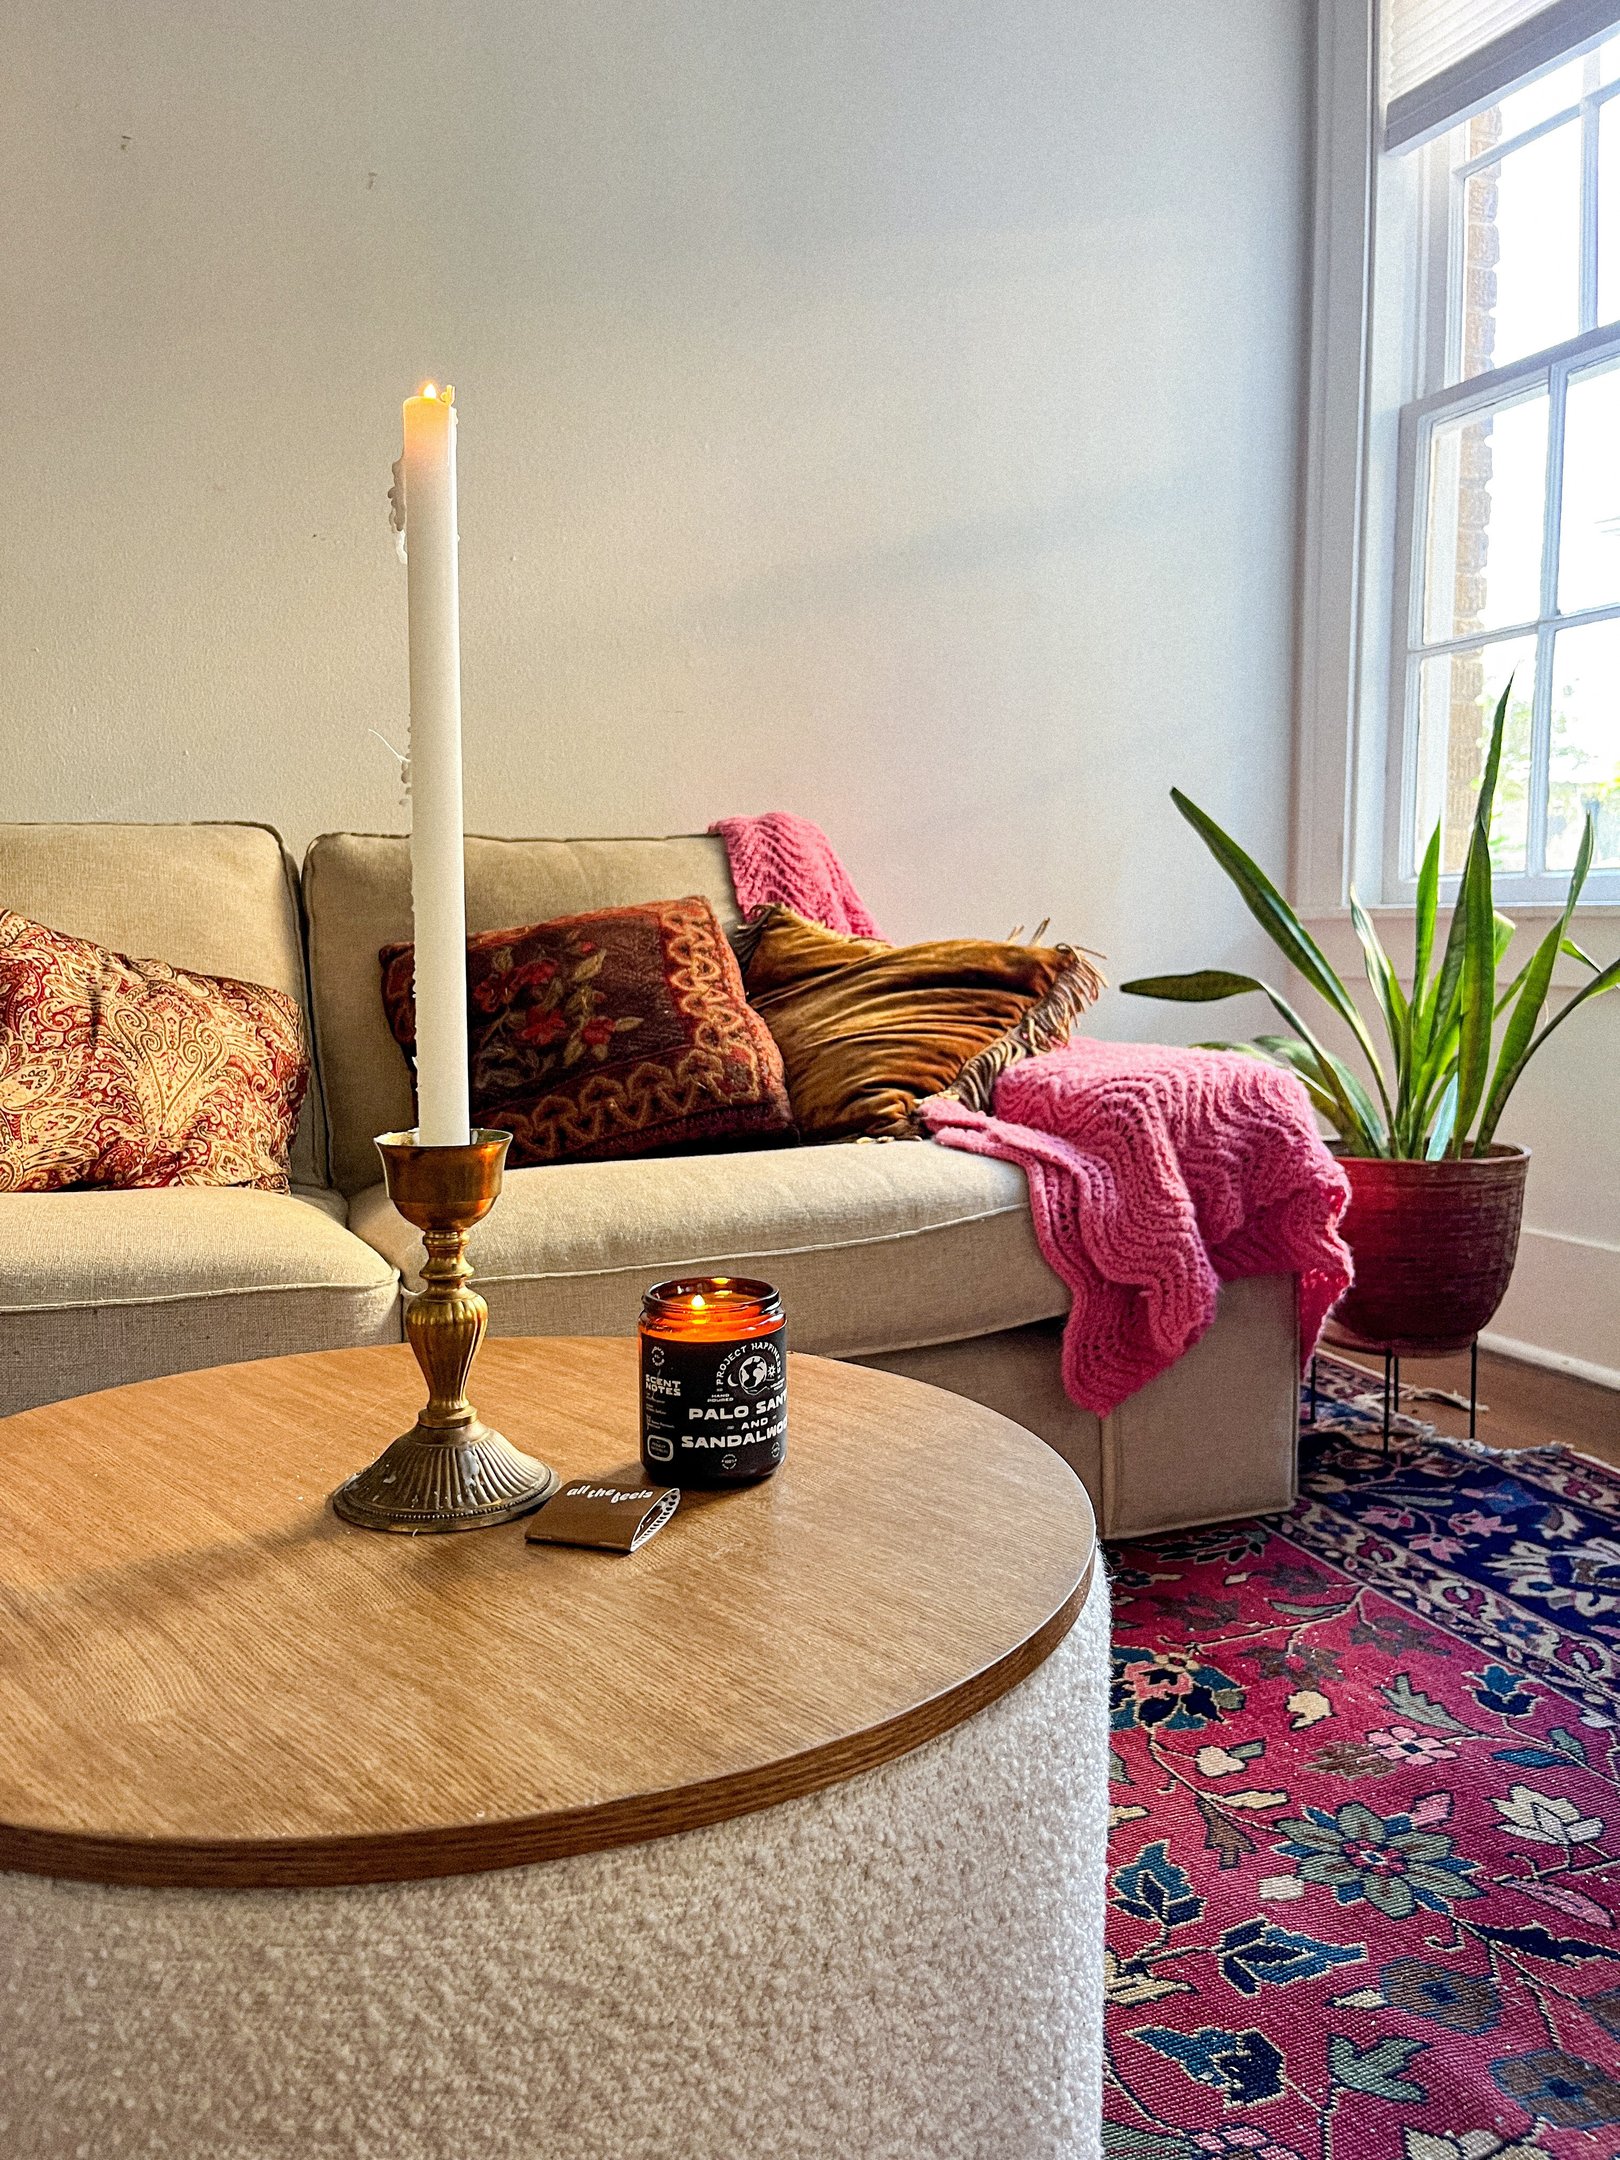
Like the scent of cinnamon drifting from a cozy kitchen or the crunch of leaves underfoot, exploring fall home decor ideas is about more than just filling your home with pumpkins. It’s about creating a space that feels warm, inviting, and seasonal.
When Fall Means Letting Go of White and Letting in Warmth
If fall to you means packing away anything white, hunting for orange pumpkins, and draping your rooms in shadows and spice—you’re not alone. For years, I believed the shift to autumn decor meant a strict palette of rust orange and deep brown.
That is, until I discovered a different kind of fall vibe: one that blends elegance with coziness, and warmth with calm. In this article, I’ll share 10 timeless fall home decor ideas that go beyond the traditional and help create a space that feels inviting, elevated, and oh-so-seasonal.
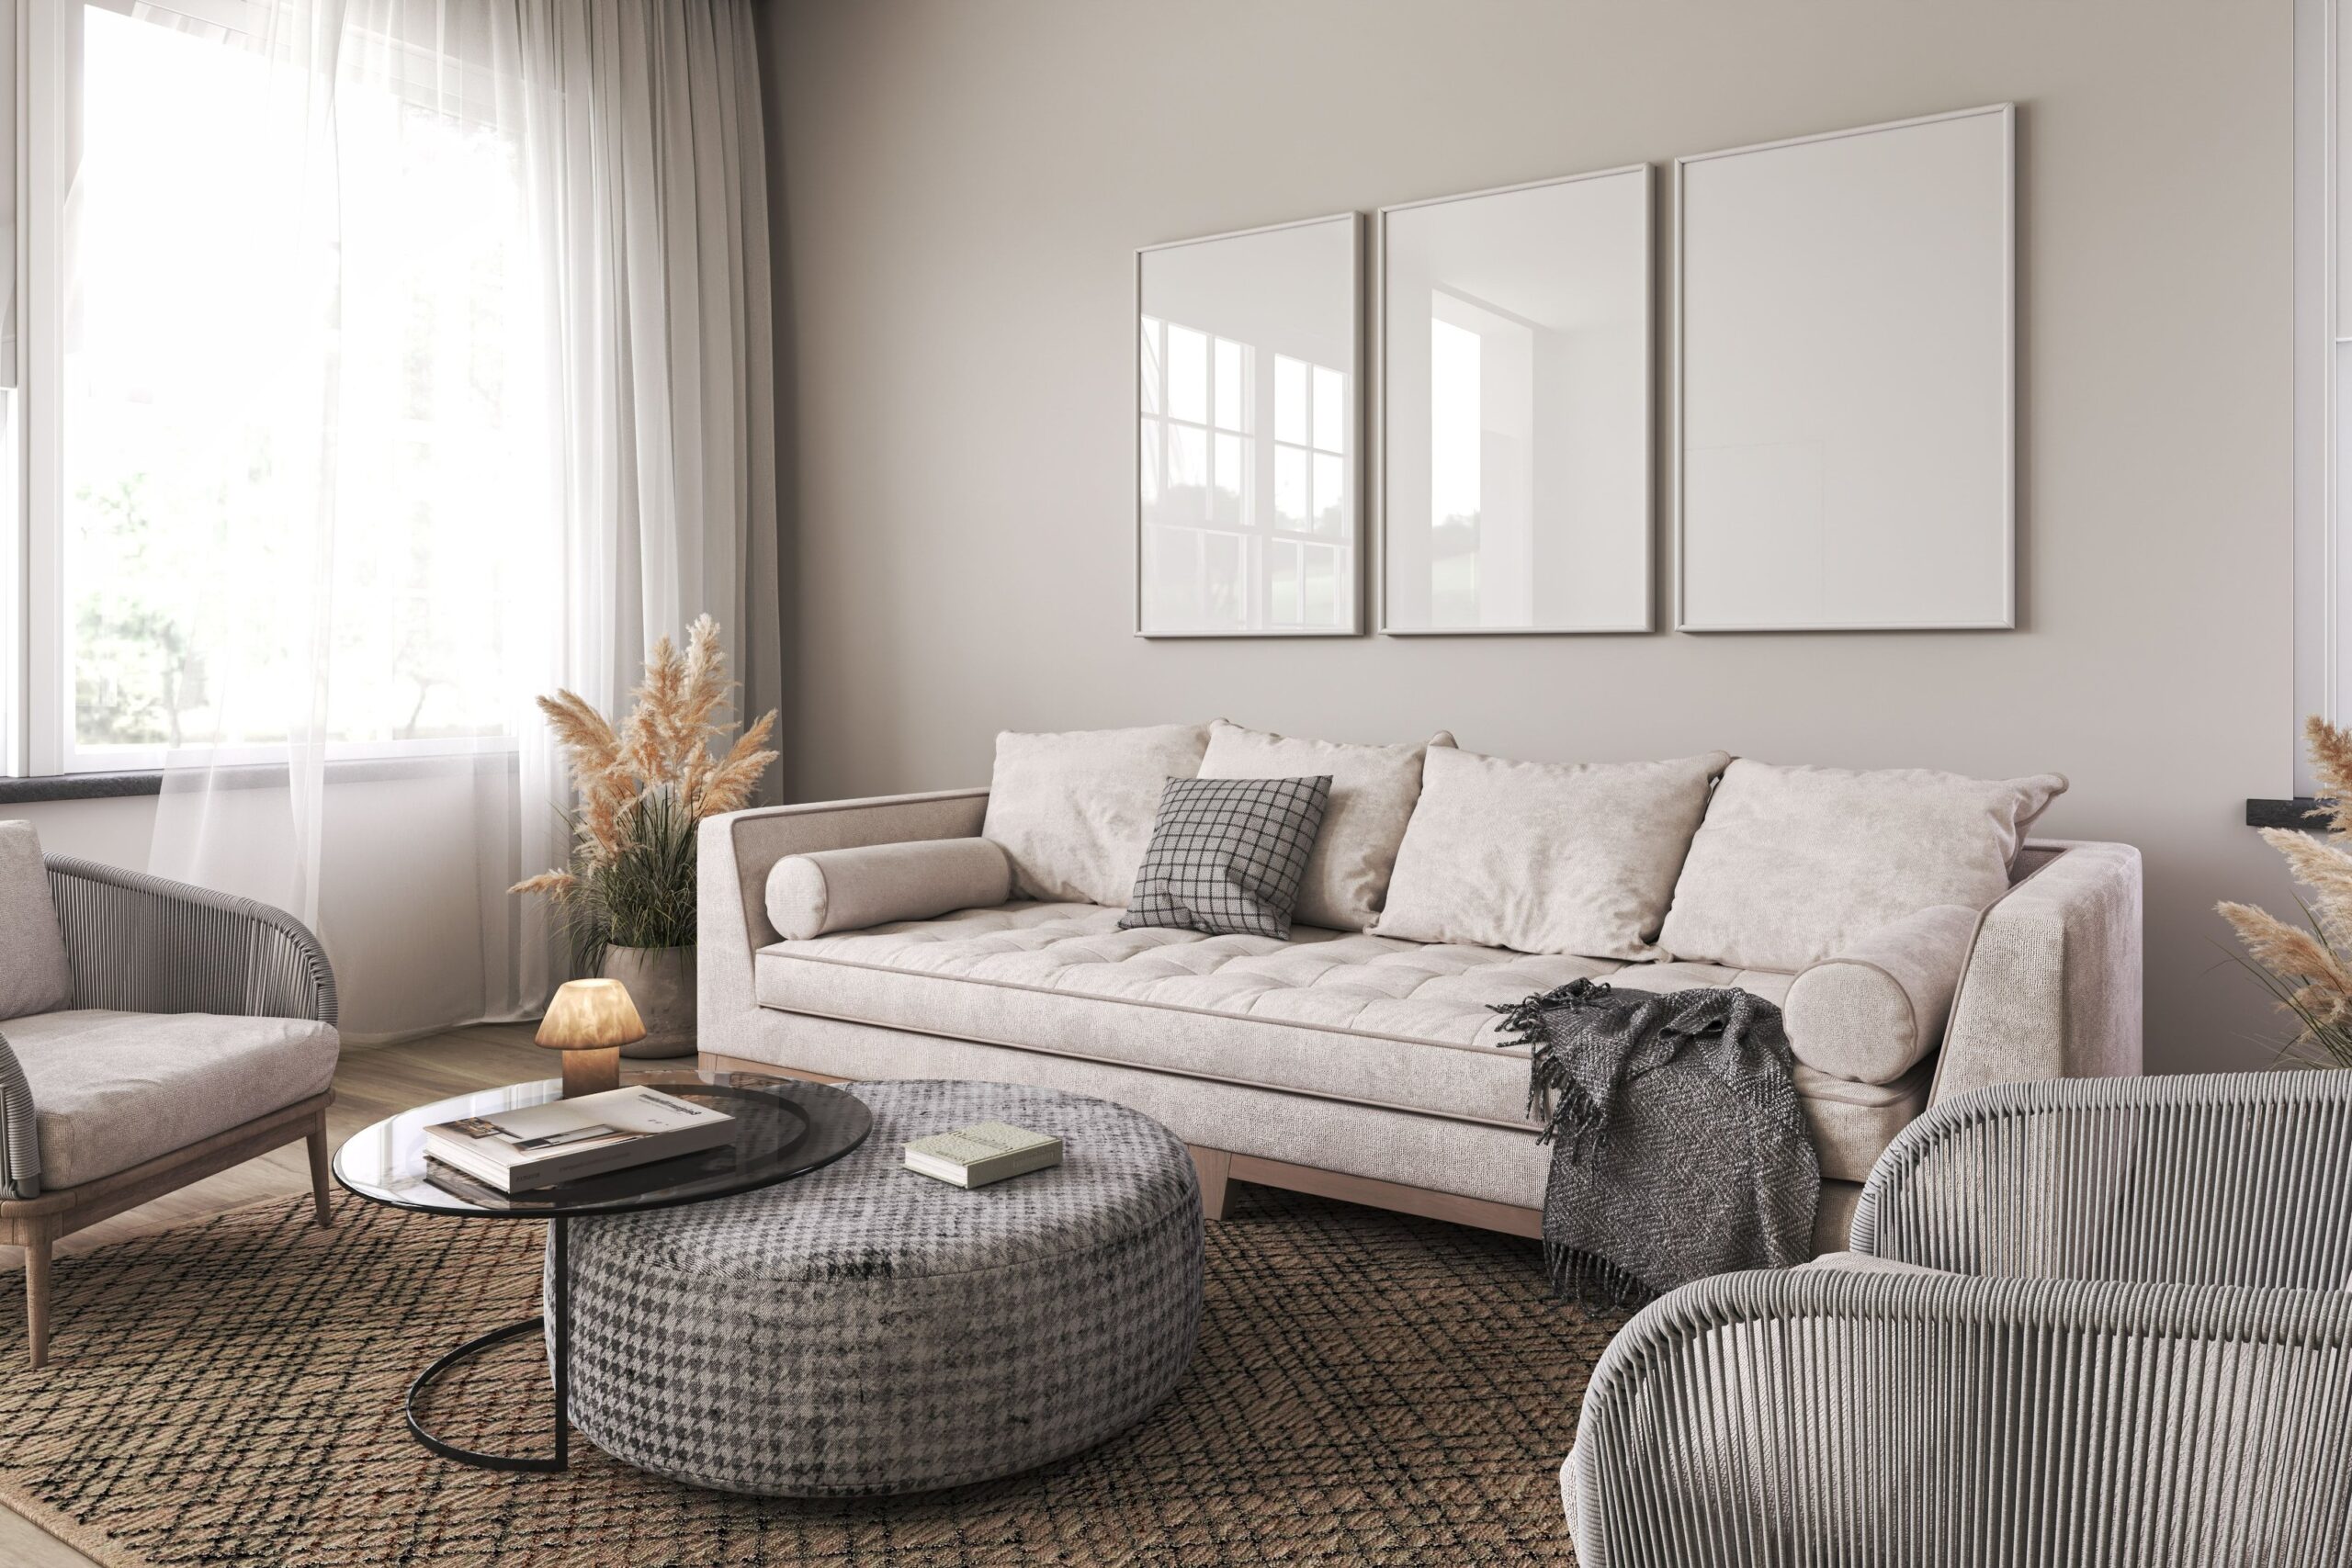
1. Warm Neutrals & Earthy Textures
Neutral doesn’t mean boring—it means balance. Swap out bright whites for creamy taupes, soft caramels, and muted clay tones. Add linen pillow covers, soft chenille throws, and touches of wood and rattan to ground the look. Try using amber glassware, matte ceramics, or wheat-colored textiles to warm up your space without adding visual noise.
These earthy accents bring a feeling of calm and groundedness to any room. Pairing warm neutrals with natural textures also helps to soften the sharp edges of a modern interior.
Don’t be afraid to mix textures like velvet, burlap, and raw wood. The key is to keep the palette soft and cohesive. Add touches of terracotta, cinnamon, or camel for that extra cozy vibe. Neutral fall decor can still feel layered and lush. Focus on light, depth, and warmth.
2. Minimal Fall Wreaths with Modern Flair
Forget the bushy, glitter-covered wreaths. This season, go for delicate hoop wreaths made with dried foliage, bunny tails, or bleached eucalyptus. A minimalist wreath adds a whisper of fall without shouting. These modern designs look especially chic on white or black doors. Add a long ivory ribbon for soft movement and an elegant touch. If you prefer something natural, try grapevine bases with just a few sprigs of seasonal greenery.
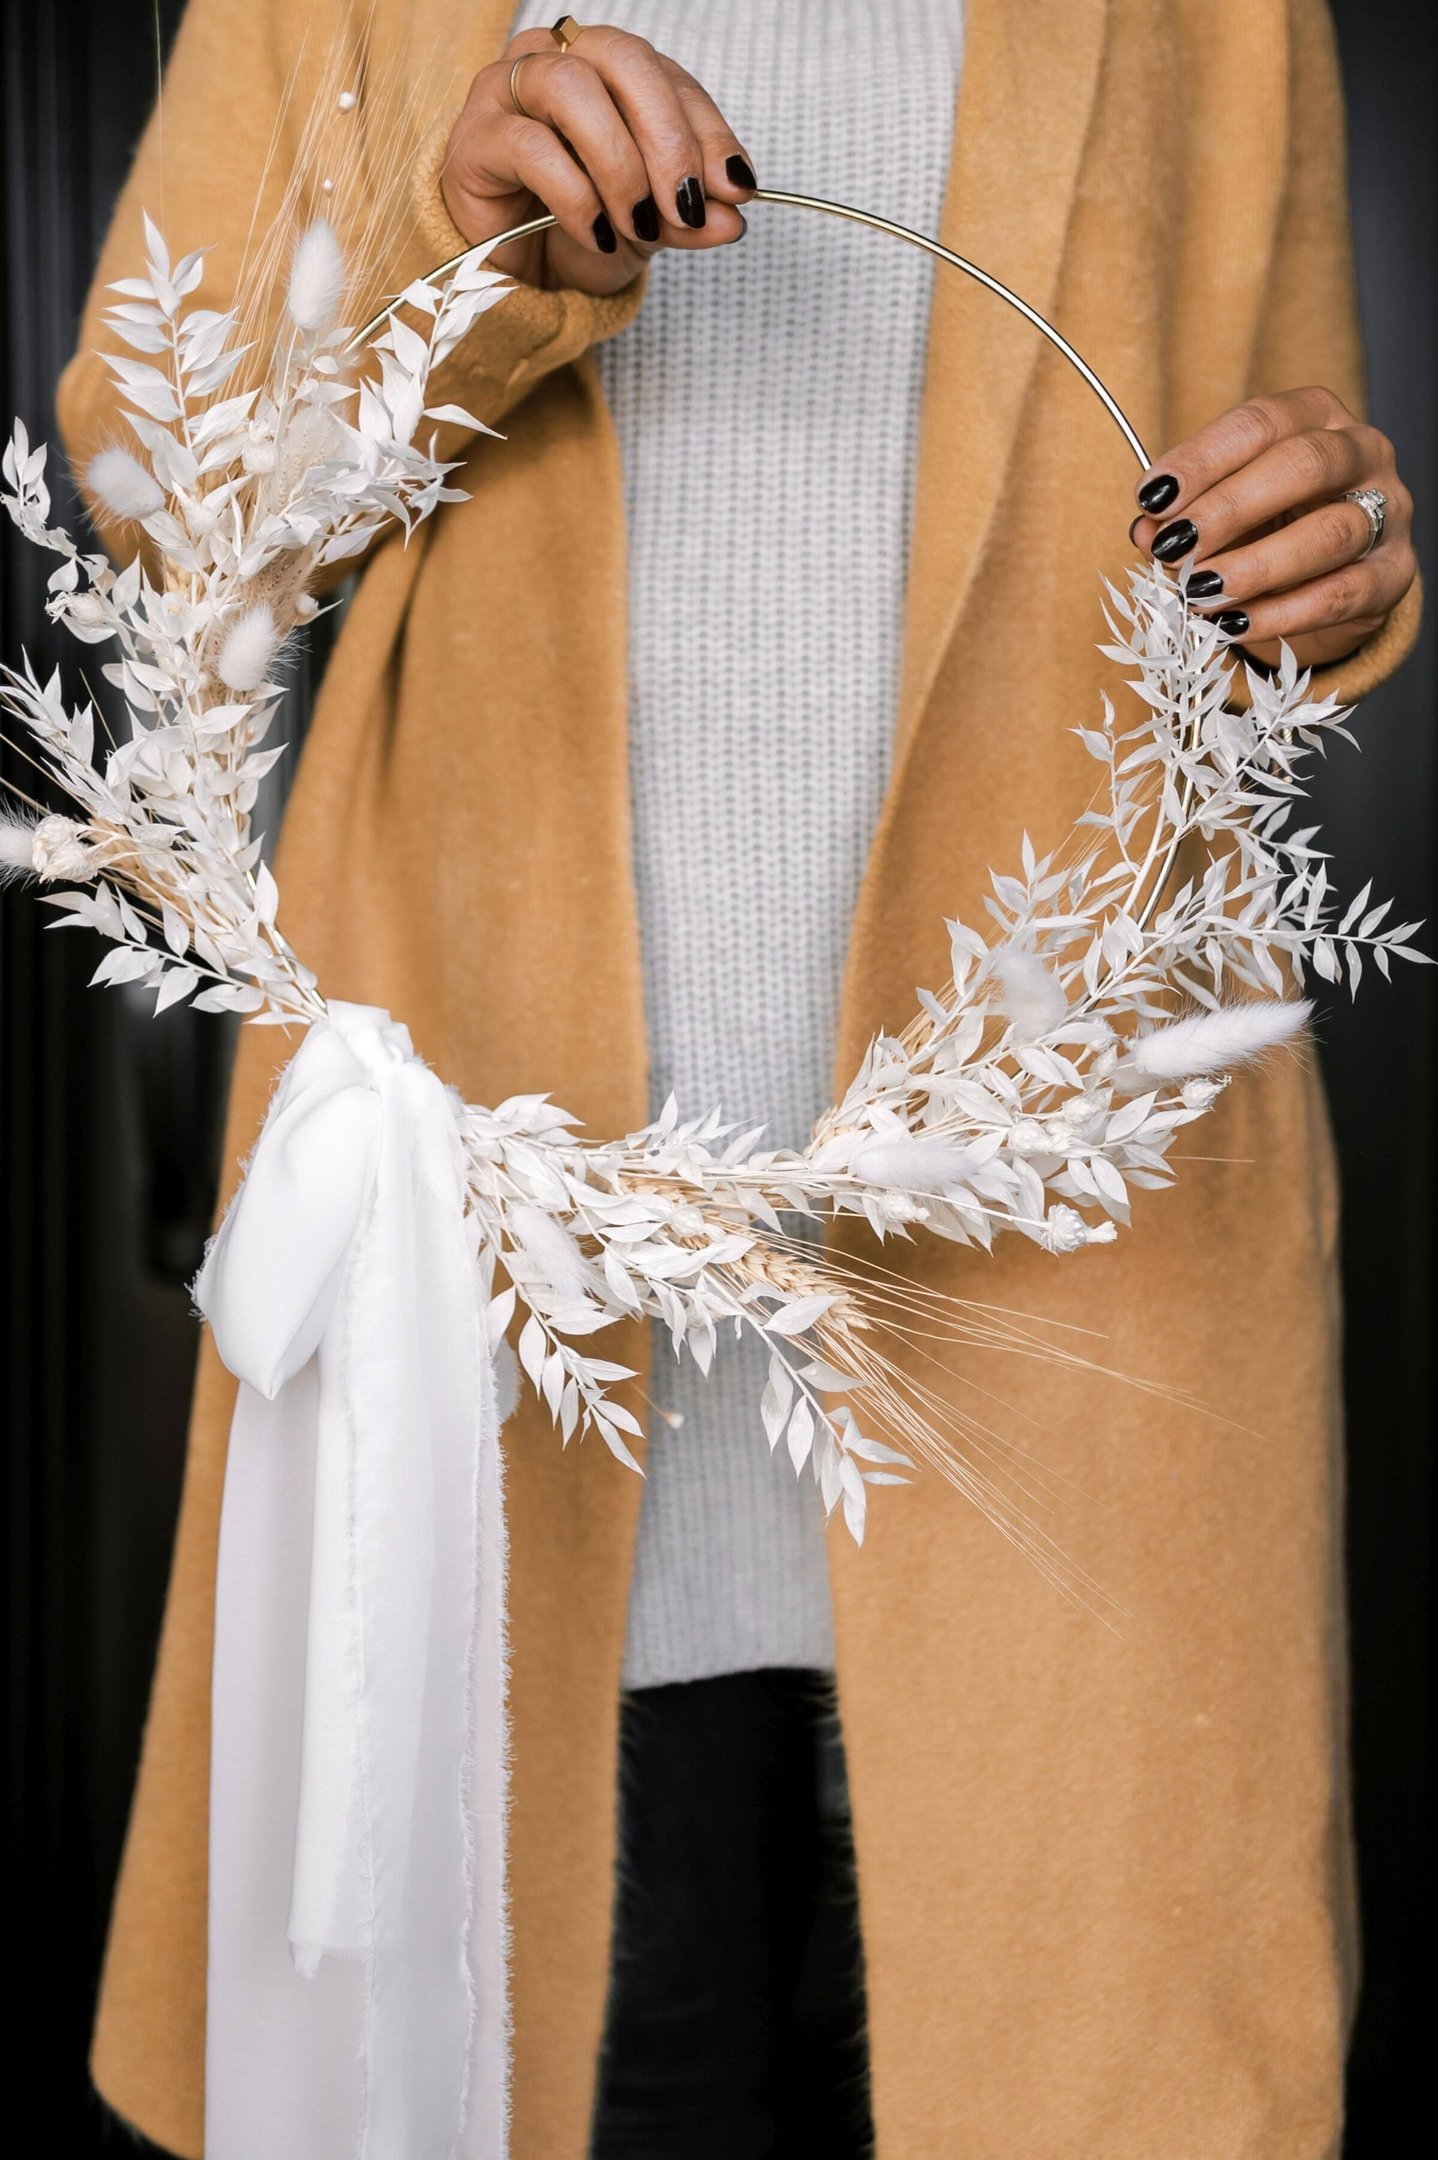
Hang them on doors, walls, or even windows for a soft, curated touch. Modern wreaths also work beautifully in interior spaces, like above the fireplace or on cabinet doors. You can even DIY one in under 30 minutes using dried flowers and a metal hoop. These wreaths are perfect for minimalist fall decor lovers or anyone wanting to try something new this season.
3. Metallic Pumpkins: The Unexpected Hero
Brushed gold, antique copper, and even velvet-covered silver pumpkins elevate your fall styling game. Scatter them on tabletops, mantels, or bookshelves for subtle seasonal sparkle. Stick to one or two metallics for a cohesive look. These pumpkins reflect candlelight beautifully and add depth to neutral spaces. Try pairing metallic pumpkins with raw wood trays or dark florals for a dramatic contrast. They also make great shelf accents—especially when mixed with books and candles. Metallics lend an elevated look to fall decor without overwhelming the space.
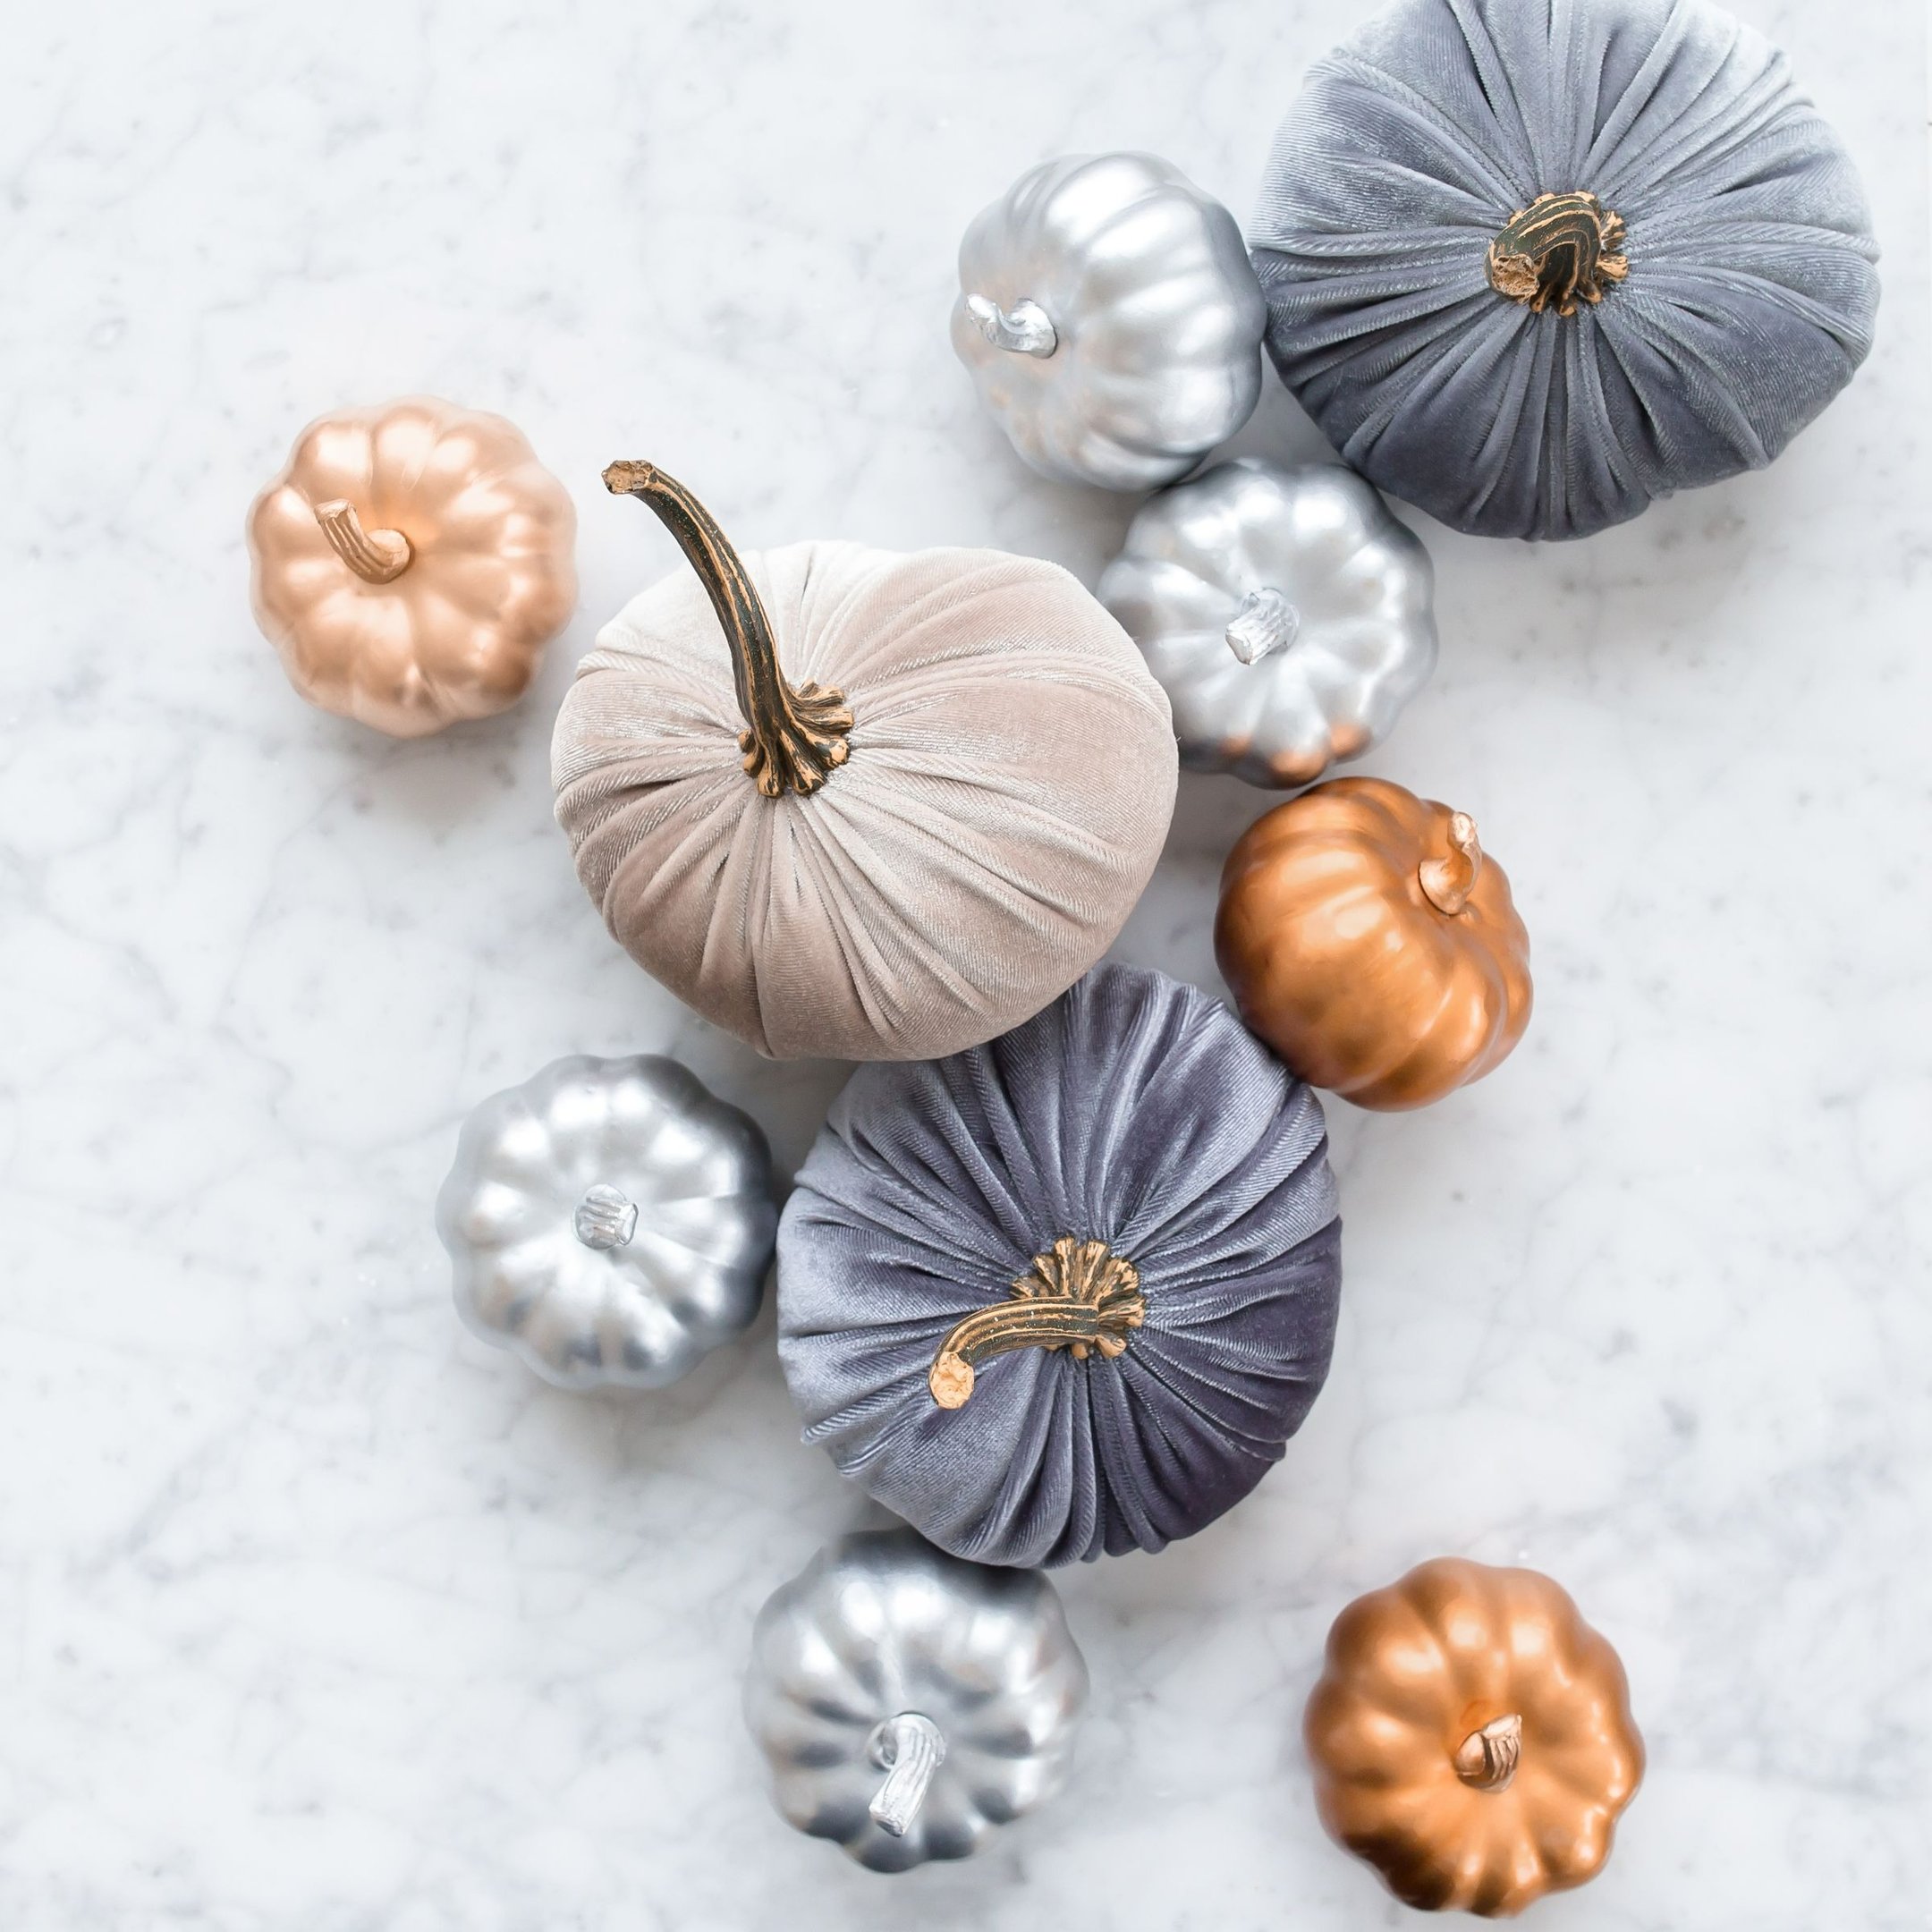
Choose soft finishes over shiny for a more sophisticated feel. If you’re feeling crafty, spray paint real pumpkins with matte metallic paint for a DIY twist. Even a single metallic pumpkin can serve as a stunning focal point. Incorporating this trend is an easy and affordable way to modernize your fall decorations.
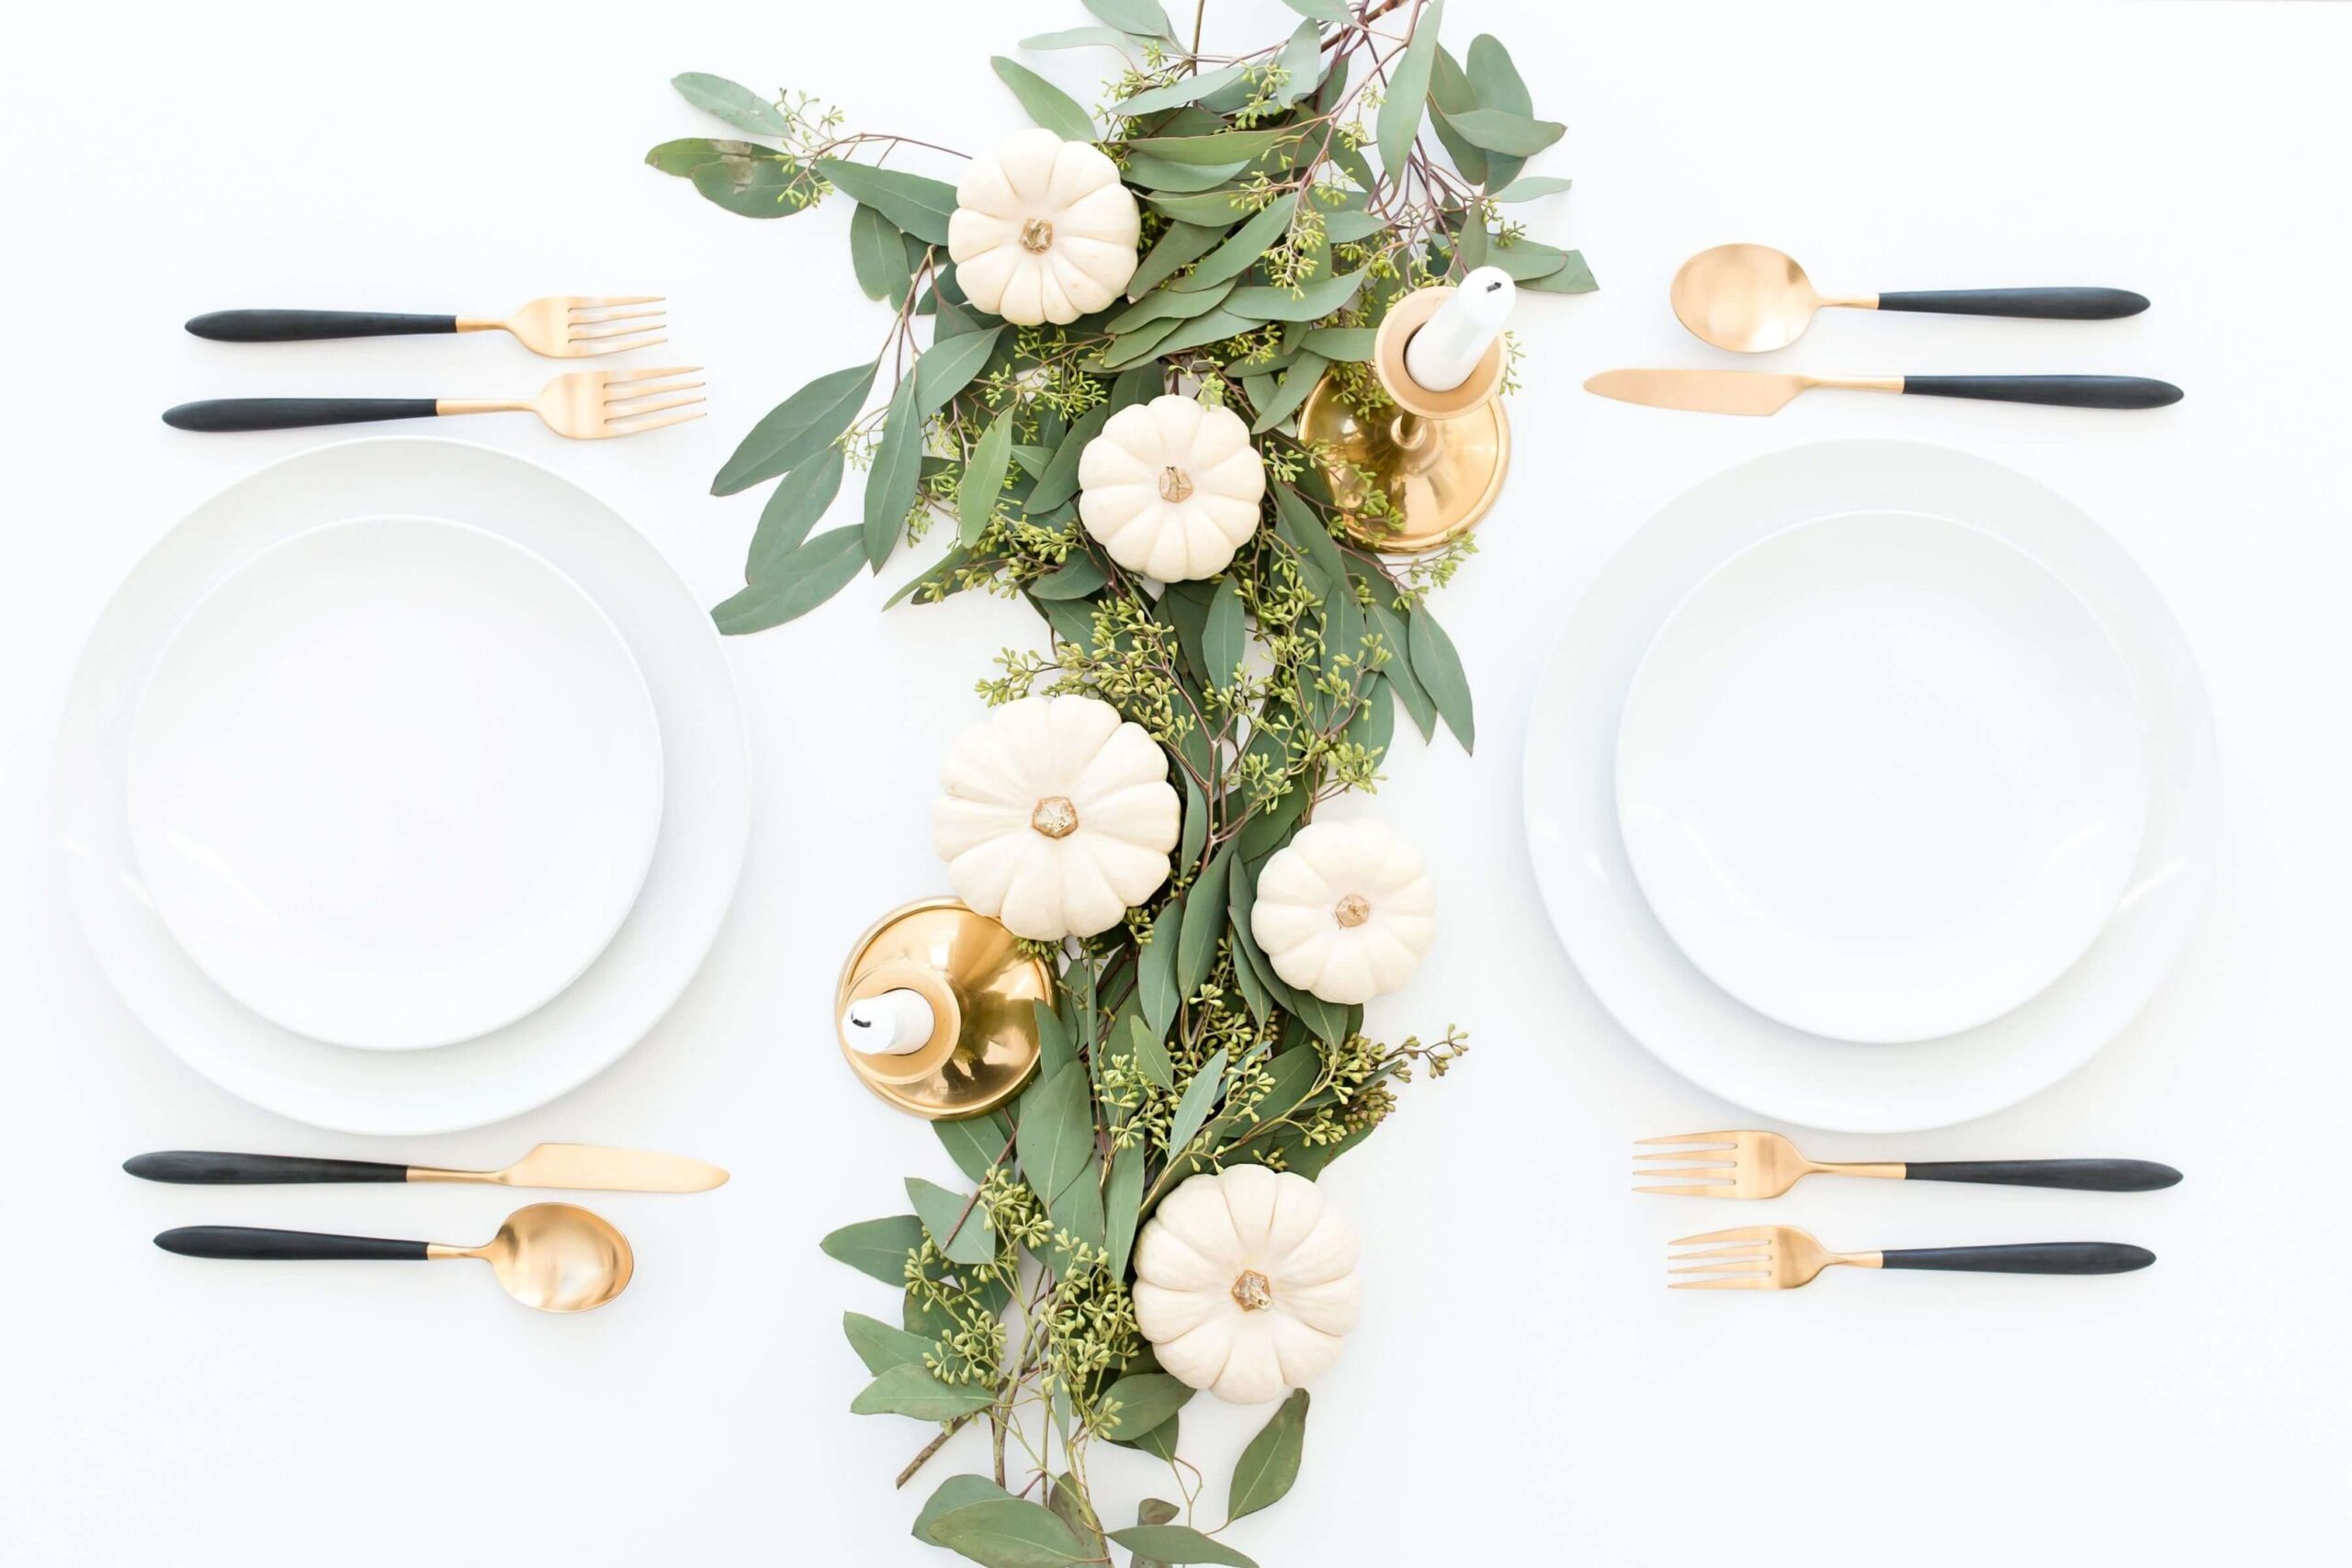
4. Natural Elements on the Tabletop
Your fall tablescape doesn’t need to be busy to be beautiful. Use eucalyptus branches, creamy mini pumpkins, and gold taper candles for a look that’s both timeless and fresh. Think farmhouse charm meets minimalist elegance. Let raw wood, linen napkins, and muted ceramics take center stage. For an everyday look, create a simple centerpiece with a small basket of apples and a vase of dried stems. Mixing in seasonal fruits like pears or figs also adds texture and color. You don’t need to reserve your table styling just for guests—treat yourself to beauty daily.

Try layering place settings with subtle patterns and soft fall tones like sage or ochre. Incorporate warm metals like brass or copper in your cutlery or chargers for added warmth. The goal is simplicity that feels intentional and comforting.
5. Pampas Grass & Dried Arrangements
Dried florals are having a moment—and fall is the perfect time to embrace them. Use pampas grass, dried thistle, wheat stalks, or even faux cotton stems in ceramic or concrete vases. These arrangements bring movement, height, and texture into your decor. Place them on kitchen islands, console tables, bathroom shelves, or windowsills. They last the entire season without any maintenance. Mix and match tall vases with smaller vessels for balance.
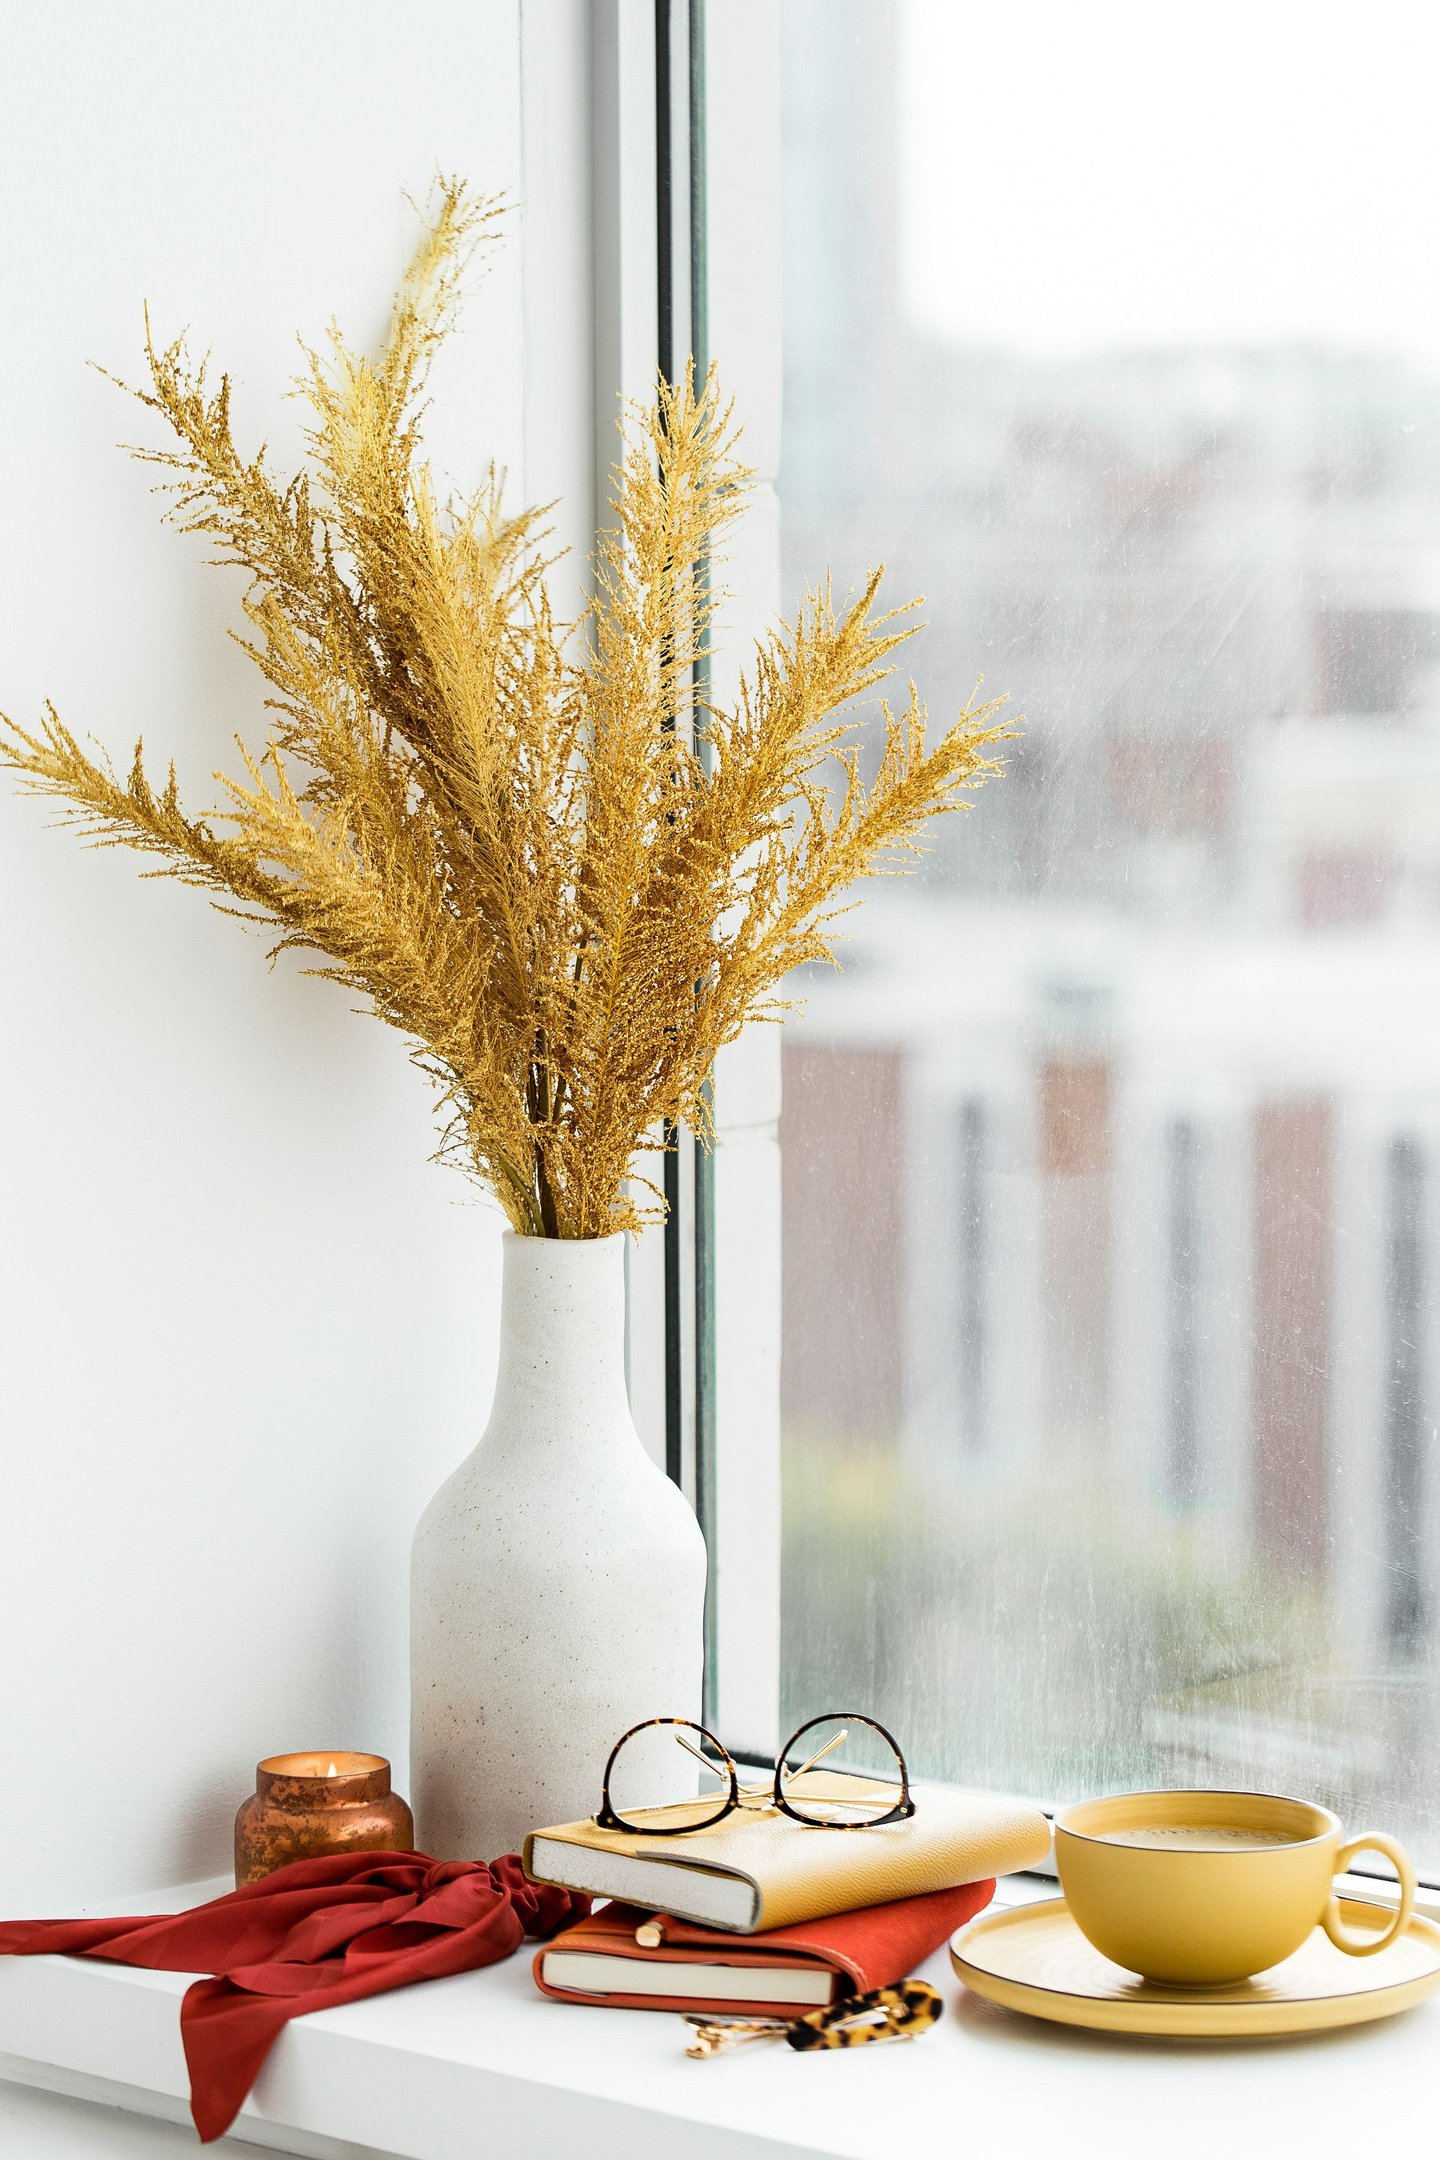
Choose a neutral palette for timelessness or mix in muted fall hues like dusty rose or rust. You can even display a bundle of wheat in a clear vase tied with twine for a rustic touch. Dried arrangements work beautifully in modern, farmhouse, and boho interiors alike. For a dramatic effect, pair pampas grass with candlelight or metallic accents. This decor trend is perfect for busy homes looking for low-maintenance beauty.
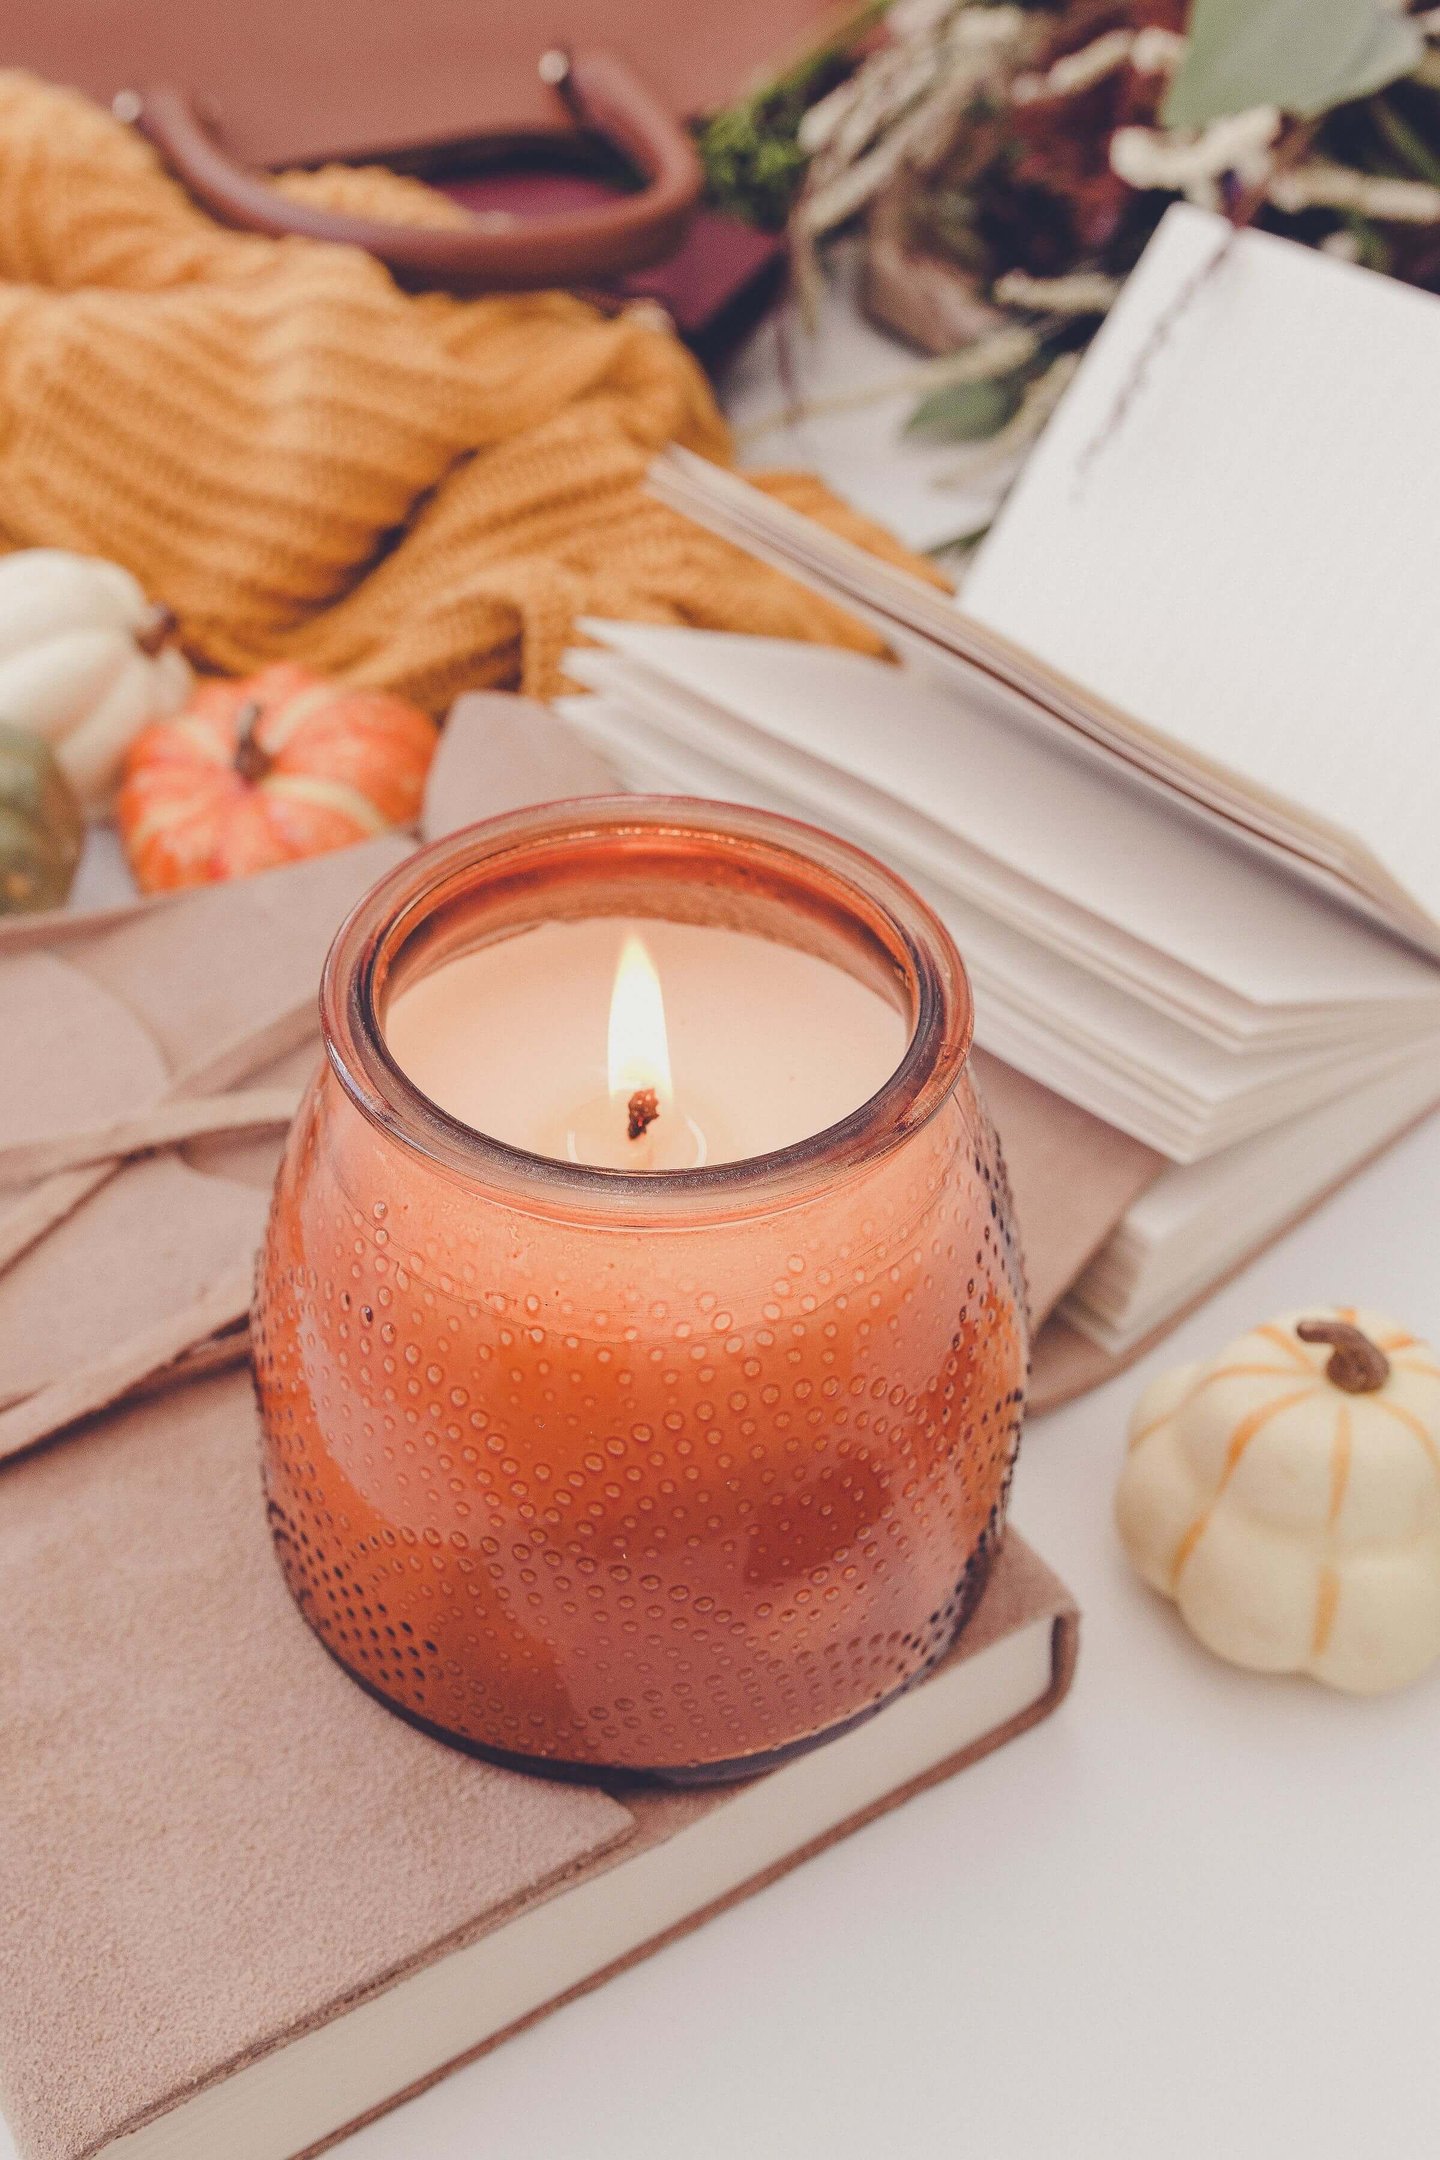
6. Moody Corners with Candlelight
Nothing says autumn like soft candlelight. Create a moody little vignette in a dark corner with stacked books, a lantern or two, and flickering taper candles. Use antique brass, warm-toned glass, and textured candle holders. Opt for candle scents that reflect the season—like cedarwood, fig, or clove. Add a plush throw or a velvet cushion for extra comfort. Moody lighting sets a calming atmosphere for slow mornings or quiet evenings.
Try arranging different candle heights to add interest. Consider adding mirrors behind candles to enhance the glow. This style of decor invites you to linger, read, or journal. It’s not just decor—it’s an experience. Experiment with pillar candles in shades of taupe, burgundy, or ivory to create visual depth. Use flameless candles on high shelves for a safe, ambient glow.
7. Soft Layers & Autumn Textiles
Bring comfort to every room with layers of autumn-inspired textiles. Add a chunky knit throw to your sofa or a plaid blanket at the foot of your bed. Choose fabrics like wool, cotton, and linen in colors like rust, mustard, and deep olive. Swap out summer cushions for ones with fall motifs or in cozy textures like velvet and boucle. A woven runner or seasonal napkins can transform your dining space without much effort. Consider layering rugs for a cozy cottage feel—think jute over wool or vice versa. Mixing materials adds warmth and visual interest.
Textiles are also easy to store and rotate, making them perfect for seasonal swaps. Even a simple kitchen towel with autumn tones can bring in that cozy touch. Layered textiles are the easiest way to introduce fall into your home with comfort and style.
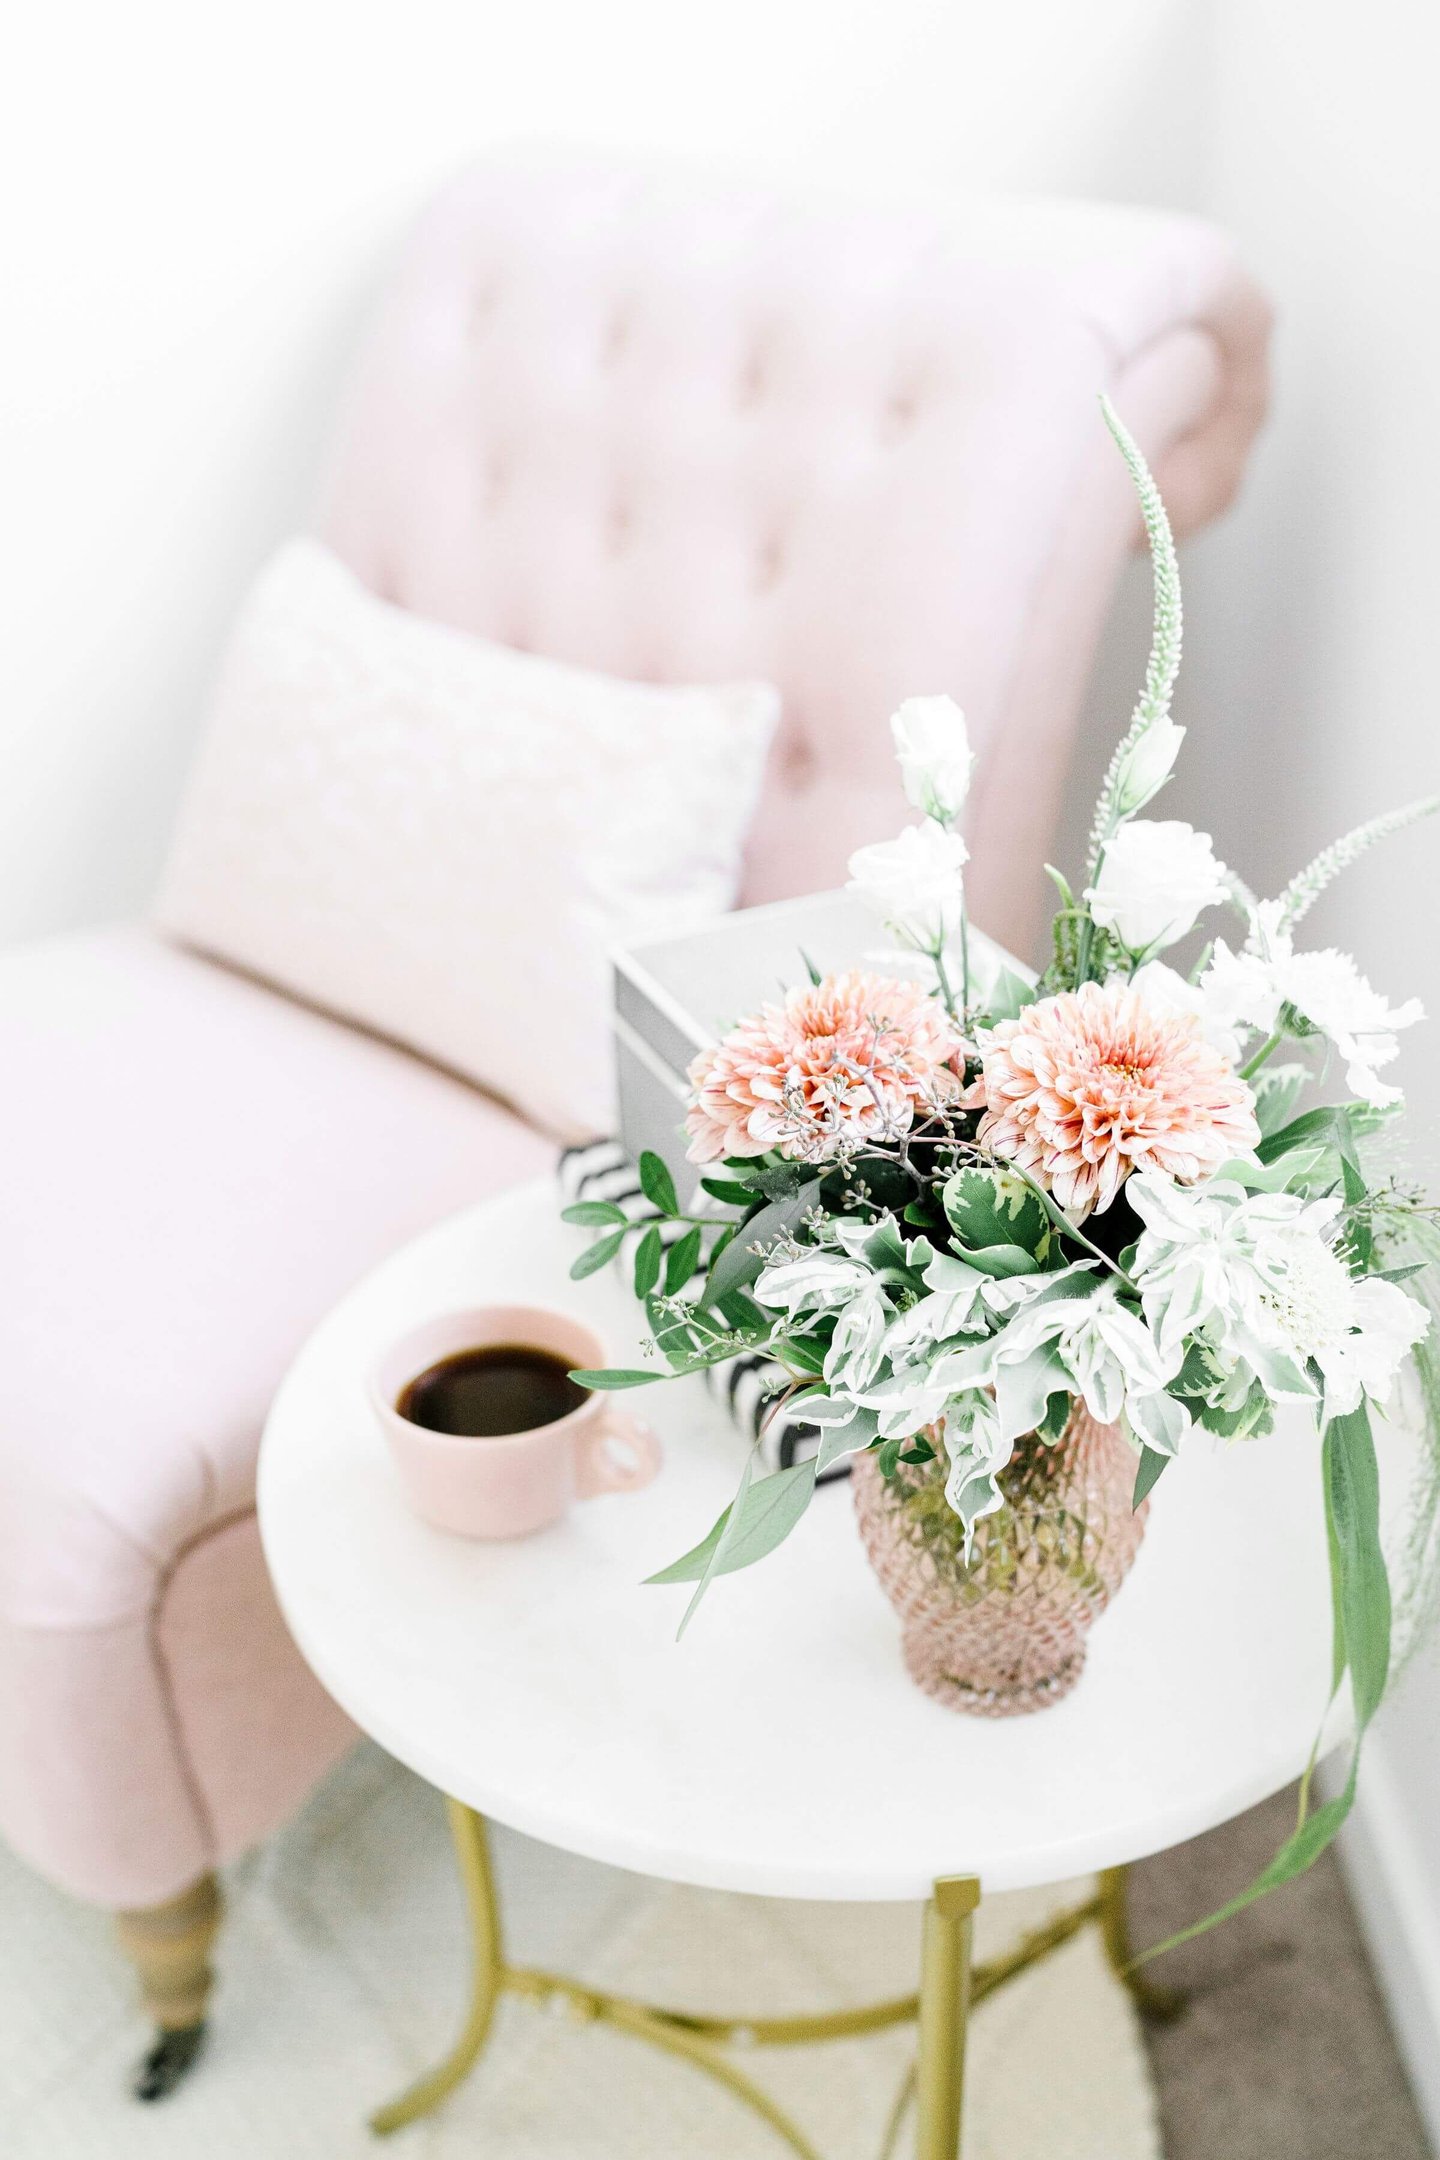
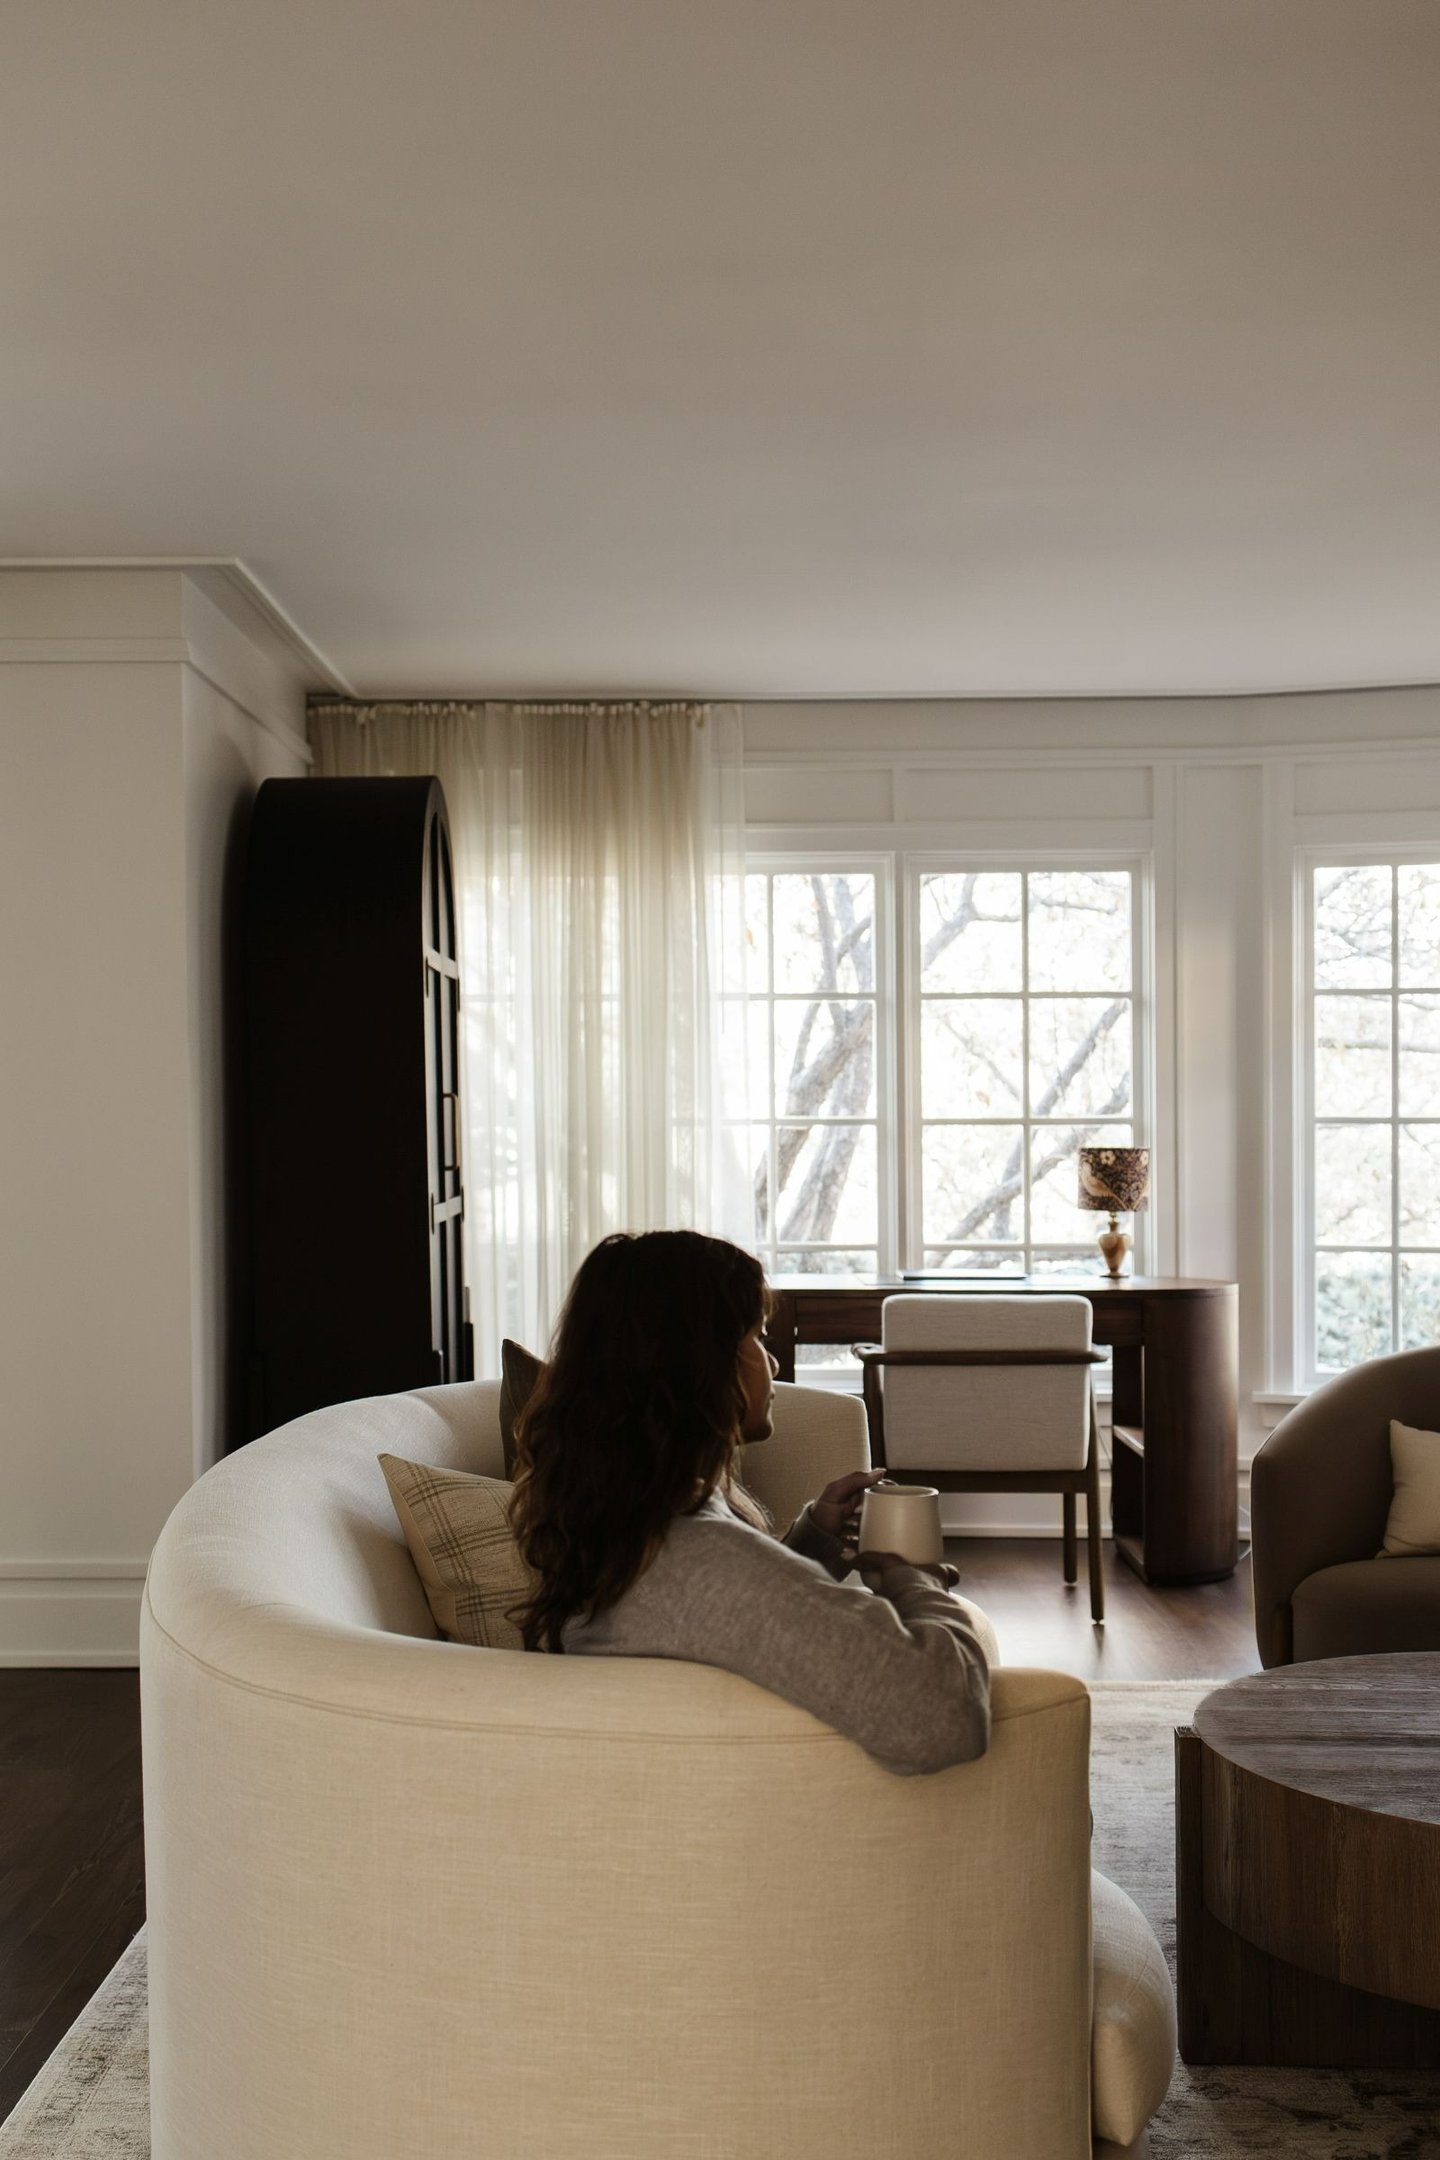
8. Cozy Coffee & Reading Nooks
Fall is the season of slow living, and nothing embodies that better than a cozy nook. Whether it’s a window seat, a tucked-away armchair, or a corner bench, transform it with plush cushions, a soft throw, and a warm lamp. Add a small table for your favorite fall drink—pumpkin chai latte, anyone? Keep a stack of books or magazines nearby to encourage slow moments. Even a small nook in the kitchen can become a retreat with a comfy cushion and a candle.
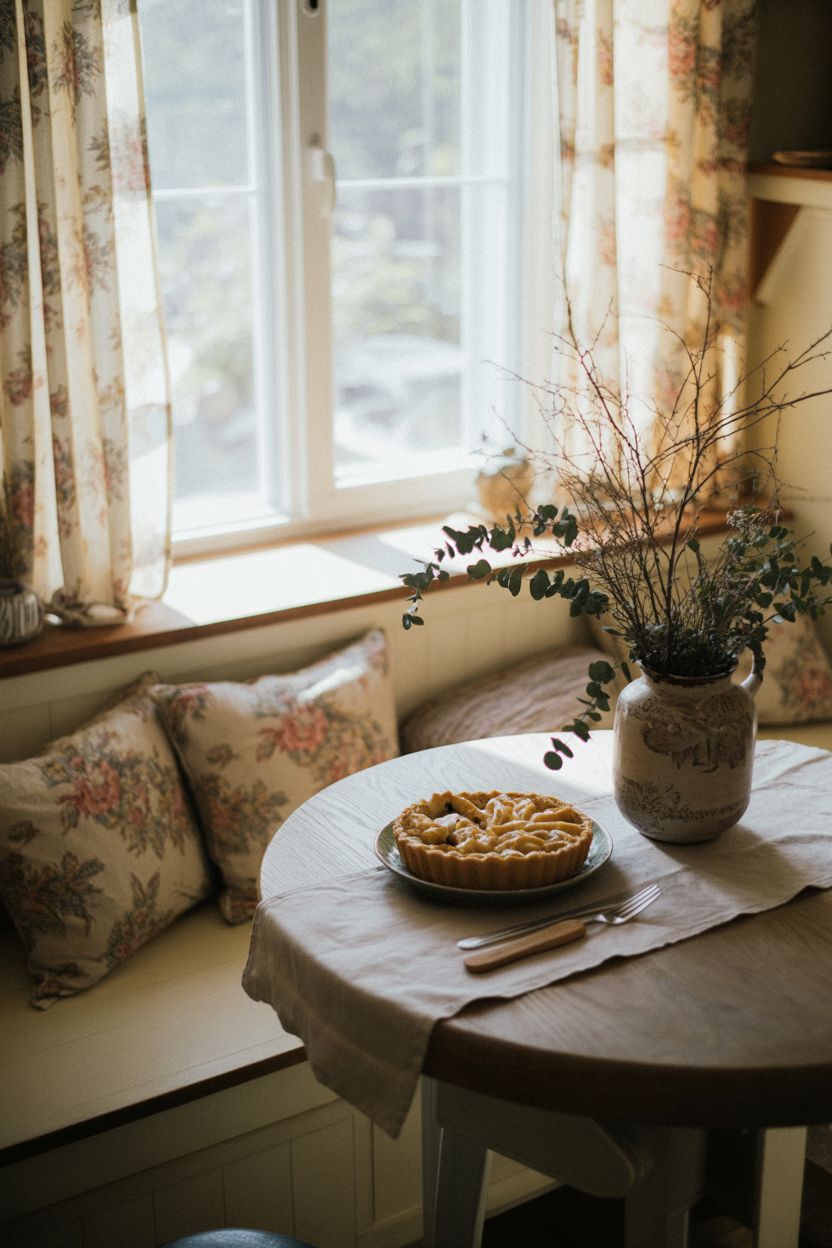
Choose warm lighting and calming colors to make the space feel like a hug. If you don’t have a built-in nook, create one with a chair, side table, and a few accessories. These spaces invite you to pause, reflect, and enjoy the simple pleasures of fall. It’s about creating atmosphere, not just decoration.
9. Scent Styling for the Season
Fall home decor isn’t complete without the comforting scent of the season. Scent styling is the art of using fragrance to evoke emotion and atmosphere. In the kitchen, try simmering a pot of cinnamon sticks, cloves, and orange slices to infuse the room with warmth. Use fall-scented candles like cedarwood, apple spice, or pumpkin chai in common areas. Essential oil diffusers with blends of nutmeg, cinnamon, and vanilla add a safe and consistent aroma. Add a bundle of dried herbs like rosemary or thyme to open shelves for both visual and aromatic appeal. Reed diffusers in amber glass bottles are both functional and stylish.

You can even tuck wax melts into small decorative dishes around the home. Incorporate scent layers throughout the house to maintain consistency. Fall is the perfect time to make your home smell like fresh-baked pie and crisp leaves. When your space smells cozy, it feels cozy.
10. Timeless Entryway Statements
Your entryway sets the tone for your home—and for the season. Start with a textured runner in autumn tones like burnt orange or olive green. Add a console table with a mirror above it to reflect natural light. A ceramic bowl filled with pinecones or acorns makes a great seasonal catchall. Place a tall vase with dried branches or eucalyptus for vertical interest. Hang a modern fall wreath on the interior of the door for added charm.

Use gold-accented hooks to display scarves or a cozy shawl. Include a small bench with a plaid cushion for warmth and practicality. Add a framed seasonal print or a wooden sign with a cozy quote. Keep it functional but curated. These small touches make your home feel welcoming and well-considered the moment someone steps in.
11. Bonus Tip: Autumnal Shelf Styling
Shelves are the perfect playground for seasonal styling. Swap out your summer pieces for fall-colored books, mini pumpkins, and amber glass. Arrange items in odd numbers for balance—think three small accents grouped together. Use risers or stacked books to create different heights. Tuck in small candles, framed art, or bundles of wheat. Keep the color palette consistent with the rest of the room.
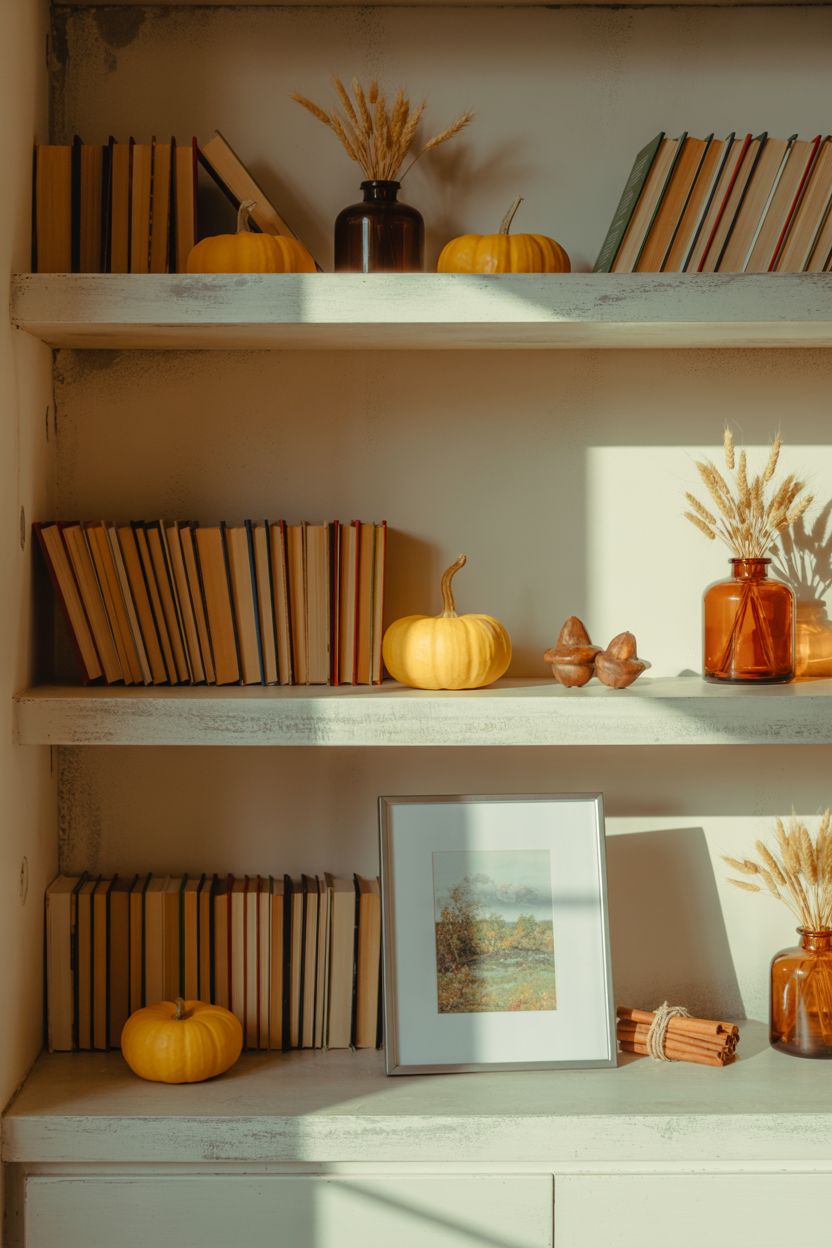
Avoid overcrowding—less is more when it comes to elegant shelf styling. Add a strand of fairy lights for a magical evening glow. Don’t forget to layer textures like ceramic, wood, and metal. Whether in the kitchen, living room, or hallway, styled shelves make your fall decor feel polished and intentional.
12. Bonus Tip: Creating a Seasonal Color Story
Curating a color palette for fall decor makes your home feel cohesive. Choose two to three core tones and repeat them throughout the space. Popular combinations include cream + rust + gold or sage + caramel + charcoal. Introduce these colors through pillows, throws, vases, and art. Let your base furniture stay neutral so seasonal colors pop. A unified color story ties each room together and elevates your decor. Even your candles, books, and dishware can reflect your chosen hues.
Stick to warm, muted tones that echo the season’s natural landscape. Adjust lighting to support your palette—warm bulbs highlight fall colors best. Having a seasonal color story helps streamline your decorating process year after year.
Want more elegant home inspiration? Follow us on Pinterest for seasonal styling boards, DIY projects, and cozy home ideas you’ll love all year long!
Happy Decorating!


I love summer—the barefoot mornings, the buzzing garden, the impromptu dinners on the patio. But come August, something shifts. The mornings cool, the light turns golden, and suddenly, I’m lighting candles, rearranging throws, and dreaming about cozy fall corners. And if the rain starts? That’s my cue to head into the kitchen.
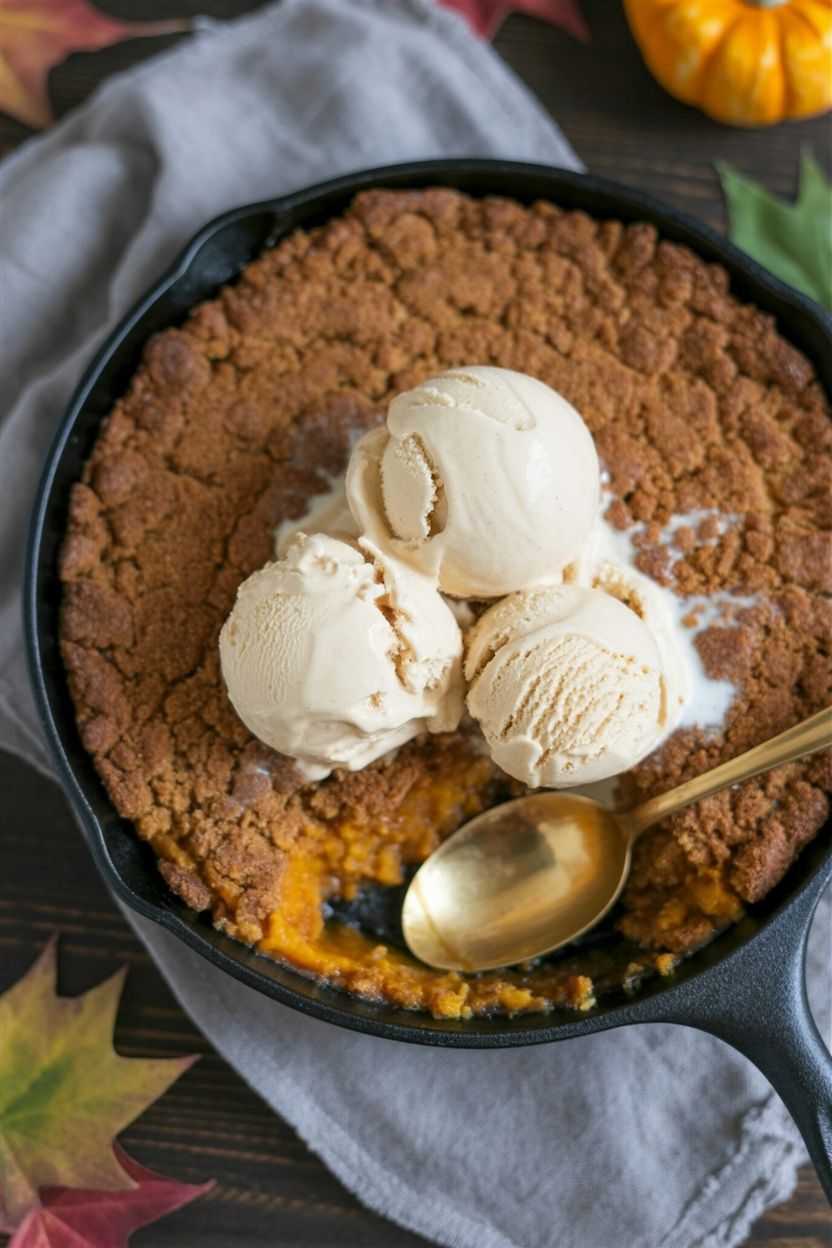
What Exactly Is Pumpkin Crisp?
Think of it as the rustic cousin of pumpkin pie. The base is silky, spiced pumpkin custard, and the topping is everything you’d want from a streusel—crunchy, cinnamon-kissed, and delightfully crumbly. Unlike a traditional pie, there’s no fussy crust to deal with, and it bakes up beautifully in a skillet or any dish you love.
It’s the kind of dessert that feels like home. It doesn’t try too hard—it just is. It’s what I turn to when the weather starts shifting and I want something warm and familiar baking in the oven.
Why You’ll Love This Recipe
There are about a hundred reasons, but here are a few you’ll notice right away:
It’s ridiculously easy. You won’t need a mixer, fancy ingredients, or special skills. Just two bowls and a whisk.
It tastes like fall. Every bite is bursting with warm spices, creamy pumpkin, and buttery streusel.
It’s flexible. Want to prep it ahead for guests? You can. Want to tweak the topping? Go for it.
It’s freezer-friendly, party-perfect, and always a crowd-pleaser.
Whether you’re baking on a lazy Sunday or bringing something cozy to Friendsgiving, this crisp has your back.
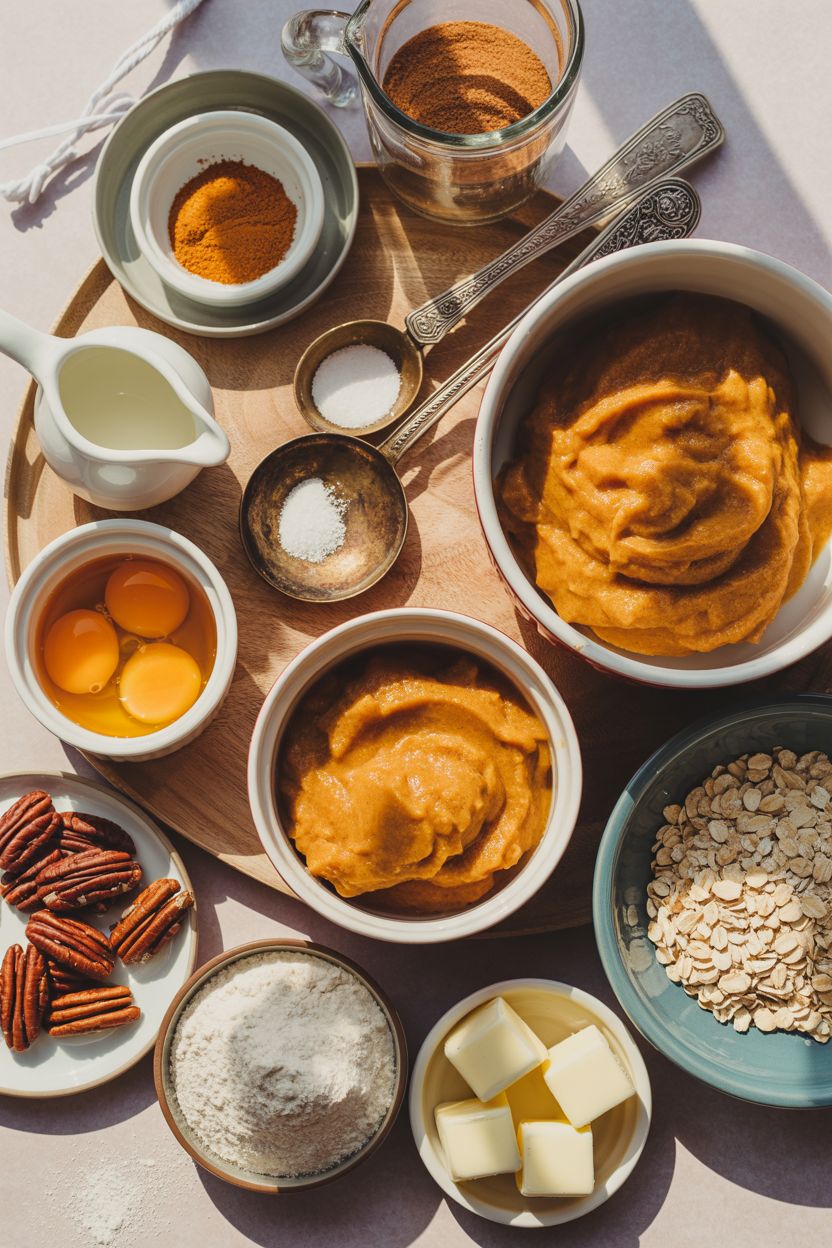
The Ingredients You’ll Need (and Some Clever Tips!)
For the Pumpkin Layer:
Pumpkin Puree: Make sure it’s 100% pure pumpkin, not the sweetened pie filling. The real deal gives you the perfect balance of earthy richness.
Sugar: Just enough to highlight the spices without overpowering the pumpkin.
Eggs: These help the filling set into a smooth, custard-like layer.
Pumpkin Pie Spice: Or create your own blend with cinnamon, nutmeg, ginger, and cloves.
Vanilla Extract & Salt: They may seem small, but they round out all the flavours beautifully.
Heavy Cream: It makes everything luxuriously creamy. You can use half and half, but I always vote for cream.
For the Streusel Topping:
All-Purpose Flour: This is your base.
Granulated Sugar: Keeps the topping sweet and crisp.
Cinnamon: The heart of the topping’s flavour.
Salt: Just a touch to balance out the sweetness.
Melted Butter: This brings the crumble together into those golden bits of joy.
Want to add a twist? You totally can:
Stir in chopped pecans or walnuts for extra crunch.
Add rolled oats for that classic crisp texture.
Sub in brown sugar for a deeper, caramelised flavour.
Step-by-Step: How to Make Pumpkin Crisp
Trust me—this recipe is as easy as slipping into your favourite sweater.
Step 1: Preheat and Prep
Heat your oven to 375°F (190°C). Grab a 12-inch cast iron skillet or a 9×9 baking dish and grease it well with butter or non-stick spray. If you’re planning to share this dessert with friends or neighbours, a disposable foil pan works beautifully too.
Step 2: Whisk the Pumpkin Filling
In a large bowl, combine:
1 can (15 oz) pumpkin puree
1 cup granulated sugar
3 large eggs
2 teaspoons pumpkin pie spice
1/2 teaspoon salt
2 teaspoons vanilla extract
Whisk it all together until smooth, then add:
2/3 cup heavy cream
Give it one last stir, then pour it into your prepared baking dish. Smooth the top.
Step 3: Make the Streusel
In a medium bowl, whisk together:
2 cups all-purpose flour
1 1/2 cups granulated sugar
2 teaspoons cinnamon
1/2 teaspoon salt
Then pour in:
12 tablespoons melted unsalted butter
Use a fork or your fingers to mix until crumbly. It should look like sandy clumps. Scatter the streusel evenly over the pumpkin filling—no need to press it down. The magic is in the messy crumbles!
Optional: Add 1/2 cup chopped nuts or oats here.
Step 4: Bake It
Slide it into your preheated oven and bake for 40–45 minutes. You’ll know it’s ready when the edges are bubbling slightly, the filling is set, and the top is golden brown. If the streusel starts to brown too quickly, loosely tent the dish with foil during the last 10 minutes.
Step 5: Cool & Serve
Let it cool for about 10–15 minutes before serving. This allows the custard to firm up just enough so it holds together when you scoop it.
Now comes the best part—add a generous scoop of vanilla ice cream. Or if you can find cinnamon ice cream? Game changer. The contrast of warm crisp and cold cream is pure magic.
Make-Ahead Magic
Want to get ahead of the game? Here’s how to prep this crisp in advance:
Mix the pumpkin filling and pour it into your baking dish. Cover and refrigerate.
Prepare the streusel and store it in a separate airtight container.
When ready to bake, take both out of the fridge, let sit at room temp while your oven preheats, then sprinkle the streusel on top and bake as directed.
You can store the unbaked filling and topping separately in the fridge for up to 48 hours.
How to Store & Reheat
This crisp keeps surprisingly well (if you have leftovers!).
Store it in an airtight container in the fridge for up to 5 days.
Reheat single servings in the microwave for about 20–30 seconds.
It’s also delicious cold, especially with whipped cream. Don’t knock it till you try it.
Easy Variations To Try
Drizzle with caramel sauce just before serving for a bakery-worthy finish.
Add chocolate chips to the streusel for a fun surprise.
Swap pumpkin for mashed sweet potatoes if that’s what you have on hand.
Add a touch of orange zest to the filling for a fresh pop of flavour.
The Heart of the Recipe
To me, this recipe is about more than just dessert. It’s about listening to the seasons—those quiet moments when summer fades and fall begins to whisper. It’s about baking not just because you’re hungry, but because the mood calls for something warm and golden and spiced.
So whether it’s raining outside or you’re just craving a little coziness in your day, trust this recipe to bring the fall feeling straight to your kitchen. Light a candle, slip on a comfy sweater, and let the scent of cinnamon and pumpkin wrap around you like a hug.
And don’t be surprised if this becomes your new early-autumn tradition. Because once you taste that first spoonful of creamy, crisp-topped pumpkin bliss… you’ll wonder how you ever welcomed fall without it.

")
These autumn nail designs are perfect for the season. I’ve heard it so many times before: “Fall is for brown nails or classic French.” It’s like the moment summer ends, I’m supposed to pack away all the color and creativity and choose something “safe.”
But let’s be honest—I don’t think fall nails have to be boring at all.
Autumn is one of the most beautiful, expressive seasons. The world outside turns into rich layers of color and texture, from crisp leaves to cozy knits and deep jewel tones. So why shouldn’t my manicure reflect that same creative energy?
I’m here to show that fall nails can be so much more than beige or plain brown. From cozy nail colors to autumn nail designs with florals, moody jewel tones, and minimalist line art, there are endless ways to make nails part of my fall style.
Below, I’m sharing real design inspiration from beautiful photo examples you can save and recreate. Get ready to discover fall nail ideas that will actually make you look forward to your next appointment.
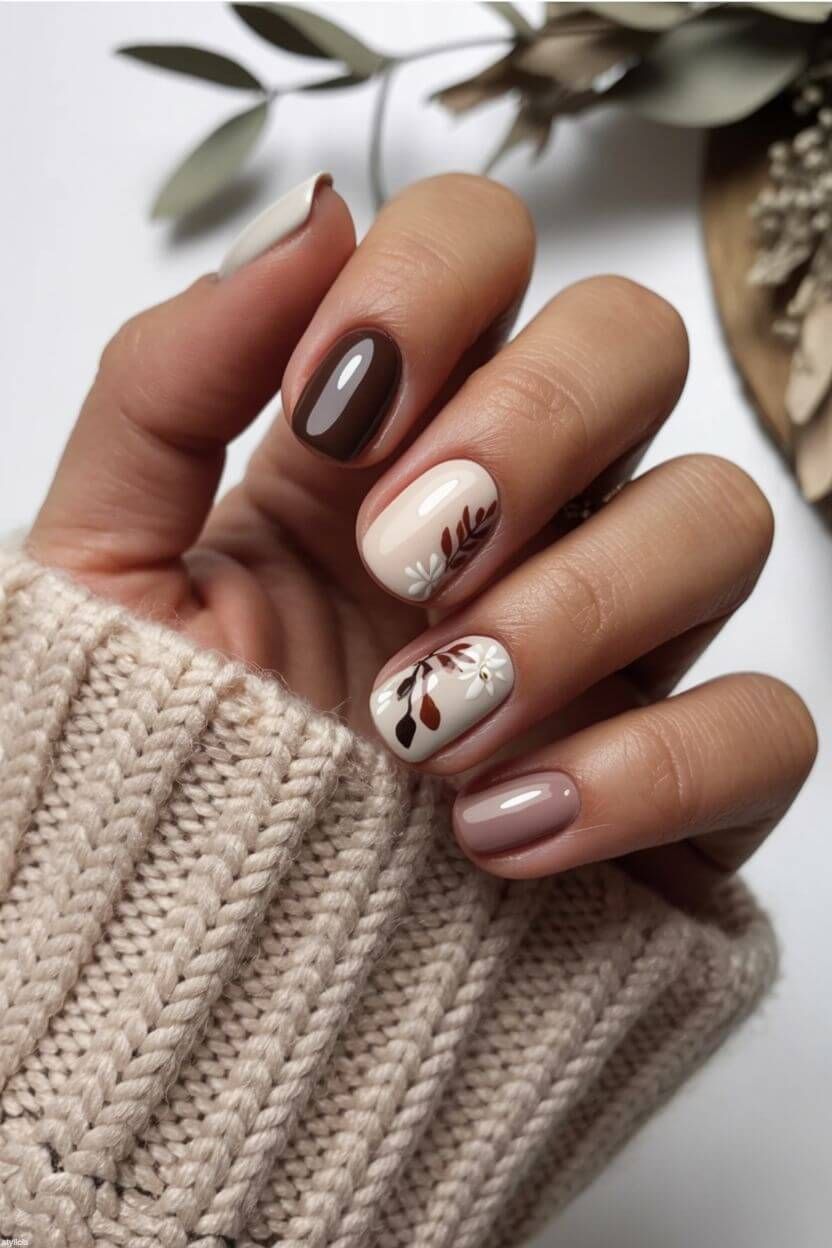
1. Classic Brown and Nude Fall Nails with Fine Leaf Details
Embrace autumn’s cosy side with these classic brown and nude nails, featuring delicate leaf art for the perfect fall manicure. The warm tones and minimalist design pair beautifully with chunky knits and seasonal outfits. Ideal for those looking for subtle yet on-theme autumn nail designs.
2. Autumn Leaf Nail Art with Glitter Ombre and Plaid Details
Nothing says fall quite like leaf-inspired nails! This design combines hand-painted autumn leaves in warm orange tones, gold glitter ombre, and a hint of plaid for a classic fall aesthetic. Perfect for pumpkin patch outings or Thanksgiving dinner.
3. Rich Plum Fall Nails with Delicate Floral Accent
For an elegant take on fall nails, these deep plum shades are the perfect jewel-tone choice. A single accent nail with fine floral detail adds sophistication while staying perfectly autumn-ready. Great for fall weddings or date nights.

4. Muted Warm Grey Fall Nails with Accent Leaf Art
Show off understated elegance with warm taupe and nude tones accented by minimalistic leaf art. These nails prove that fall nail trends don’t have to be bold to be beautiful, offering a chic, neutral option for any occasion. These autumn nail designs never go out of style.
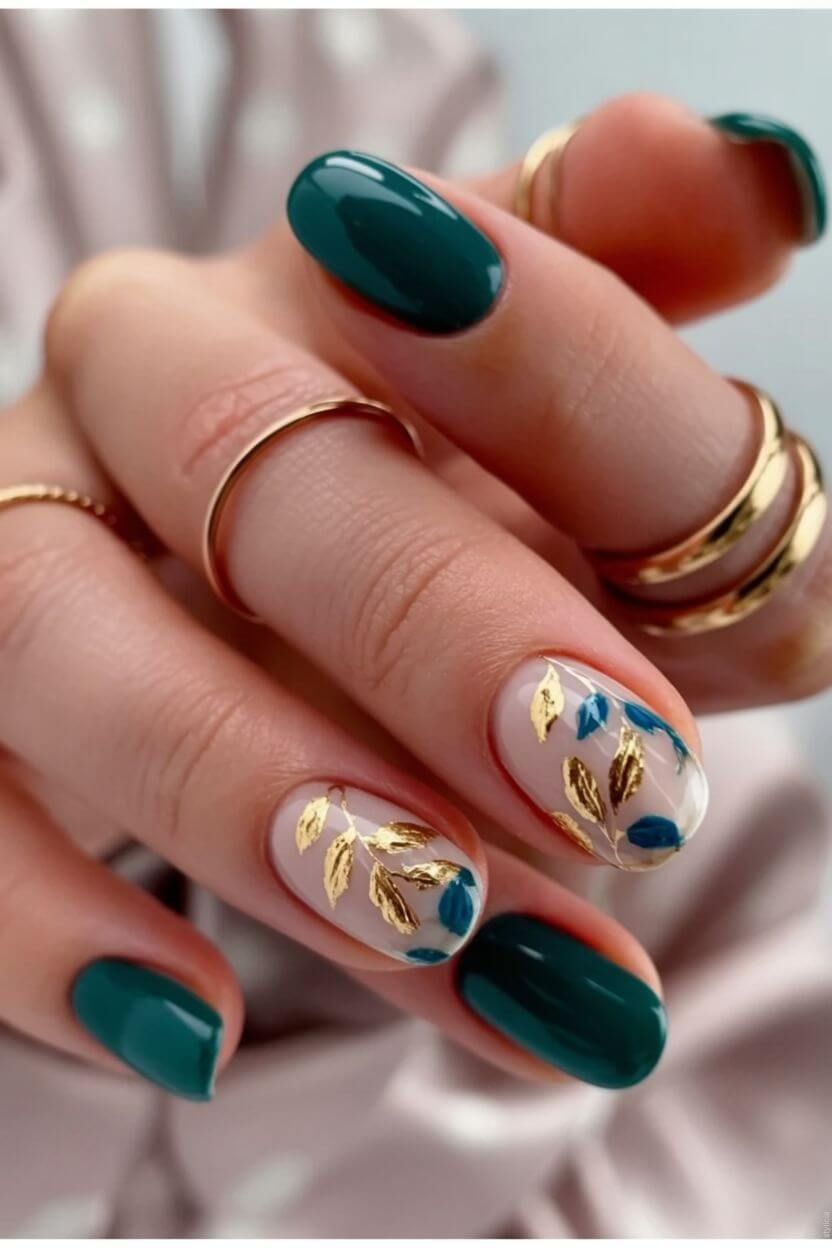
5. Emerald Green Fall Nails with Gold Foil Leaf Design
Channel autumn’s lush, earthy feel with these dark green nails featuring delicate gold foil leaf art. A sophisticated choice for anyone wanting a luxe, nature-inspired fall manicure.
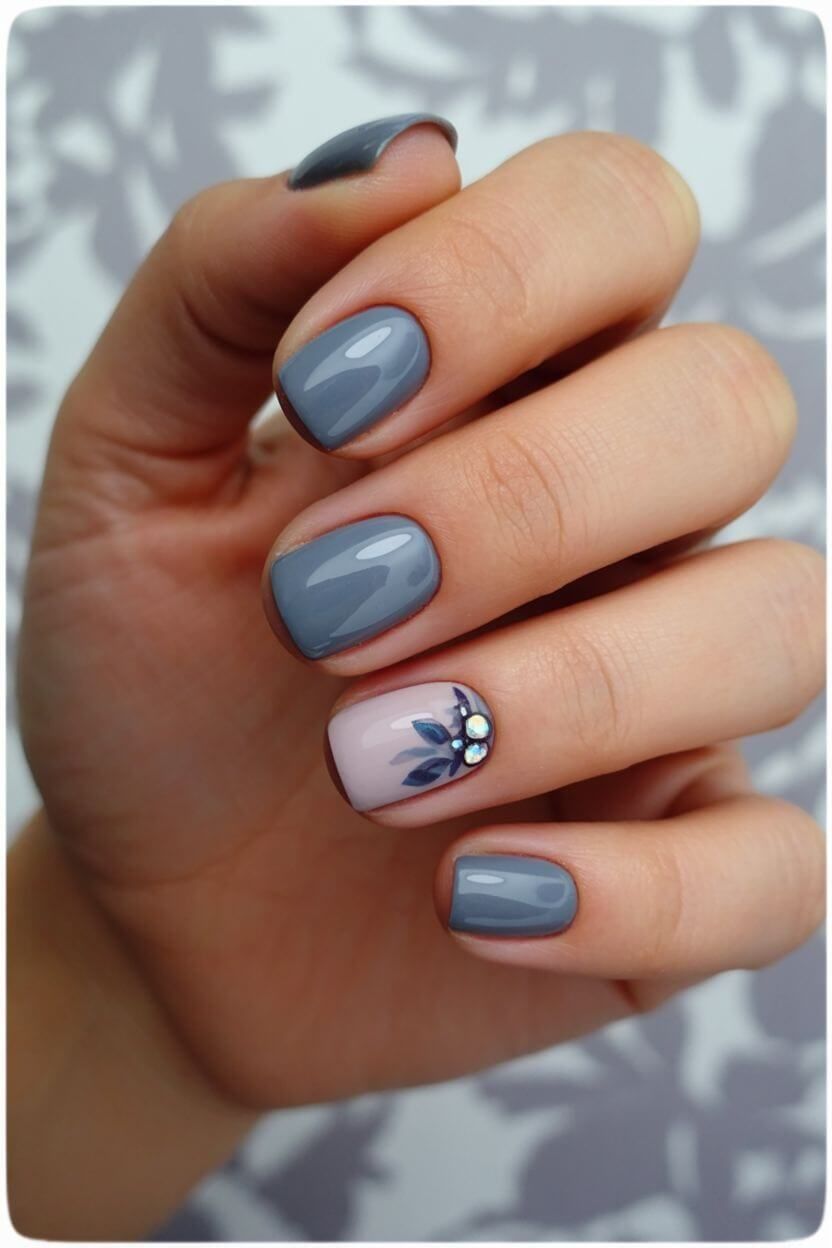
6. Dusty Blue-Grey Fall Nails with Crystal Leaf Accents
Go beyond typical autumn tones with this cool-toned dusty blue-grey manicure. A single accent nail with crystal embellishments and navy leaf details makes this design both modern and seasonally appropriate.
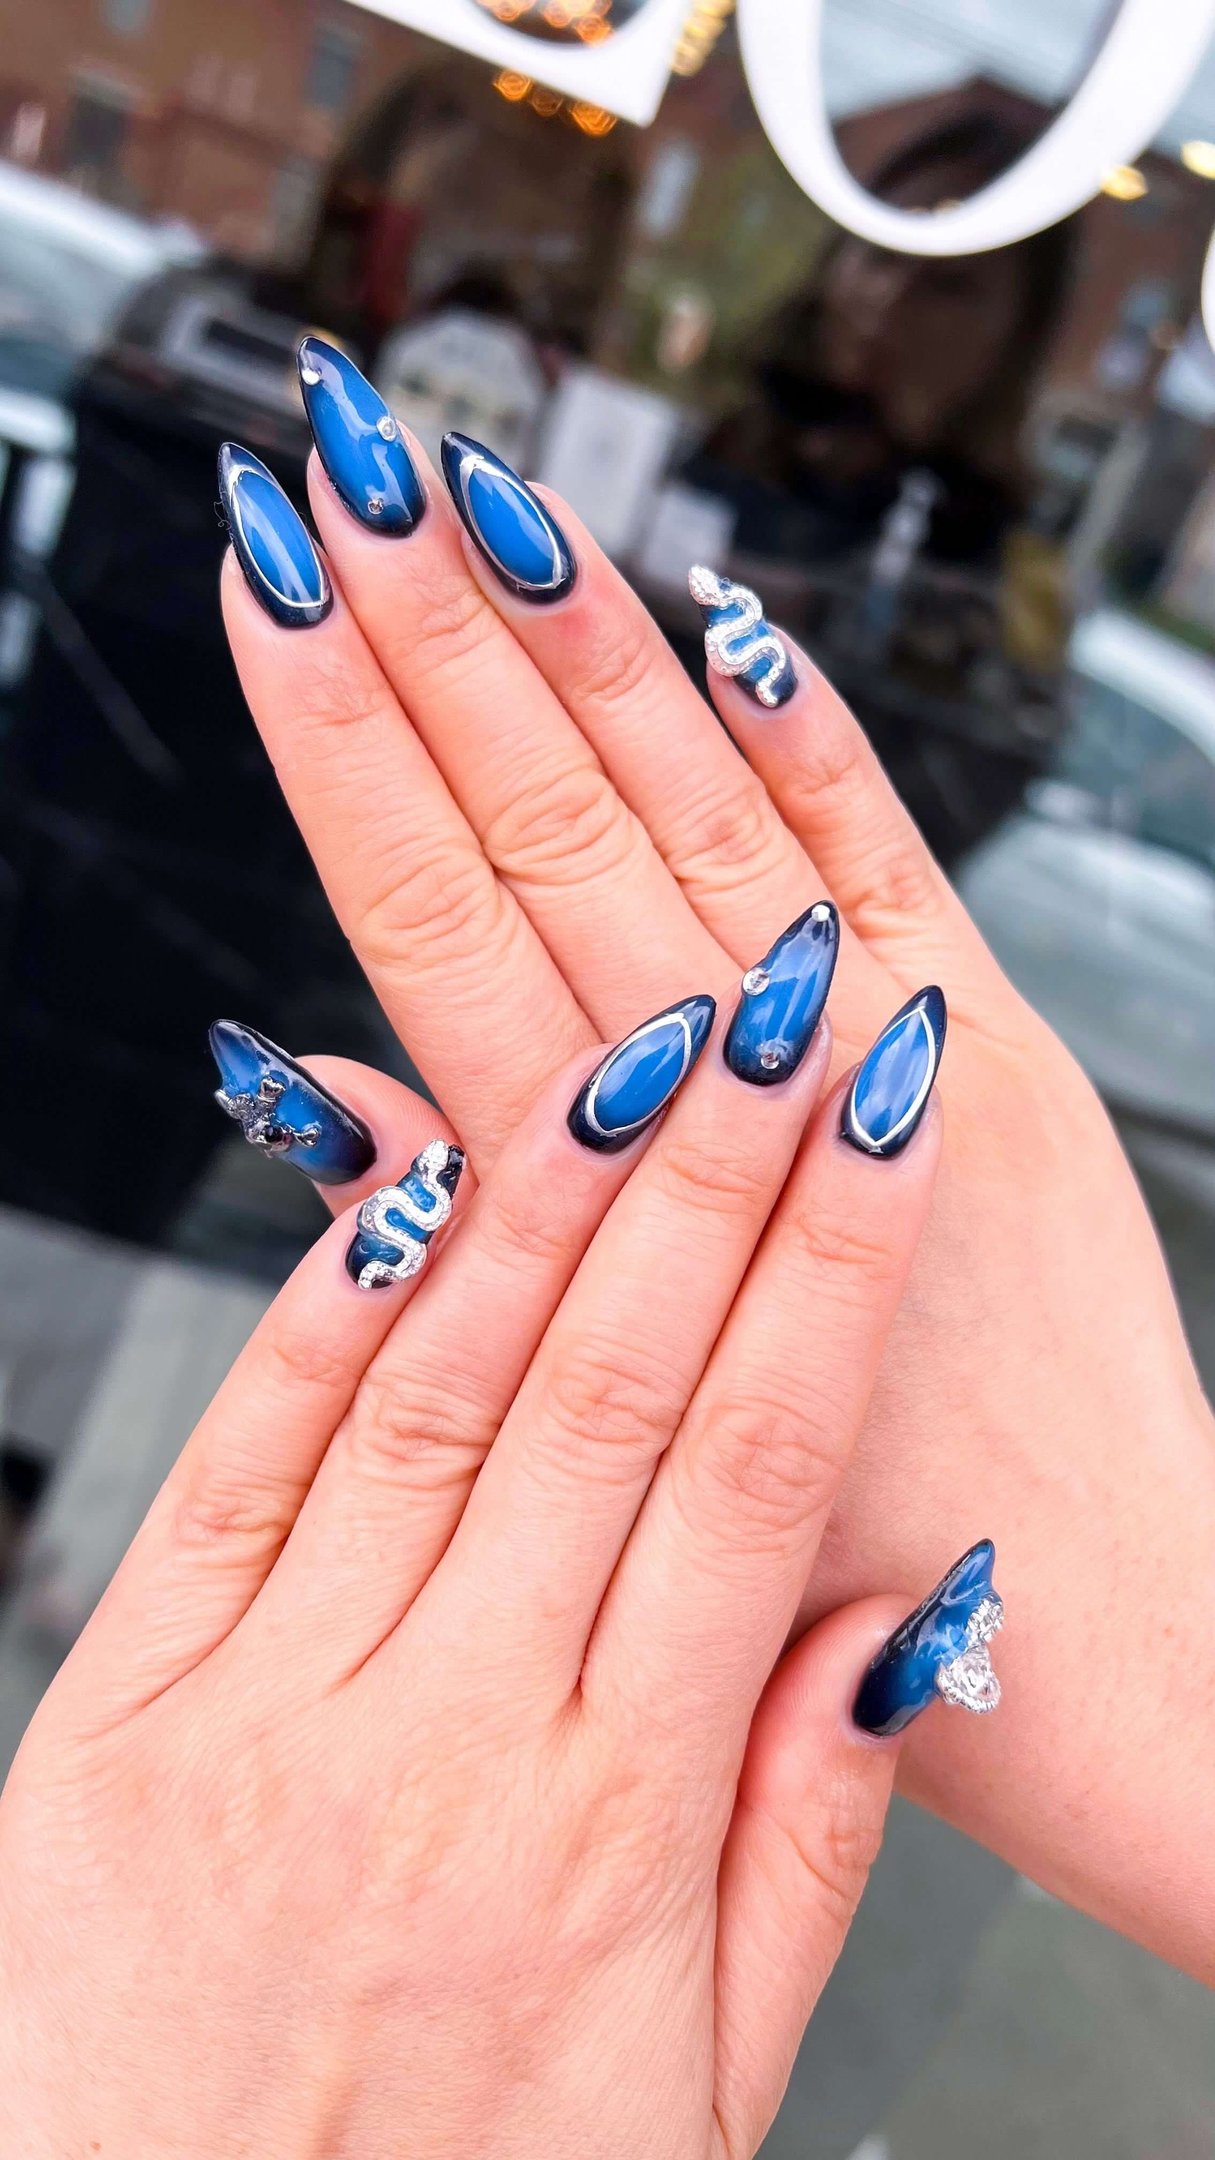
7. Moody Blue Fall Nails with 3D Crystal Snake Accents
For those who love a dramatic fall look, these navy and cobalt ombre nails feature striking 3D crystal snake accents. They’re the ultimate statement for a bold, mysterious autumn vibe.
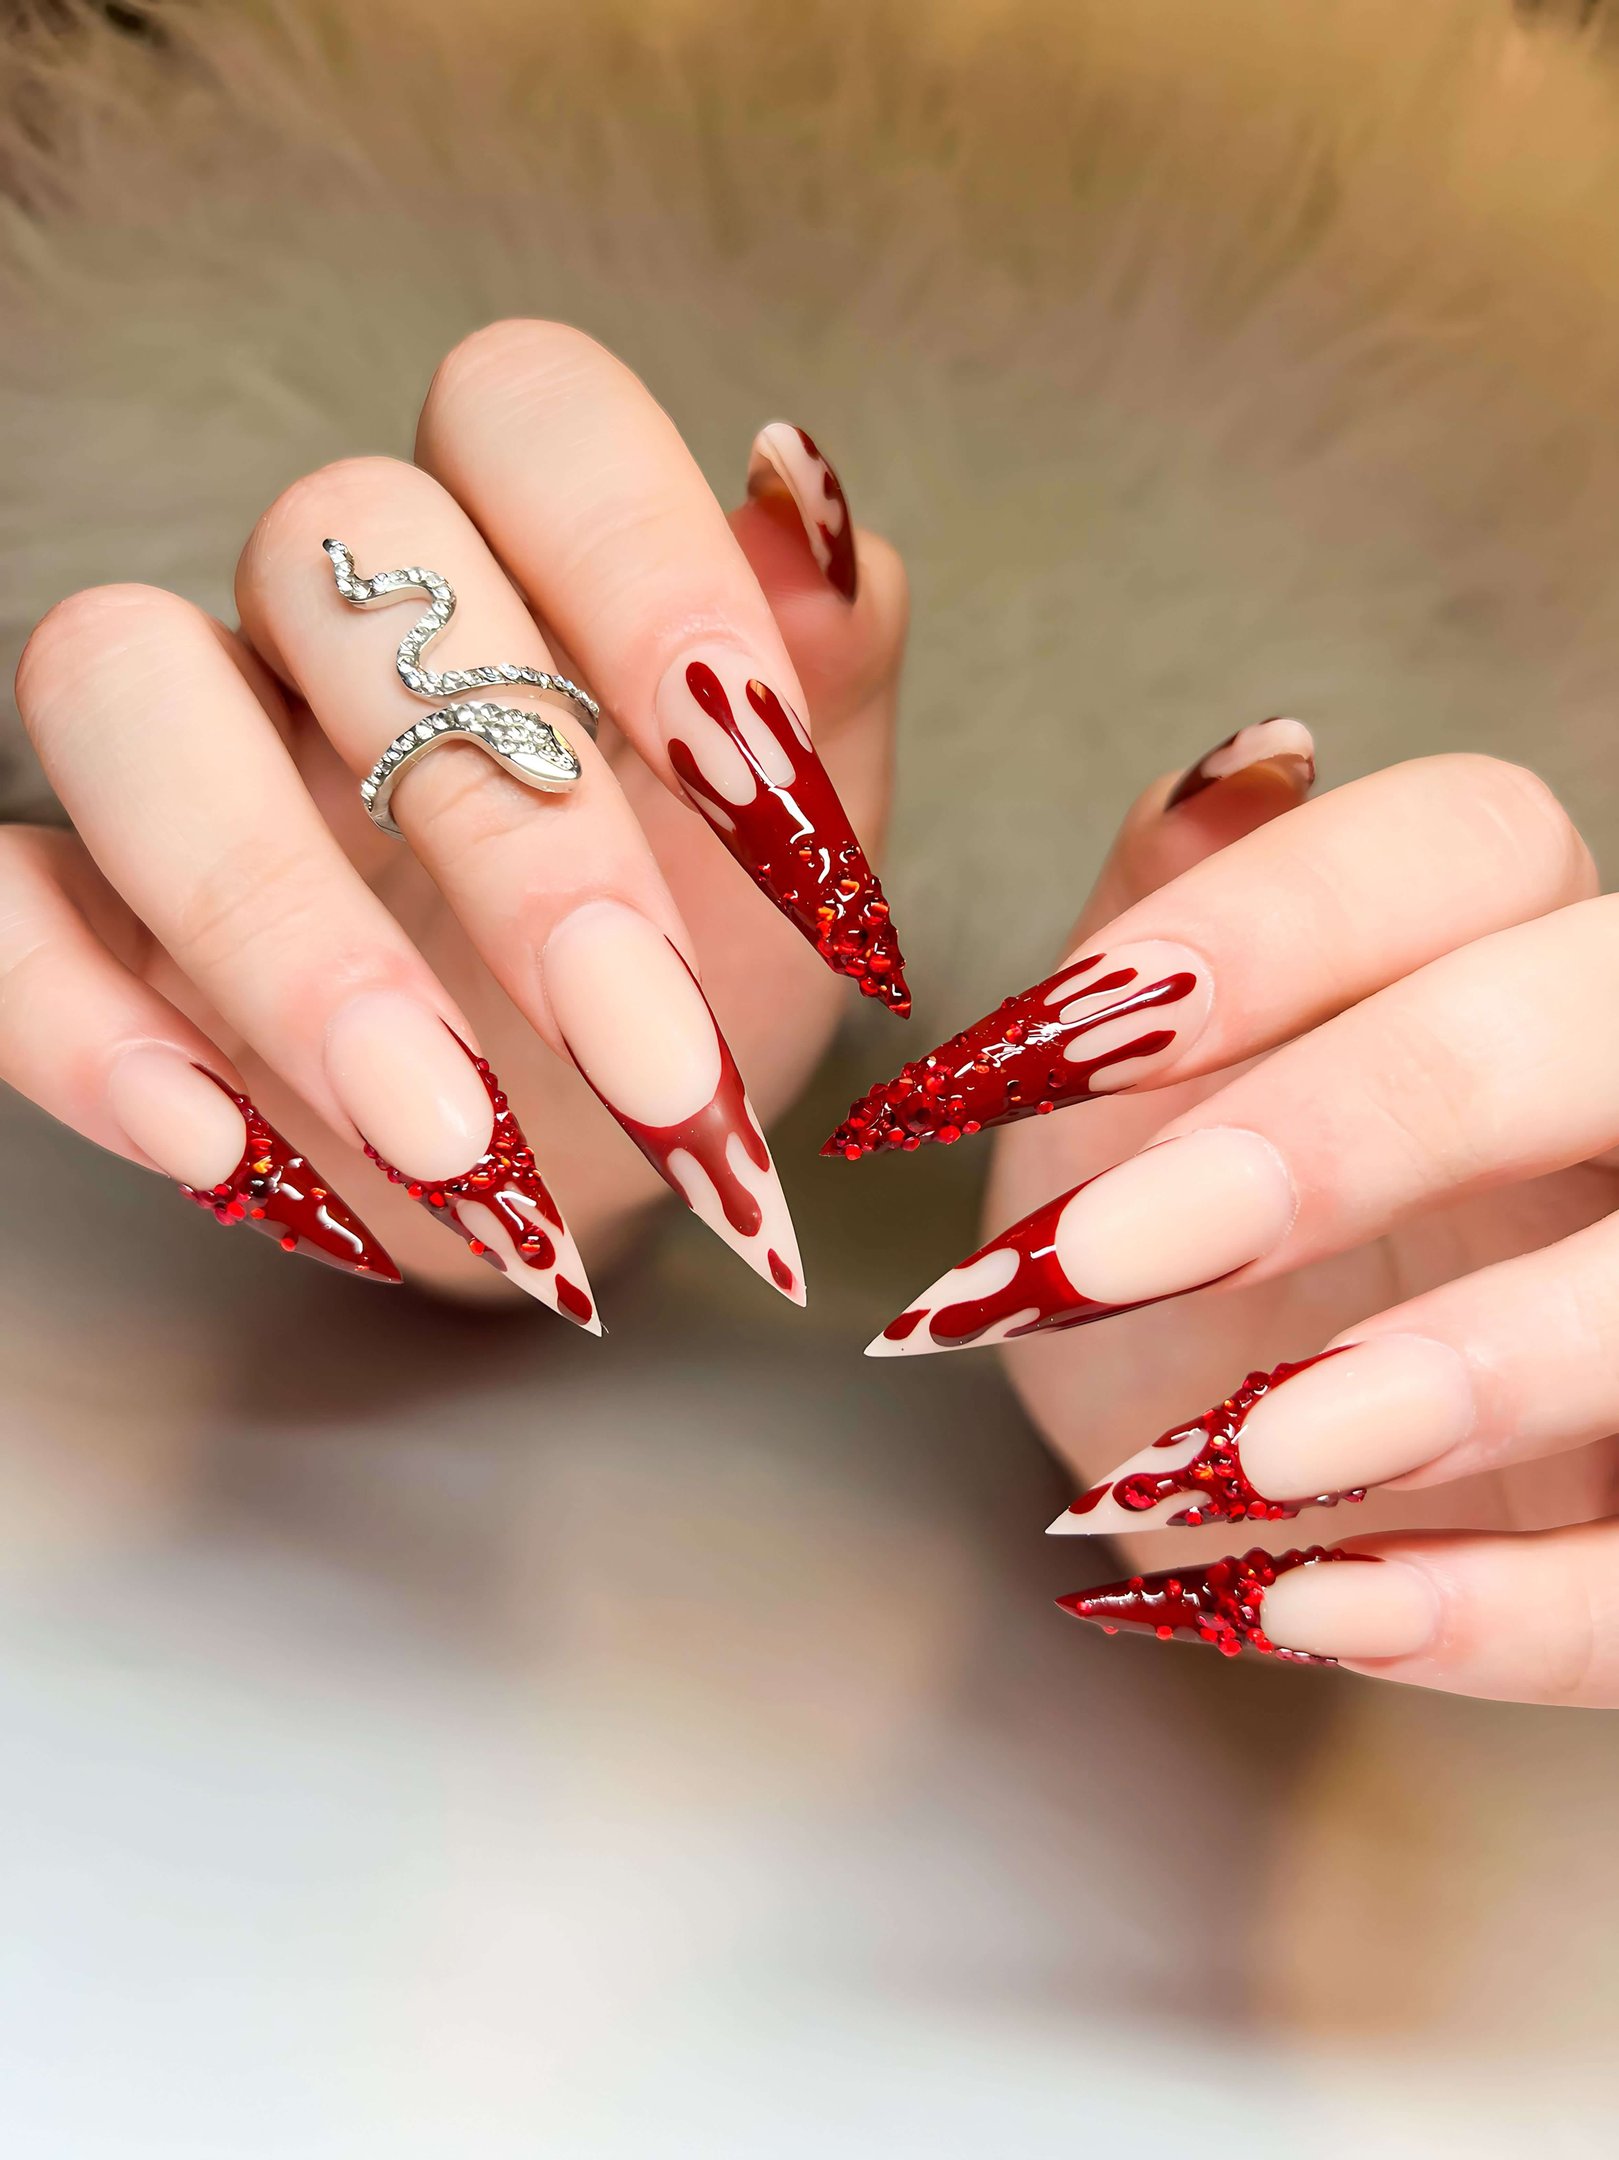
8. Red Drip Halloween Nails with Sparkling Accents
Perfect for spooky season, these striking stiletto nails feature blood-red drip designs and sparkling details. A fierce choice for anyone embracing the darker side of fall nail art.
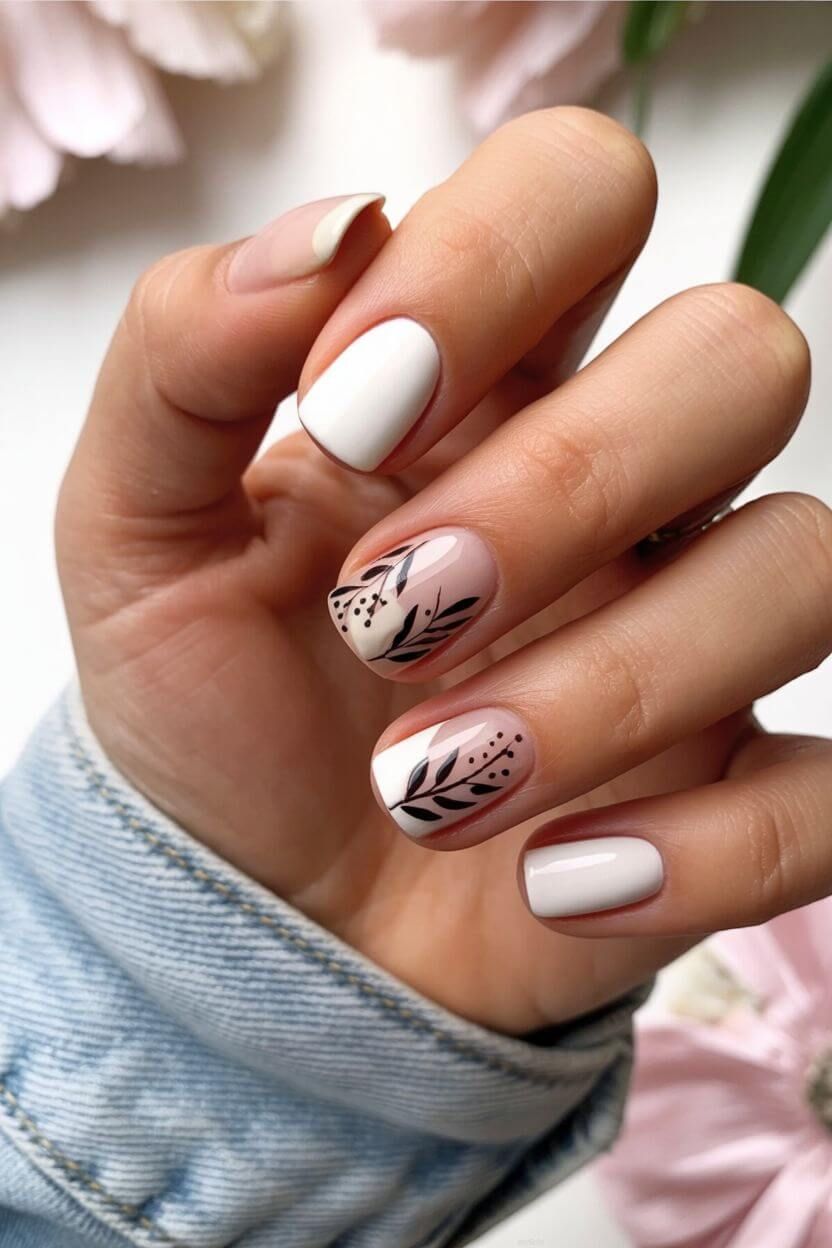
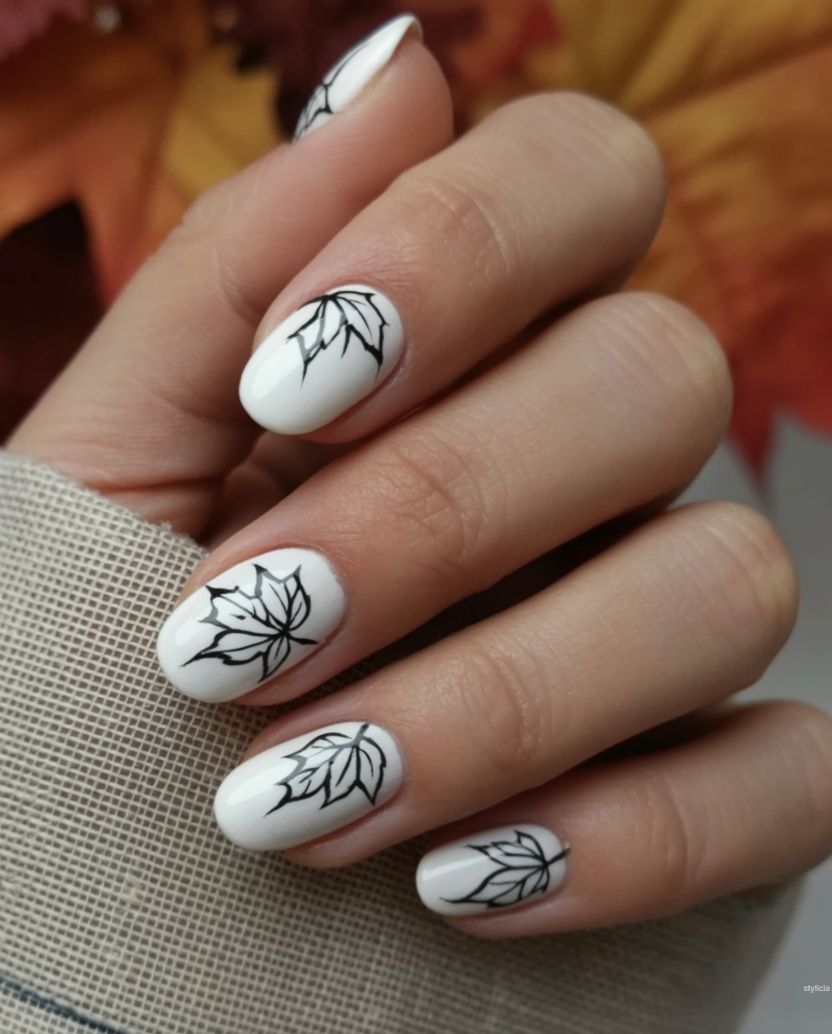
9. Minimalist Black and White Fall Nails with Botanical Line Art
These clean white nails with fine black leaf line art are perfect for minimalists who still want seasonal flair. A timeless option that pairs beautifully with any fall outfit. These autumn nail designs never go out of style.
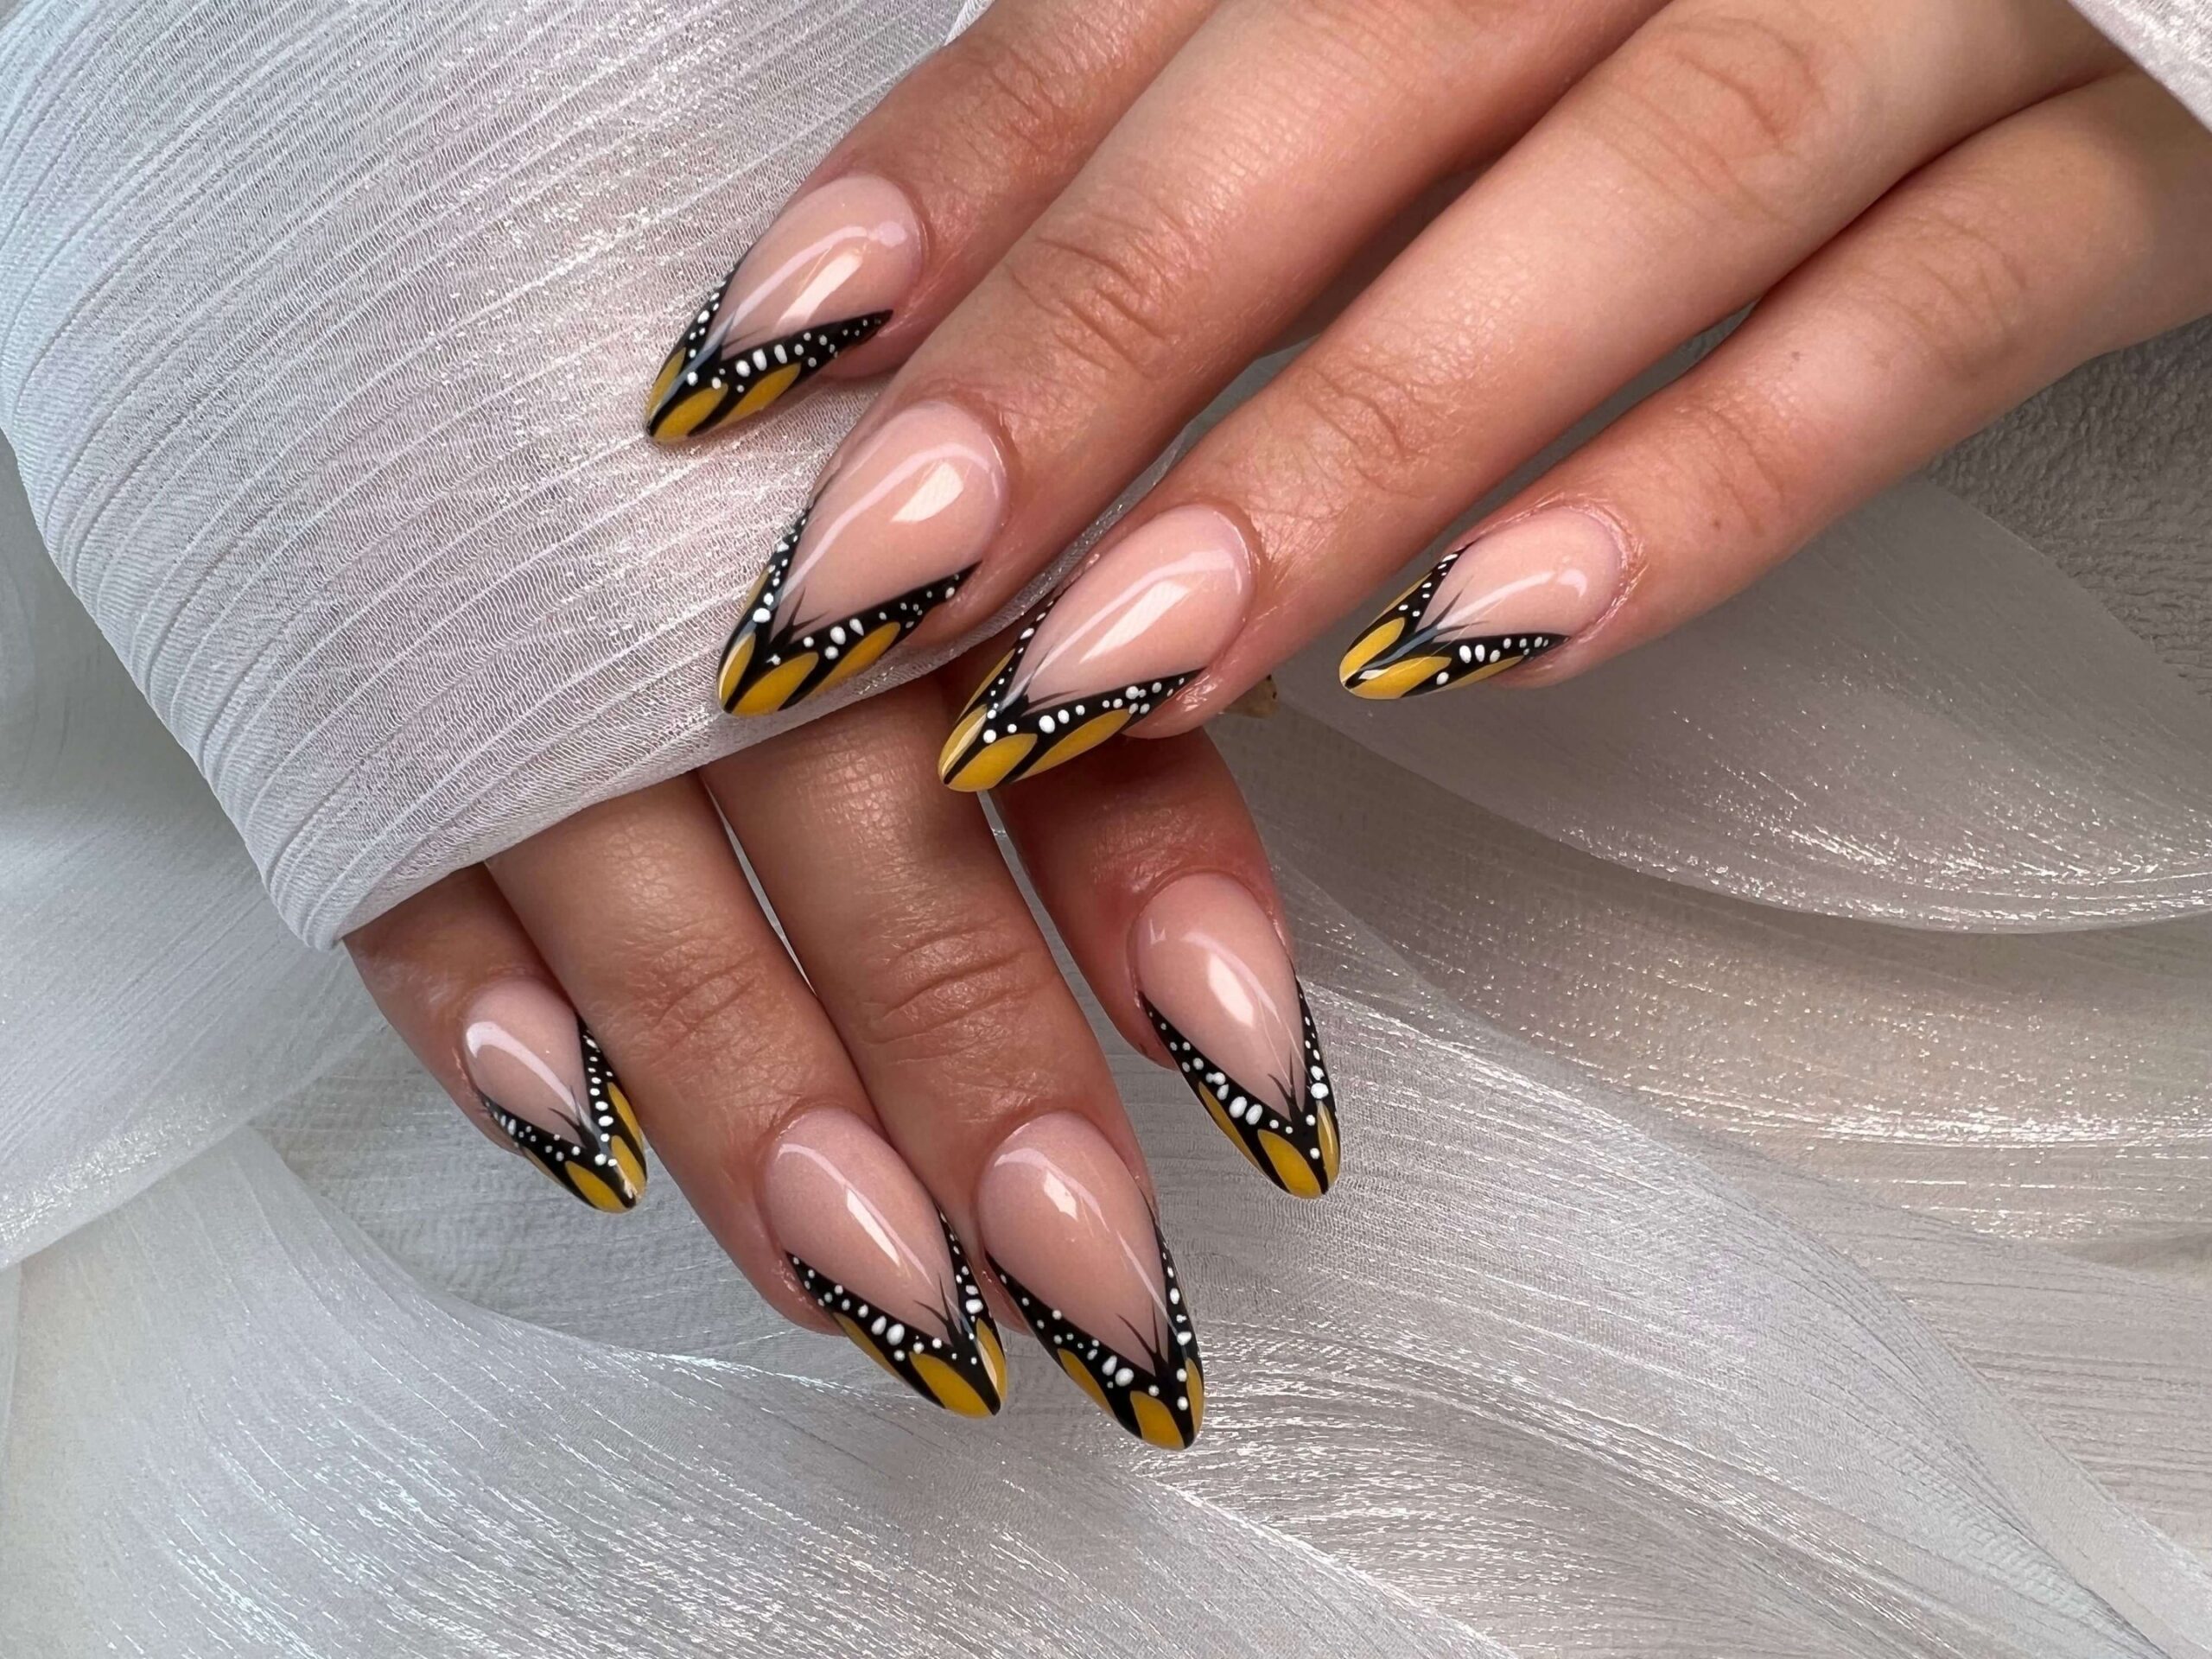
10. Nude and Silver Glitter Fall Nails with 3D Butterfly Accents
Add a bit of sparkle to your autumn with these nude nails featuring silver glitter tips and stunning 3D butterfly accents. Perfect for holiday parties or when you want something extra special.
11.Black and White Spiderweb Fall Nail Design
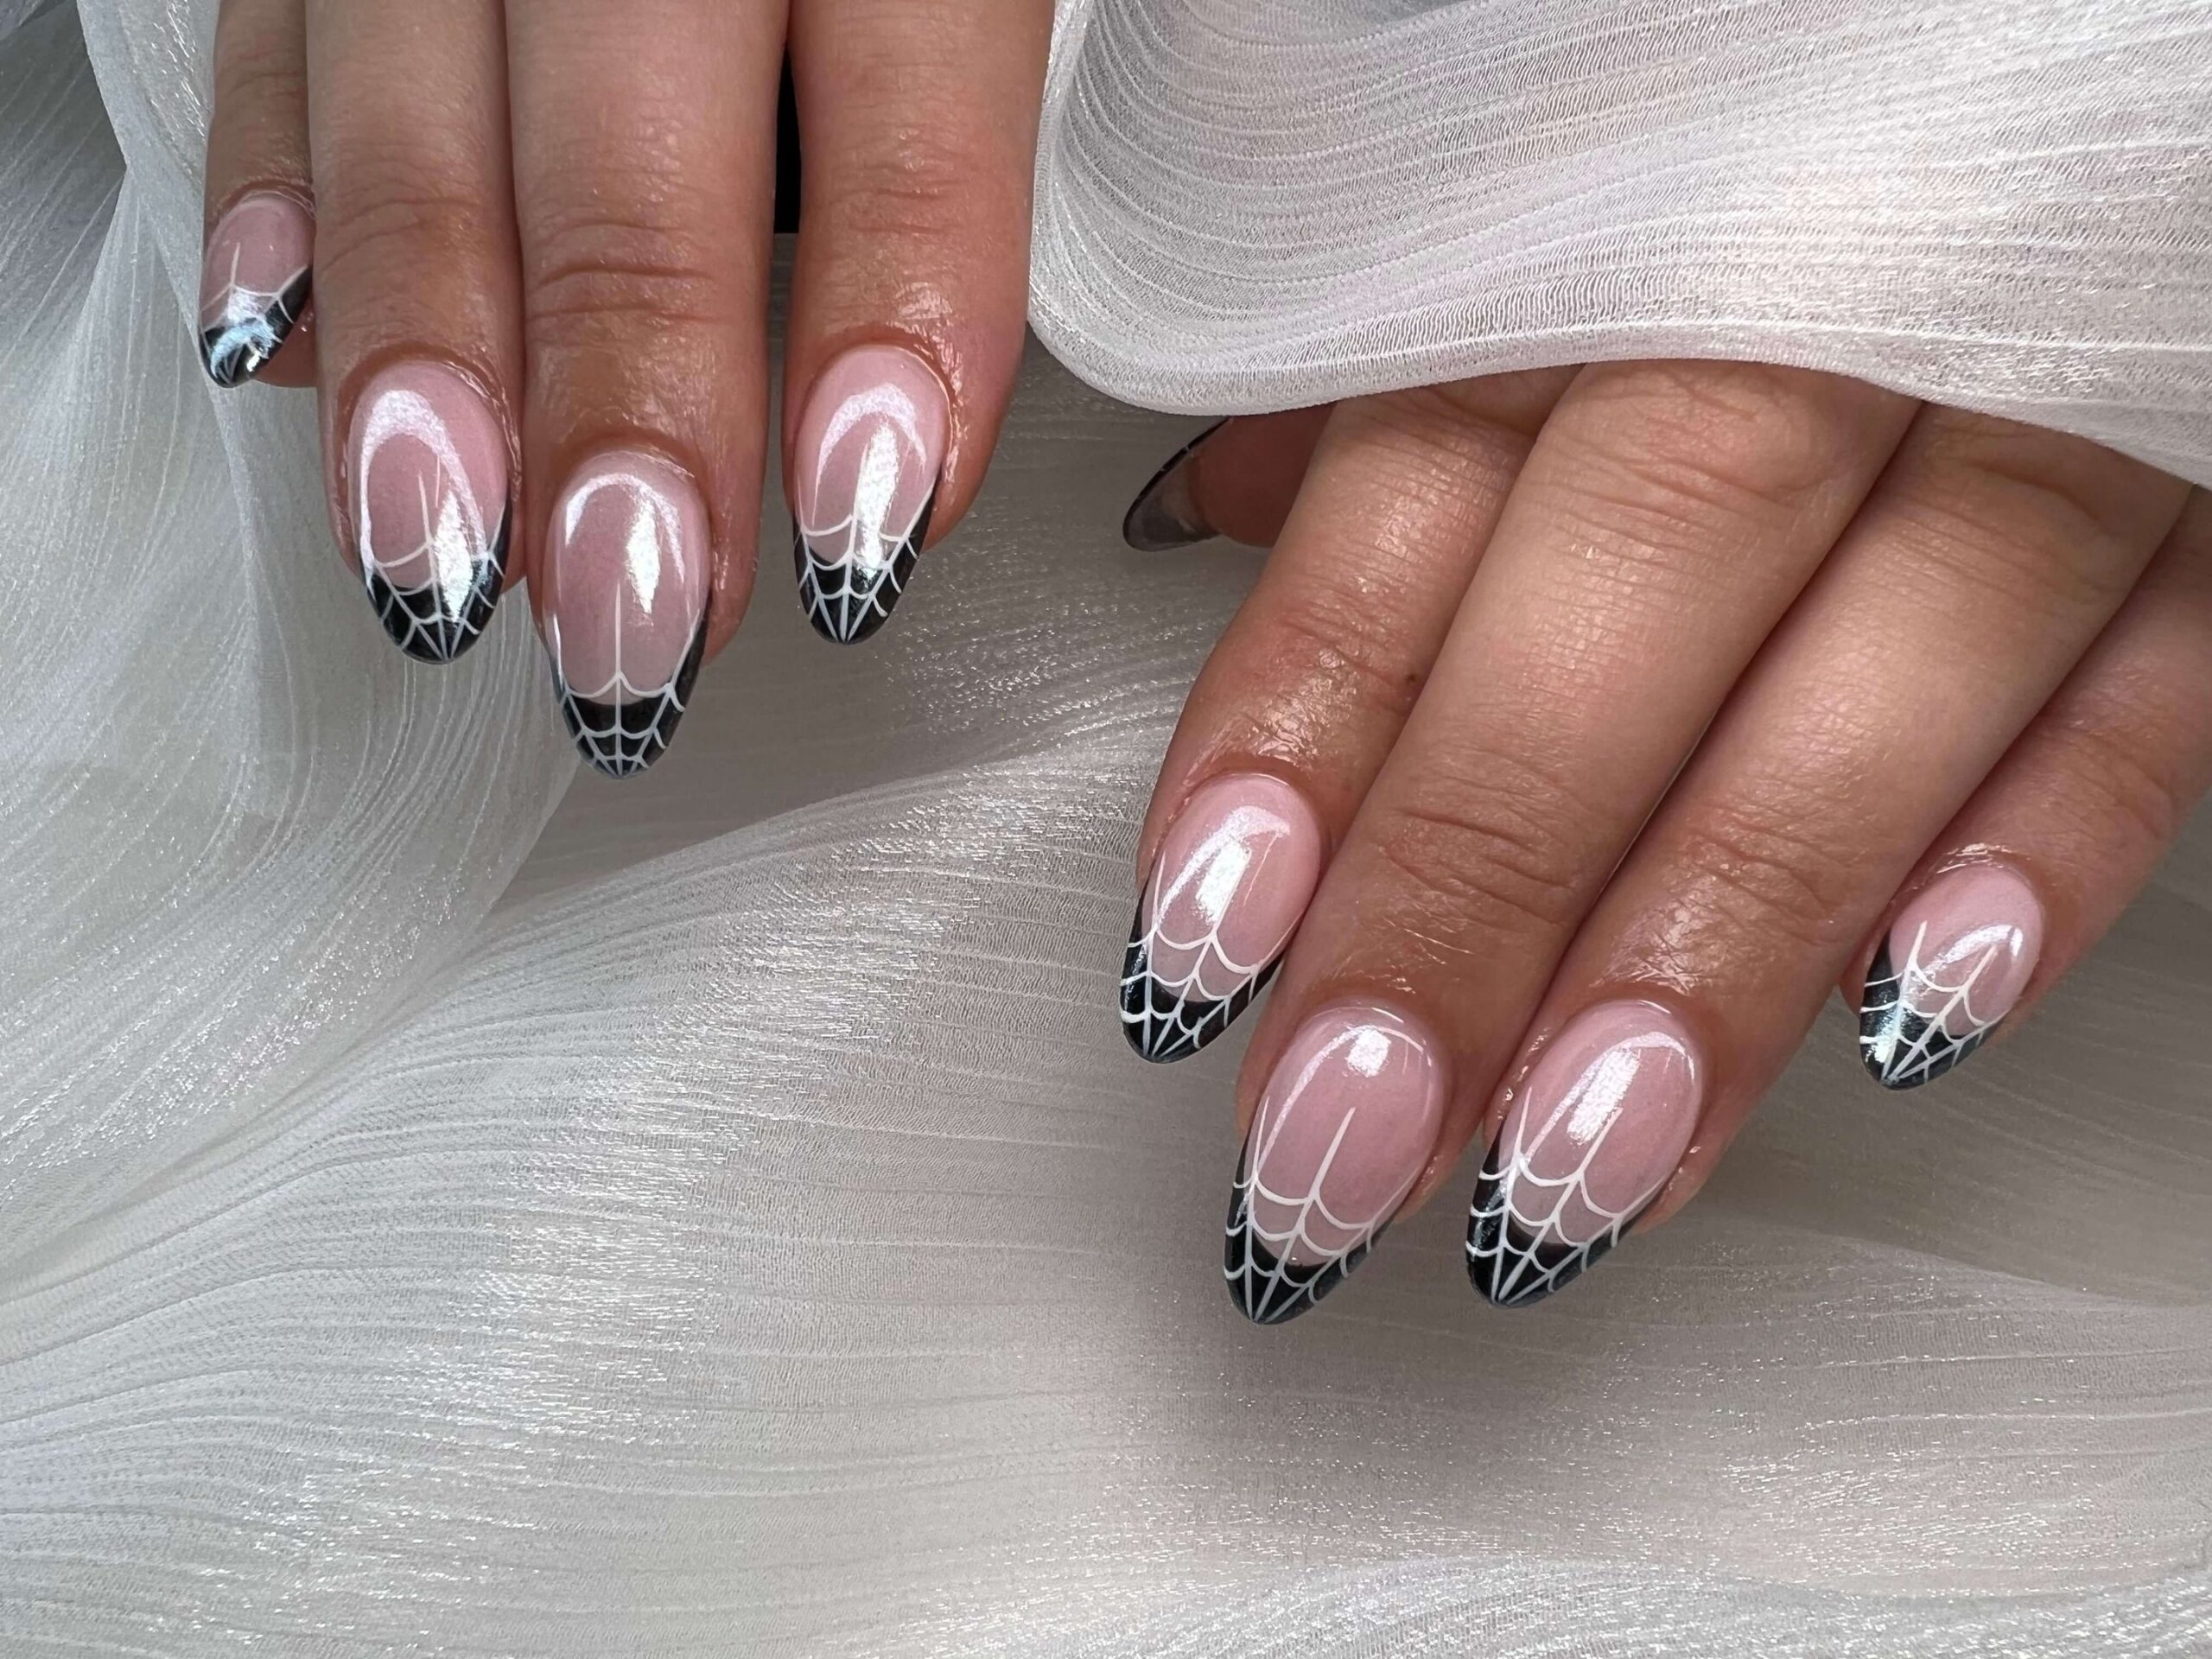
Ideal for Halloween or anyone loving spooky season aesthetics, these black and white spiderweb tips bring a playful yet edgy vibe to classic almond-shaped nails.
Final Thoughts on Fall Nail Designs
When it comes to fall nail designs, there’s truly no reason to settle for boring. From earthy brown shades with subtle leaf art to dramatic jewel tones, Halloween-inspired details, and modern minimalist line art, the options for autumn nails are limitless.
Your manicure can (and should!) reflect the cozy, creative, and colorful spirit of the season. Whether you love bold statement nails or understated neutrals with a hint of gold, these fall nail ideas prove that autumn is the perfect time to play with color, texture, and art.
Save your favorite photos from this post and bring them to your next nail appointment! See more at Nails Magazine.
Experiment with cozy, rich shades and unique fall nail art to match your autumn outfits. More ideas on Stylicia.
Don’t forget to share your fall manicure looks with us—we’d love to see how you make these ideas your own!

I’ll be honest with you. My relationship with pumpkin smoothies wasn’t always love at first sip. I used to think of them as overly sweet, or worse—artificially spiced, a poor imitation of real pumpkin pie. But something about those warm fall flavors kept tempting me back.
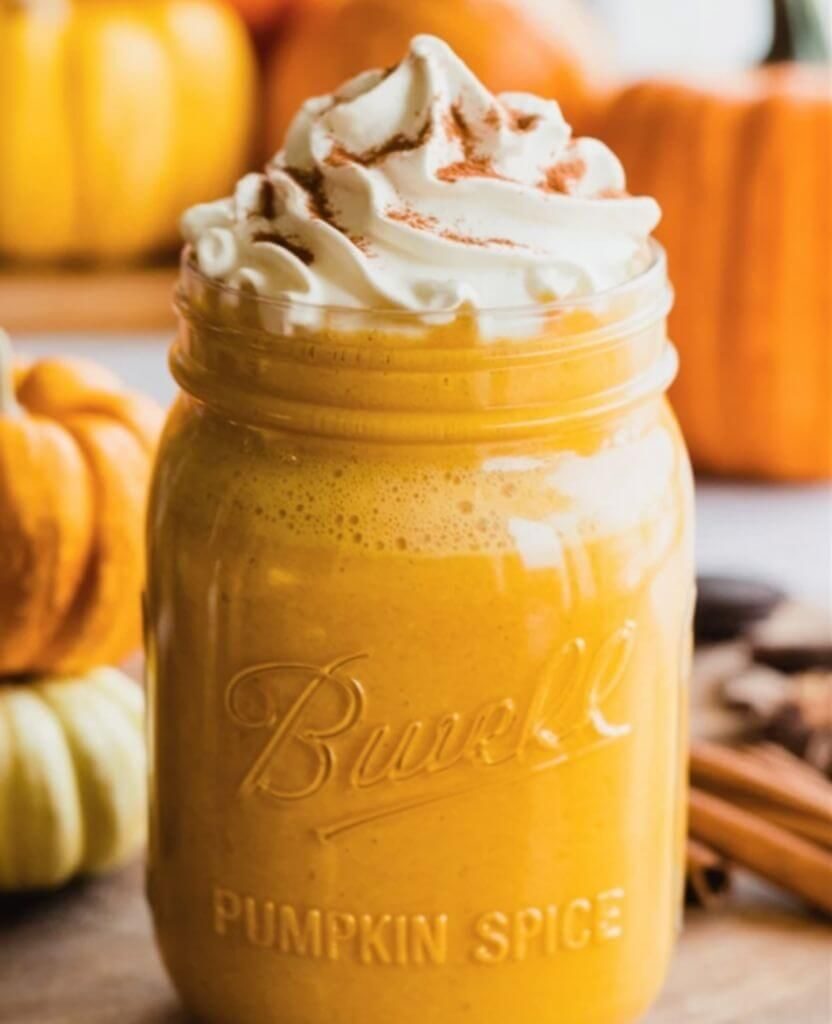
It wasn’t until I made my own Easy Pumpkin Smoothie at home that everything changed. Creamy, lightly sweetened with real maple syrup, packed with pumpkin puree and those classic pumpkin pie spices—this is autumn in a glass. Ready in just 5 minutes, dairy-free, and 100% plant-based.
Why You’ll Love This Pumpkin Smoothie
Perfect Fall Flavour: Tastes just like pumpkin pie but in smoothie form!
Quick & Easy: 5-minute recipe with simple, real-food ingredients.
Dairy-Free & Vegan: Made with almond milk and dairy-free yogurt for a creamy, plant-based treat.
Healthy & Wholesome: Packed with fibre, vitamins, and naturally sweetened with real maple syrup.
Ingredients You’ll Need

1 frozen banana (adds natural sweetness and creaminess)
2/3 cup pumpkin puree (not pie filling)
1/2 cup dairy-free plain yogurt (or vanilla for extra flavour)
1/4–1/2 cup unsweetened almond milk (or other plant-based milk)
2–4 tbsp real maple syrup (adjust to taste)
1/2 tsp pumpkin pie spice
1/4 tsp cinnamon
Handful of ice cubes
Dairy-free whipped cream and cinnamon stick for topping (optional)
Nutrition Breakdown (Per Serving)
(Approximate values)
Calories ~ 200–250 kcal
Protein 4–6 g
Fat 5–7 g
Carbohydrates 35–40 g
Sugar ~15–20 g (from banana, maple syrup)
Fibre 4–5 g
Naturally gluten-free. Fully vegan when using plant-based milk and yogurt.
How to Make Your Pumpkin Smoothie (Step-by-Step)
- Step 1: Gather Your Ingredients : Make sure your banana is frozen for that thick, creamy texture.
- Step 2: Blend It Up: Add the pumpkin puree, frozen banana, dairy-free yogurt, almond milk, maple syrup, pumpkin pie spice, cinnamon, and ice cubes to a high-speed blender.
- Step 3: Adjust & Taste: Blend until smooth and creamy. Taste and add extra maple syrup or almond milk if needed for sweetness or consistency.
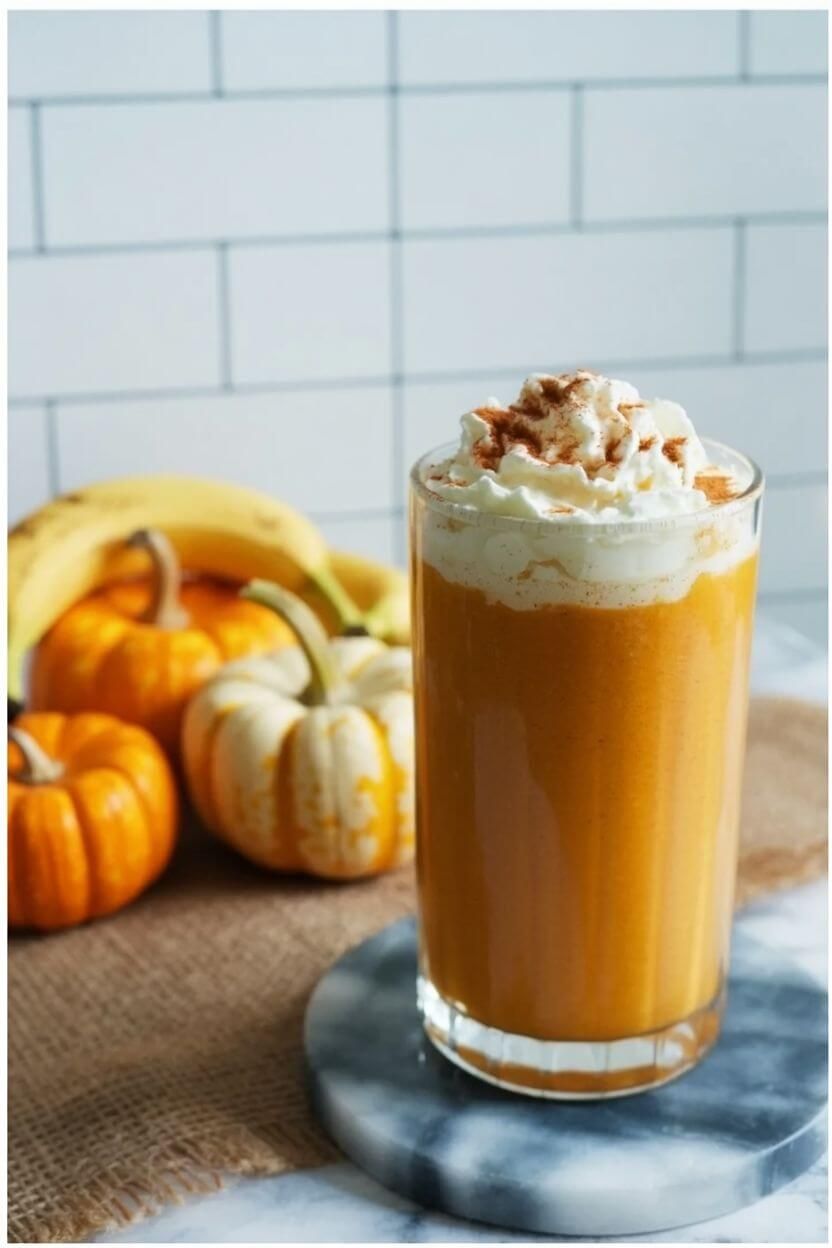
- Step 4: Pour & Top: Pour into your favourite glass. Top with dairy-free whipped cream, a sprinkle of cinnamon, or even a cinnamon stick for that cozy fall vibe.
Tips for the Perfect Pumpkin Smoothie
Freeze Ahead: Store pumpkin puree in ice cube trays for easy blending.
Make It Creamier: Add extra frozen banana or a bit more dairy-free yogurt.
Add Protein: Boost with a scoop of vegan protein powder or collagen (if not vegan).
Spice It Up: Add extra cinnamon, nutmeg, or ginger for a bolder pumpkin spice kick.
Serve Cold: Always use ice cubes and serve immediately for the most refreshing fall smoothie.
Variations You’ll Love
Pumpkin Pie Smoothie Bowl: Pour into a bowl and top with granola, nuts, or coconut flakes.
Iced Pumpkin Smoothie: Blend with extra ice for a super-chilled drink.
Coconut Pumpkin Smoothie: Use coconut milk for a rich, tropical twist.
Pumpkin Protein Shake: Add vanilla protein powder for a post-workout treat.
Pumpkin Latte Smoothie: Add chilled coffee or a shot of espresso for a pumpkin spice latte vibe.
Frequently Asked Questions about Pumpkin Smoothie Recipes
Can I make it ahead of time?
You can prep the ingredients ahead and freeze them in bags, but for the best texture, blend fresh.
Is this smoothie vegan?
Yes! Just use plant-based milk and yogurt.
Can I use pumpkin pie filling?
No—stick with pure pumpkin puree to control sweetness and spice.
How do I make it sugar-free?
Skip the maple syrup or swap for monk fruit/stevia.
Does it have caffeine?
Not unless you add coffee! Enjoy it as a caffeine-free fall drink.
Can I make a pumpkin smoothie without banana?
Yes! If you prefer a banana-free pumpkin smoothie, you can use Greek yogurt, avocado, or even soaked oats to add thickness and creaminess without altering the flavour too much.
Is pumpkin smoothie good for breakfast?
Absolutely! A pumpkin smoothie is a healthy breakfast option, packed with fibre, vitamins, and warm fall flavours. Adding protein powder, nut butter, or oats makes it even more filling and energising.
Pin It, Save It, Sip It
If you’re as obsessed with fall flavours as I am, this Easy Pumpkin Smoothie is a must-try. It’s simple, healthy, and brings all those cozy pumpkin pie vibes straight to your glass. Don’t forget to tag @stylicia in your beautiful pumpkin creations!
Stay cozy!
")
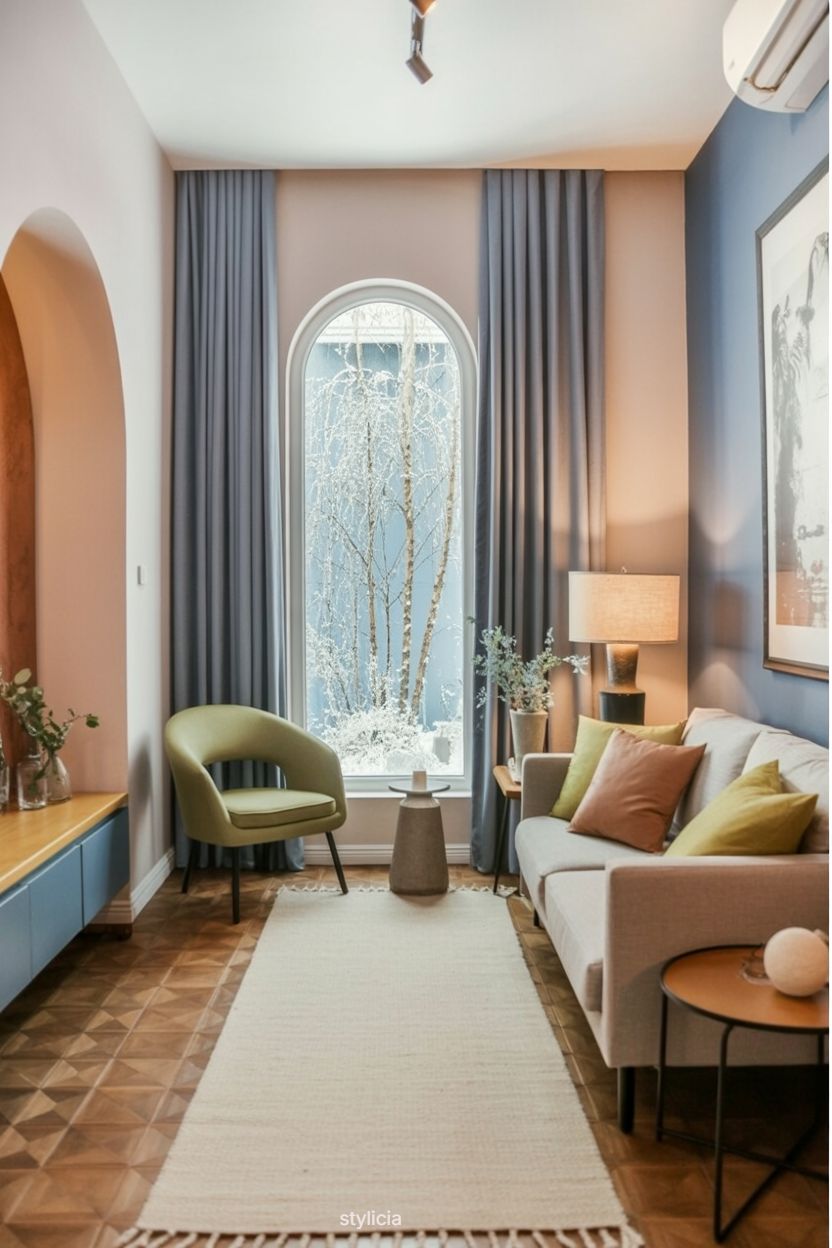
Let’s be real: a narrow living room can easily feel like nothing more than a fancy hallway with a sofa tossed in. Whether you’re dealing with a long rectangle living room, a family room design that’s weirdly off-centre, or a small apartment that’s short on space—it all leads to the same question:
How do you make it look good, feel welcoming, and actually work—without tripping over the coffee table every time you cross it?
Maybe it seems too cramped. Maybe you’re doing the sideways shuffle between chairs to get to the kitchen. Or even if you have a wider living room layout, it might still feel disconnected or awkward.
Sound familiar? You’re definitely not the only one.
Good News: No Need to Tear Down Walls
Here’s the thing—gorgeous living room design doesn’t have to mean gutting the place or spending your whole budget on renovations. It’s really about smart furniture placement, intentional styling, and breaking the space into zones that actually work for you.
That’s exactly what we’re diving into next.
1. Zoning Tricks for Narrow Living Rooms – Divide and Conquer
Think zoning is only for huge open-plan homes? Nope. Even the narrowest living room layouts can feel totally transformed by splitting them into clear, purposeful areas.
Here’s how to do it:
Create obvious “zones” like a lounging area, reading corner, or even a tiny workspace.
Position your sofa or sectional to act as a subtle divider without blocking sightlines.
Use area rugs to mark out each section visually.
Add a console table behind the sofa with a lamp or books for separation without walls.
Tuck accent chairs into corners to make cosy conversation spots.
Why it’s great:
Avoids that single, awkward sea of furniture.
Lets you make the most of every bit of your narrow floor plan.
Works beautifully for family room designs that need to serve multiple activities.
Style tip: Use layered lighting—a pendant over the lounge, a floor lamp for reading, wall sconces for a warm vibe.
2. The Floating Sofa Move – Stop the Hallway Look
If your narrow living room feels like a bowling lane, you’re not imagining it. Pushing everything against the walls might seem like it creates space, but usually it just exaggerates the long, tunnel effect.
Solution? Pull your sofa forward.
How to do it:
Place the sofa away from the wall, facing your media console, fireplace, or feature wall.
Add a slim console table behind it for style and function.
Anchor the whole seating area with a rug big enough to hold all the main pieces.
Balance it with accent chairs opposite, or a single chair with an ottoman.
Why it helps:
Breaks up that long corridor vibe.
Creates a more inviting, unified seating zone.
Improves circulation, so you can move naturally around the room.
Extra tip: In a wide living room that still feels disjointed, use this setup to split it into two zones—like a snug lounge and a reading nook or work area.
3. Multi-Functional Narrow Living Room – Make Every Inch Count
Modern living rooms often have to do it all: workspace, gym, playroom, movie zone. That’s even more true in small apartments or narrow living rooms.
But you don’t have to sacrifice style to fit everything in.
Try this:
Dedicate one end to the main lounge zone with a slim sofa, area rug, coffee table, and wall-mounted TV.
Use a bookshelf, console, or screen to carve out a mini office or hobby corner.
Make the most of unused corners with desks, reading chairs, or storage benches that double as extra seating.
Opt for closed storage to keep clutter hidden.
Tie it all together with a consistent palette of colours, art, and lighting.
Why it works:
Supports multiple activities without looking messy.
Keeps the main seating area relaxing and tidy.
Perfect for small apartments or open layouts where space is precious.
Bonus: Consider wall-mounted fold-down desks for tight spots, and mark out your mini office with a small rug and a comfy chair.
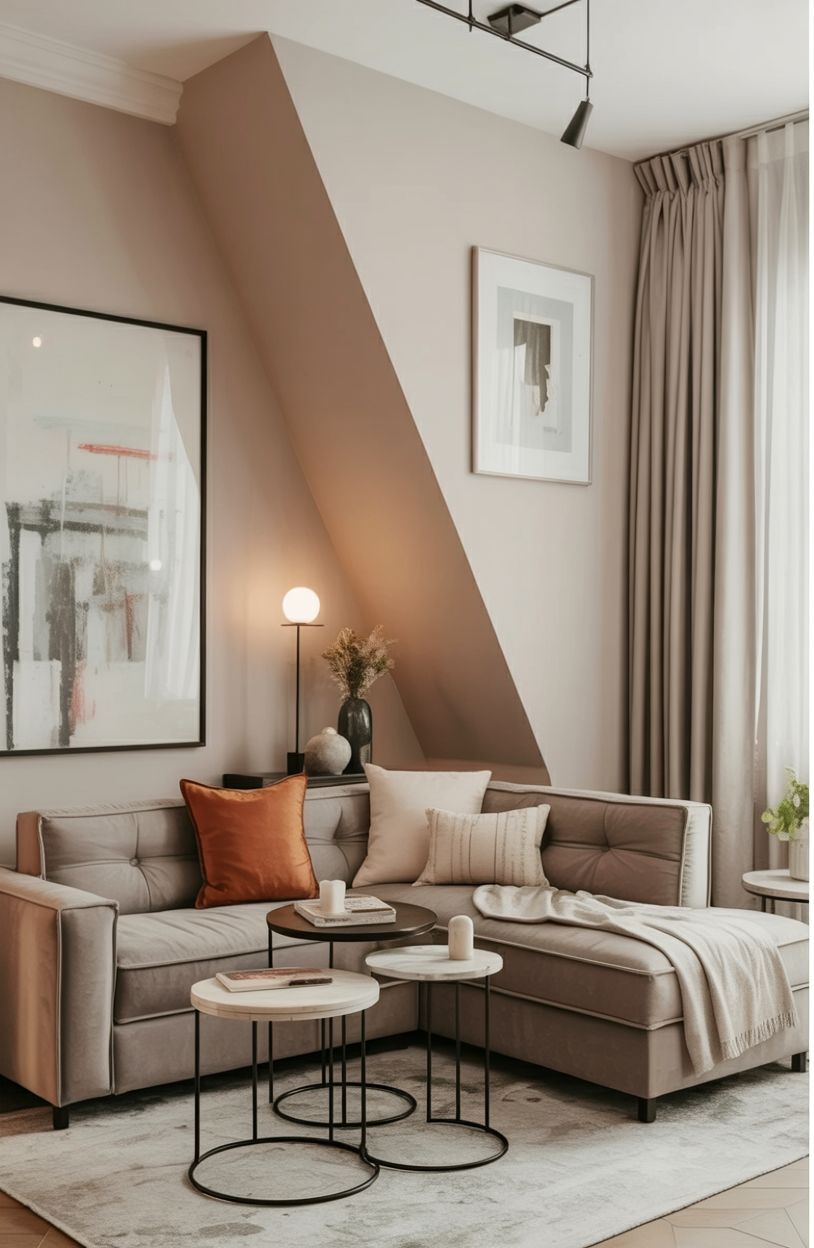
4. Slim + Chic Narrow Living Room – Small-Scale, Big Impact
Just because your living room is small doesn’t mean it has to be boring or cramped. The key is choosing scaled-down pieces that still have personality and comfort.
How to nail it:
Go for a loveseat or apartment-sized sofa (under 72″ is great).
Pick armless chairs, low-profile pieces, or even built-in benches with cushions.
Swap a big coffee table for a round or nesting option.
Mount the TV on the wall to save floor space.
Hang curtains high and wide to make ceilings look taller.
Add mirrors to reflect light and visually expand the space.
Why you’ll love it:
Makes smart use of every square foot.
Gives you a modern, uncluttered feel.
Keeps things cosy and welcoming without overcrowding.
Styling idea: A tall leaning mirror or a gallery wall of small mirrors bounces light around and adds depth.
5. Symmetrical Layout for Square or Awkward Rooms – Balance Is Everything
Square living rooms can feel boxy or off-kilter. The fix? Embrace symmetry and build around a clear focal point.
Here’s how:
Place a large area rug in the centre.
Arrange your sofa or sectional opposite a pair of accent chairs for a U-shaped setup.
Choose a round coffee table to soften angles.
Mount the TV or artwork centrally with a slim console below.
Use matching side tables or twin lamps to reinforce balance.
Why it works:
Draws the eye to the middle instead of pushing everything to the edges.
Feels cohesive, comfortable, and proportioned.
Works with both minimalist and decorative styles.
Pro tip: If you have an off-centre fireplace or odd windows, just shift your setup slightly while keeping the symmetrical feel.
6. Prioritise Flow – Easy Pathways in a Narrow Living Room
If you’re constantly squeezing past tables and chairs just to get through your living room, it’s time to rethink the traffic flow.
A clear path can make the whole room feel bigger.
How to plan it:
Identify the main entry and exit points (hallway, kitchen, stairs).
Aim for a walkway that’s at least 24–30 inches wide.
Float or angle furniture to one side to open up movement.
Pick open-back or leggy pieces to keep things light and airy.
Choose multifunctional furniture like storage ottomans or slim tables with hidden compartments.
Why it matters:
Improves how you move through the space without losing seating.
Prevents the “obstacle course” vibe.
Especially good for small apartment living rooms where every inch counts.
Styling tip: Lay down a narrow runner to highlight the path and visually tie the room together.
7. Embrace the Quirks – Make Awkward Narrow Living Rooms Work for You
Got weird angles, sloped ceilings, strange columns, or windows in the wrong place? Join the club.
Instead of fighting it, lean in.
Try this:
Watch how people naturally move through the room and let that guide your setup.
Don’t be afraid of angled furniture to suit unusual walls.
Use corner sectionals or L-shaped sofas to balance tricky features.
Choose flexible pieces like nesting tables, ottomans, and stools.
Mount your TV on a swivel arm or create a changeable gallery wall.
Why it works:
Turns “problem” features into highlights.
Encourages full use of the space.
Ideal for open plans, multi-use rooms, or long narrow living room layouts with odd transitions.
Extra tip: Hang floor-to-ceiling curtains—even over weird windows or blank walls—to soften lines and create a calm, cohesive look.
Final Thoughts – Love Your Narrow Living Room
Designing a narrow living room doesn’t have to feel like solving a puzzle with missing pieces. The truth is, these so-called “challenging” spaces have tons of potential to become your favourite spot at home.
By breaking things into zones, floating your sofa, choosing the right scale of furniture, and making sure there’s good flow, you can transform even the trickiest layout into something beautiful, comfortable, and functional.
Remember—it’s not about having a giant open-plan space, but about using what you have with intention. Don’t be afraid to experiment, move things around, and let your style shine through every corner.
If you enjoyed these layout secrets, don’t miss our fall home decor ideas that will bring a cozy vibe to your living space.
Happy decorating!
")
Dreaming of a Pinterest-perfect wedding without the $30,000 price tag? You’re not alone. The truth is, you don’t need a fortune to have a gorgeous celebration—just a few affordable wedding hacks that make your big day look elegant, meaningful, and unforgettable. From DIY Dollar Tree wedding ideas to budget-friendly styling tricks, it’s all about creating a celebration that feels like a million bucks, without spending it.”
Today I’m sharing my favorite affordable wedding hacks—all built around creative, budget-friendly Dollar Tree wedding ideas. So grab a notebook (or your Pinterest board) and get ready to save these cheap wedding hacks that deliver affordable elegance for your big day.
Why Choose Budget-Friendly Wedding Hacks?

Let’s start with a truth: Wedding planning can be stressful. Costs spiral, emotions run high, and every vendor seems to want a blank check.
But affordable doesn’t mean ugly or boring. It just means creative.
With Dollar Tree wedding ideas, you can achieve affordable elegance—making every detail look thoughtful, personal, and high-end while spending just a few dollars.
These wedding hacks are about resourcefulness, DIY charm, and adding your personality to every element.
1. DIY Centerpieces That Wow
Forget $300 floral arrangements.
Dollar Tree wedding hacks for centerpieces:
Glass vases
Faux flowers (roses, peonies, eucalyptus)
Decorative stones
Candles in glass votives
Burlap or lace wraps
Styling tip: Combine white faux flowers and decorative stones in a clear vase. Add tealight candles for a warm glow.
Rustic touch? Wrap the vase with burlap or lace.
Pro Tip: Customize with your wedding colors using ribbons from Dollar Tree.

2. Thoughtful Wedding Favors on a Budget
Personalized wedding favors don’t have to cost $5 each.
Try these cheap wedding hacks:
Mini mason jars filled with candy or homemade bath salts
Custom labels with your names and date
Tiny gift boxes with candles or soap
Dollar Tree has all of these supplies—and your guests will love the personal touch.
Pro Tip: Add a thank-you card or note inside for extra charm.

3. Stunning Reception Table Decor Ideas
You don’t need to rent fancy chargers or designer linens.
Dollar Tree reception hacks:
Metallic or patterned chargers
Simple white dinner plates
Tealight candles
Small faux greenery
Set the mood with elegant napkins, simple silverware, and cohesive colors.
Styling note: Keep the palette neutral with pops of green and metallics for a polished, sophisticated vibe.

4. Creating a Beautiful Wedding Arch on the Cheap
Your ceremony photos deserve a gorgeous backdrop.
DIY Dollar Tree wedding arch supplies:
Faux flowers in your colors
Soft tulle fabric
String lights
Greenery accents
Wrap these around a basic frame.
Pro Tip: Use floral wire for secure placement. Choose complementary colors for a cohesive theme.

5.Affordable Bridal Party Gifts
Show your gratitude without maxing out your credit card.
Dollar Tree wedding hacks for gifts:
Small gift bags or boxes
Spa essentials (nail polish, bath salts, candles)
Personalized thank-you cards
DIY jewelry holders
Pro Tip: Use Dollar Tree’s crafting supplies to make matching drink tumblers or monogrammed gifts.

6. Stylish Seating Cards and Holders
Affordable elegance:
Mini picture frames as place card holders
Custom labels with guest names
Cardstock and calligraphy pens
Pro Tip: Add decorative stickers or tiny faux flowers for a personalized finish.

7. Eye-Catching Wedding Signage
Guide your guests beautifully.
Dollar Tree wedding signage hacks:
Chalkboards with white paint markers
Poster boards for welcome signs
Picture frames for table numbers or instructions
Photo booth props
Pro Tip: Coordinate signage styles with your overall theme for a cohesive look.

9. Dessert Table Displays on a Dime
Affordable, Pinterest-worthy display:
Tiered trays for cupcakes and cookies
Glass jars filled with candy
Cake stands for height variation
Faux flowers and string lights
Styling note: Add fabric runners or burlap for a rustic look, or keep it sleek and modern with simple white linens.

10. Elegant DIY Candle Holders
Super simple wedding hacks:
Glass vases from Dollar Tree
Decorative gems
Floating candles or tea lights
Pro Tip: Mix gem colors to match your theme. Dim the lights for a romantic glow.

11. Elevated Place Settings with Dollar Tree Chargers
Budget-friendly wedding table ideas:
Metallic or patterned chargers
White plates
Folded napkins with ribbon napkin rings
Pro Tip: Use Dollar Tree faux flowers or greenery for personalized napkin holders.

12. Chic Mirror Table Numbers
Easy glam hack:
Small Dollar Tree mirrors
Metallic paint markers or stencils
Pro Tip: Position them to catch candlelight and add sparkle to your tablescape.

13. Adorable DIY Flower Girl Baskets
Affordable wedding idea:
Wicker baskets from Dollar Tree
Ribbon and faux flowers to decorate
Silk flower petals
Pro Tip: Match ribbon and flowers to your wedding palette for a cohesive aisle look.

14.Romantic Floating Candle Centerpieces
Dollar Tree supplies:
Cylinder glass vases
Water and floating candles
Rose petals or decorative gems
Pro Tip: Vary vase heights for extra visual interest.

15. Timeless DIY Bridal Bouquets
Wedding hacks for a lasting keepsake:
Faux flowers in your colors
Satin ribbon
Pearl or gem accents
Pro Tip: Use Dollar Tree’s selection to create a bouquet that’s affordable, customized, and will last forever.

16.Decorative Ribbon Chair Sashes
Simple, elegant detail:
Satin ribbon from Dollar Tree
Faux flowers or greenery
Pro Tip: Tie large bows for ceremony chairs or add flowers for extra dimension.

17. Quick Recap: How to Make Budget Wedding Dreams Come True
Use Dollar Tree wedding hacks for maximum savings.
Embrace DIY wedding ideas to add personal touches.
Focus on affordable elegance over expensive trends.
Choose cohesive color themes for a polished look.
Remember: It’s your day. Make it yours.
18. Bonus Pro Tips for Affordable Wedding Planning
Buy in bulk for major savings.
Combine rustic and modern elements for unique style.
Use Dollar Tree wedding signage to guide guests.
Customize everything—from seating cards to bridal bouquets.
Don’t forget the little details like mirror table numbers and floating candle centerpieces.
19. Pin-Worthy Inspiration: Save and Share!
Love these wedding hacks? Save this post for later!Share with friends planning their own weddings.Follow Stylicia for more budget-friendly wedding ideas, DIY wedding inspiration, and affordable elegance that turns your dream day into reality.
")
Have you ever watched the sunrise in a glass?
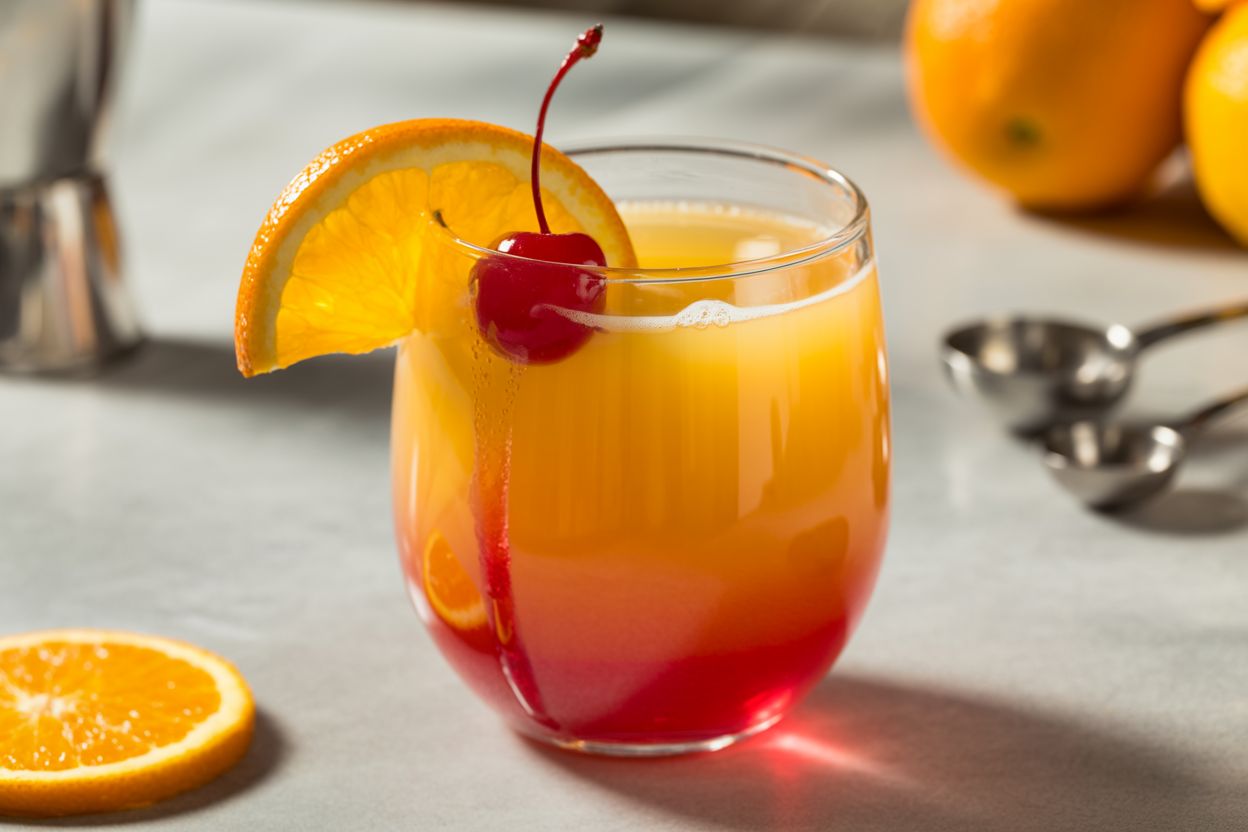
If you’re looking for a non-alcoholic sunrise that feels as magical as the real thing, this Sunrise Mocktail (Orange Juice Mocktail) is your new go-to. It’s family-friendly, sober-friendly, and perfect for inclusive beverage options at any party. Whether you’re hosting a brunch, planning a family-friendly party, or just want to sip something pretty on your patio, this Virgin Sunrise Mocktail has you covered.
Imagine the bright citrus of freshly squeezed orange juice, the rich red glow of grenadine syrup sinking in a perfect layered sunrise effect, and a fizzy splash of club soda to wake up your senses.
Ingredients
-
Ice (for that essential chill)
-
½ cup freshly squeezed orange juice (or your favourite orange juice)
-
¼ cup club soda (soda water works too)
-
1 tbsp grenadine syrup
-
Optional: splash of agave nectar for a touch of extra sweetness
-
Garnish: orange slice, maraschino cherry
Instructions
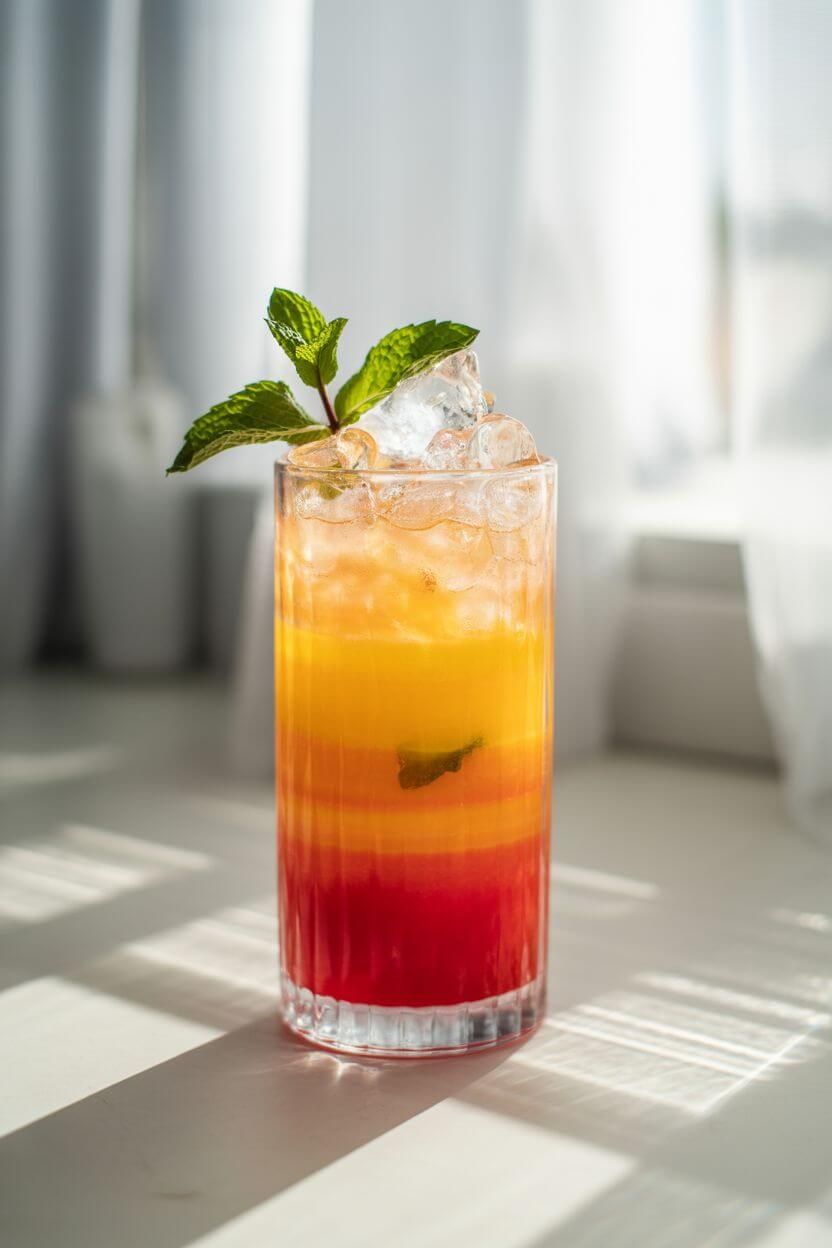
1️⃣ Fill a highball glass (or any tall, clear drinking glass) with ice.
2️⃣ Add club soda first for that refreshing fizz.
3️⃣ Pour in the orange juice slowly to layer over the soda.
4️⃣ Carefully drizzle the grenadine syrup over the back of a cocktail spoon so it sinks to the bottom, creating that signature ombré effect.
5️⃣ Garnish with a fresh orange slice and a maraschino cherry – on the rim or skewered on a cocktail stick.
Pro Tips for the Perfect Virgin Sunrise Mocktail
Use freshly squeezed orange juice
-
- for the brightest, most natural flavor.
Chill your glass in the freezer
- for a few minutes to keep your mocktail cold without watering it down.
-
Pour the grenadine slowly and carefully to keep those beautiful, layered sunrise bands intact.
-
Agave nectar adds a gentle sweetness that plays beautifully with the citrus.
-
Experiment with crushed ice for extra texture and a frosty finish.
-
Serve in clear glassware to really show off that gorgeous sunrise effect – it’s half the fun!
When to Serve This Non-Alcoholic Sunrise
This Sunrise Mocktail is made for daytime parties, relaxed afternoons, tropical-themed nights, and summer events. It’s perfect poolside, at family-friendly brunches, or as a house signature drink for sober friends who still want something special.
Cheers to beautiful moments, inclusive gatherings, and enjoying the sunrise any time of day!
FAQ About This Sunrise Mocktail (Non-Alcoholic Orange Juice Mocktail)
What is a Sunrise Mocktail?
A Sunrise Mocktail is a non-alcoholic drink inspired by the classic Tequila Sunrise. It layers orange juice, grenadine syrup, and club soda to create a beautiful ombré effect that looks just like a sunrise—without any alcohol.
Can I make this a Virgin Sunrise Mocktail for kids?
Absolutely! This Virgin Sunrise Mocktail is family-friendly and perfect for kids’ parties. It’s sweet, colourful, and feels festive without any booze.
What’s the difference between a Tequila Sunrise Mocktail and a regular Sunrise Mocktail?
A classic Tequila Sunrise uses tequila as the base spirit. A Tequila Sunrise Mocktail (non-alcoholic) skips the tequila entirely, using club soda or soda water to create the same layered look and refreshing taste, making it a true non-alcoholic sunrise.
Do I have to use freshly squeezed orange juice?
Freshly squeezed orange juice gives the best flavour, but store-bought juice works too! Choose one with no added sugar for a more balanced mocktail.
How do I get the perfect layered sunrise effect?
Pour grenadine syrup very slowly over the back of a cocktail spoon so it sinks gently and forms that signature ombré effect. If it mixes too much, just add a little extra orange juice on top.
Can I swap club soda for something else?
Yes! You can use sparkling water, soda water, or even lemon-lime soda if you want a sweeter, fizzy mocktail.
What garnishes work best?
We love a classic orange slice and maraschino cherry—either on the rim or skewered on a cocktail stick. It adds that retro cocktail-bar look and a pop of colour.
Is this mocktail good for parties?
Definitely! This Orange Juice Mocktail is perfect for family-friendly parties, brunches, summer events, and even tropical-themed nights. It’s inclusive, easy to make in batches, and visually stunning.
Can I make this ahead of time?
You can mix the orange juice and club soda ahead, but add the grenadine syrup and ice just before serving to keep the layers sharp and the drink cold.
")
Ever walk into a space and think, “This just feels so them”?
And then wonder—how do I make my home feel more like me? The answer often lies in choosing the right home decorating ideas that reflect who you are.
We all want our homes to be more than just pretty spaces. We want them to reflect our personality, hold our memories, and feel like a safe, inspiring place to land. If you’ve ever stood in a room and felt like something was missing (even though everything matched perfectly), you’re not alone. Often, what’s missing is you—your personality, your story, your unique spark.
In this guide, we’ll explore 10 creative home decor ideas that go beyond style and dive into self-expression. From travel-inspired home decor to using bold colors and unique lighting, these ideas will help you turn your interiors into a truly personal haven.
1. Showcase Personal Collections
Why it matters: Whether it’s vintage cameras, ceramic mugs, or stacks of beloved books, your collections say a lot about who you are.
How to use this idea:
Curate a small display of your favourite pieces on open shelves or in glass-front cabinets.
Group similar items to create cohesive, balanced arrangements.
Rotate collections seasonally to keep the space fresh.
Stylicia Tip: Add personality to your home by mixing in a few quirky or unexpected pieces—it sparks conversation and brings joy every time you see it.
2. Incorporate DIY Artwork or Custom Pieces
Feeling crafty or creative? Making your own art is one of the easiest and most meaningful ways to personalize your home interiors.
How to do it:
Create abstract canvas art using your favourite colours.
Frame your travel photos or meaningful moments.
Commission a local artist to make a custom piece that reflects your story.
DIY decor is all about self-expression. Plus, it adds a one-of-a-kind element to your space that no store-bought print ever could.
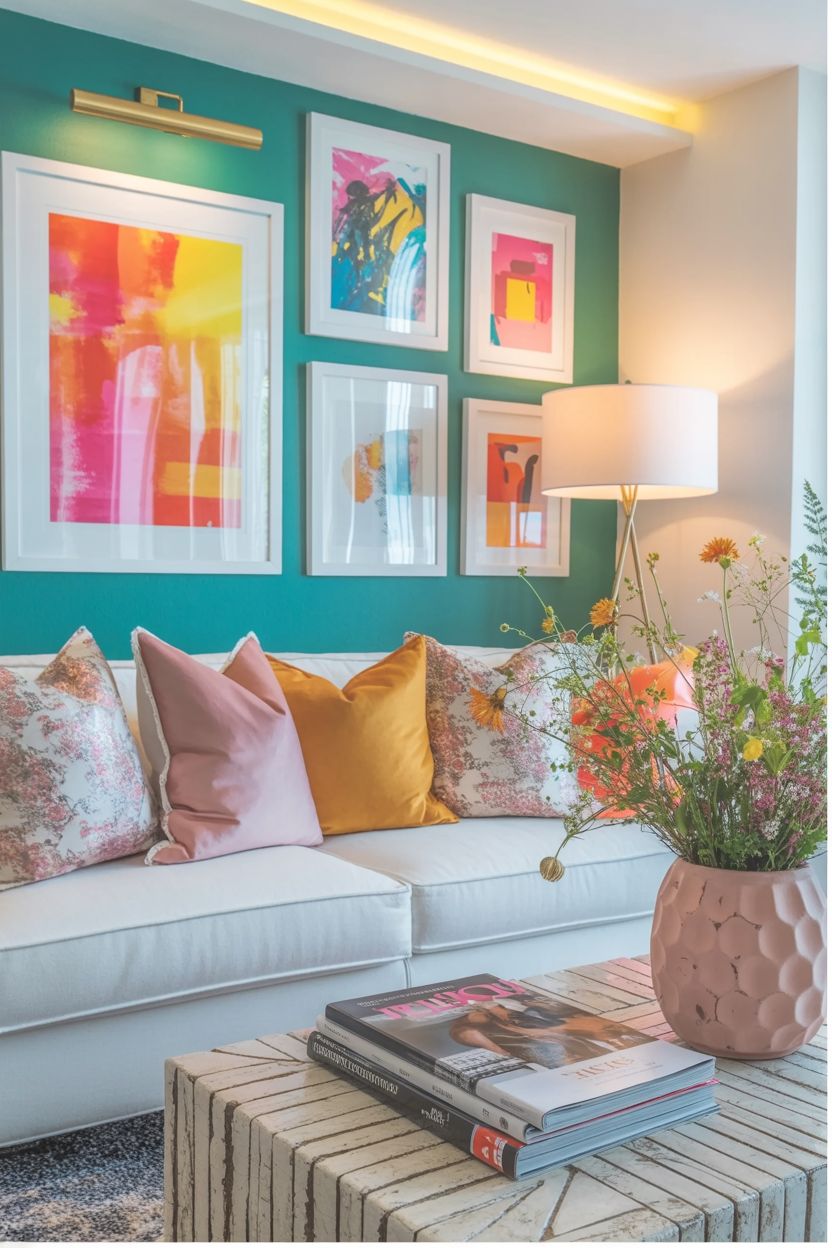
3. Play with Bold Colors and Patterns
Think bold = overwhelming? Think again.
Adding personality to your home doesn’t have to mean going wild, but a splash of bold color or a striking pattern can instantly energize a space.
Ideas to try:
Paint an accent wall in a colour that makes your heart race.
Use patterned wallpaper in a small powder room or hallway.
Layer colorful throw pillows and rugs over neutral furniture.
Stylicia Tip: To avoid visual clutter, balance bold design with neutral tones. That way, your vibrant choices pop rather than overwhelm.
4. Use Furniture with History
How do you create a space that feels warm and rooted? Add a little history.
Whether it’s your grandma’s armchair or a flea market sideboard, vintage furniture adds depth and nostalgia to your interiors.
Try this:
Mix modern and vintage styles for an eclectic look.
Reupholster a second-hand chair with a fresh fabric.
Let one or two unique pieces shine in each room.
Why it works: Combining old and new decor gives your home a layered, lived-in feel—and that’s what makes it feel real.

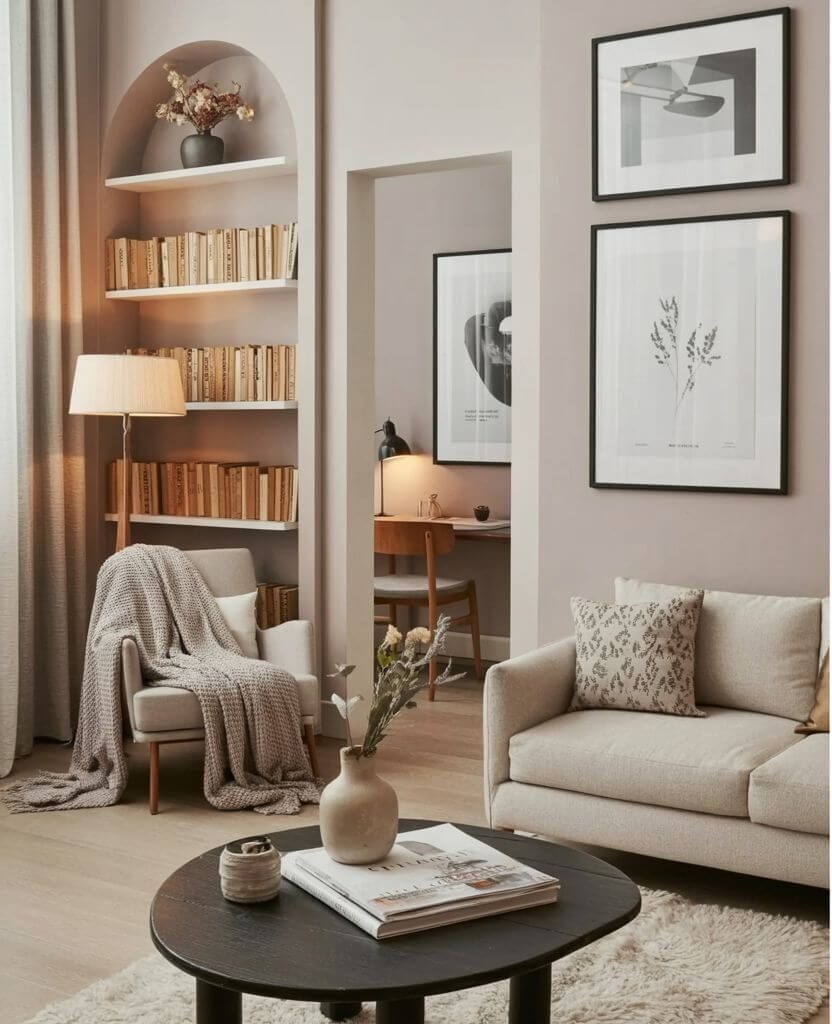
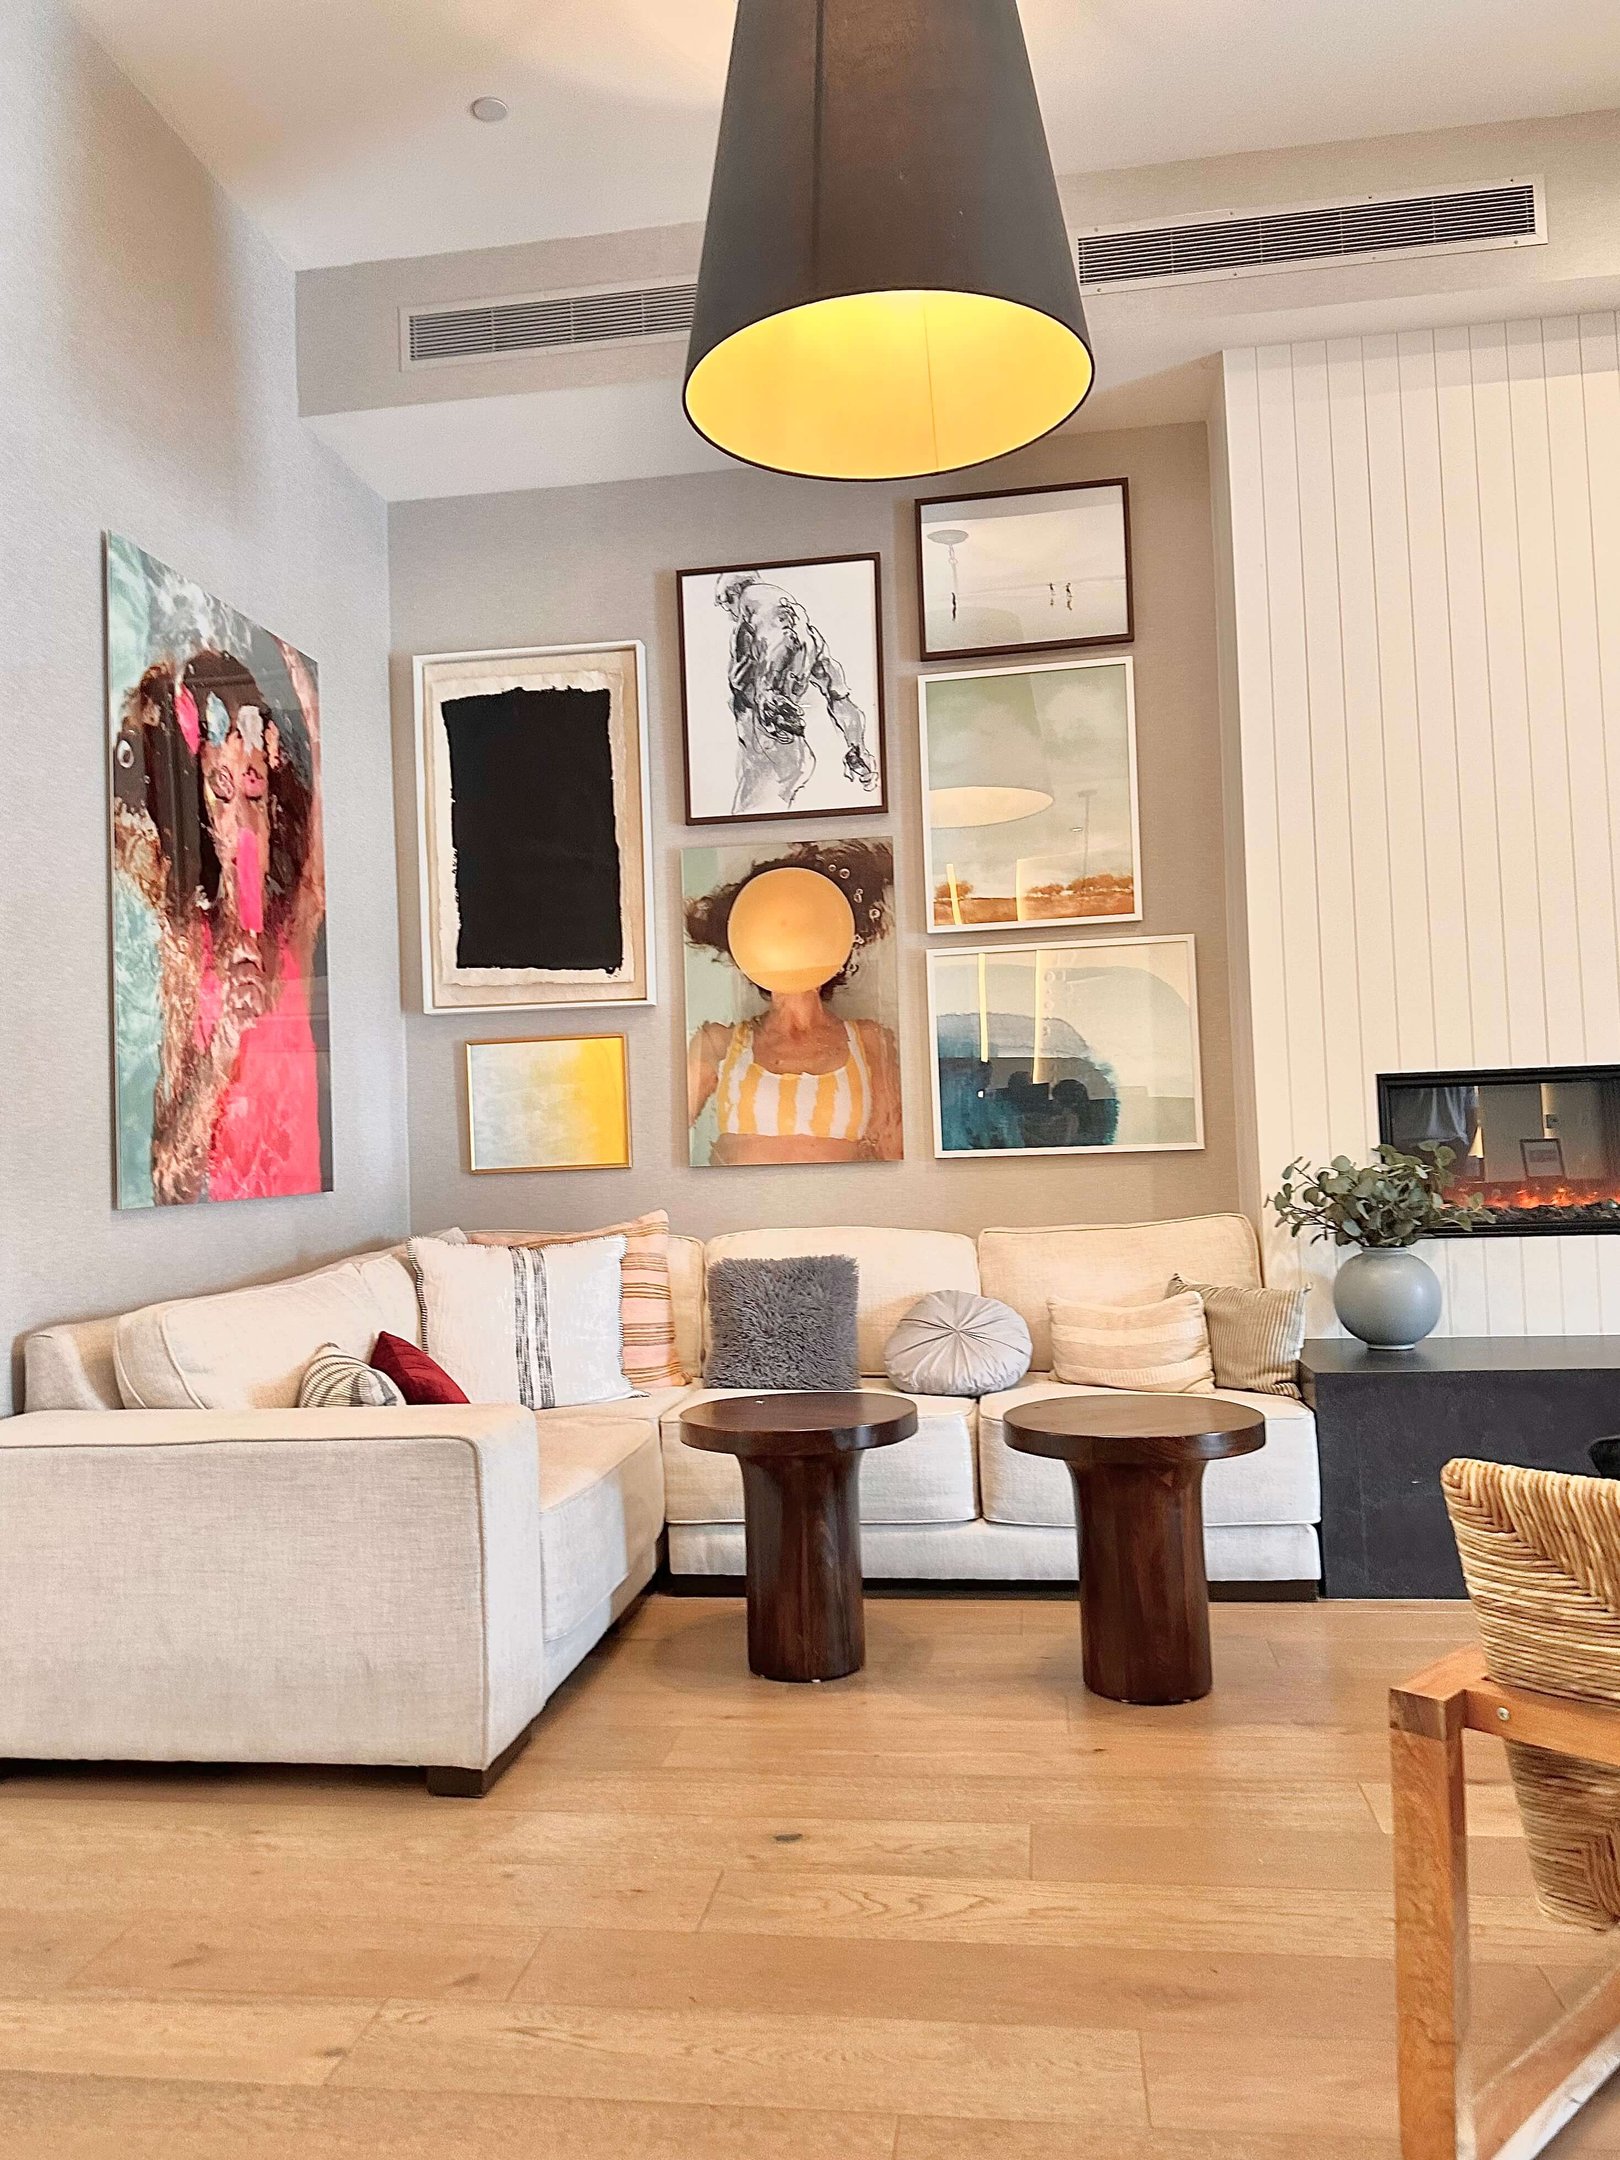
5. Create a Feature Wall That Tells Your Story
Your walls are prime real estate for personality. A feature wall draws the eye and gives you a creative place to showcase what matters to you.
What to include:
A gallery wall with framed photos, quotes, or personal artwork
Textured panels like wood, stone, or even DIY shiplap
Bookshelves filled with items that tell your story
Stylicia Tip: Use accent lighting like LED strips or wall sconces to make your display pop.
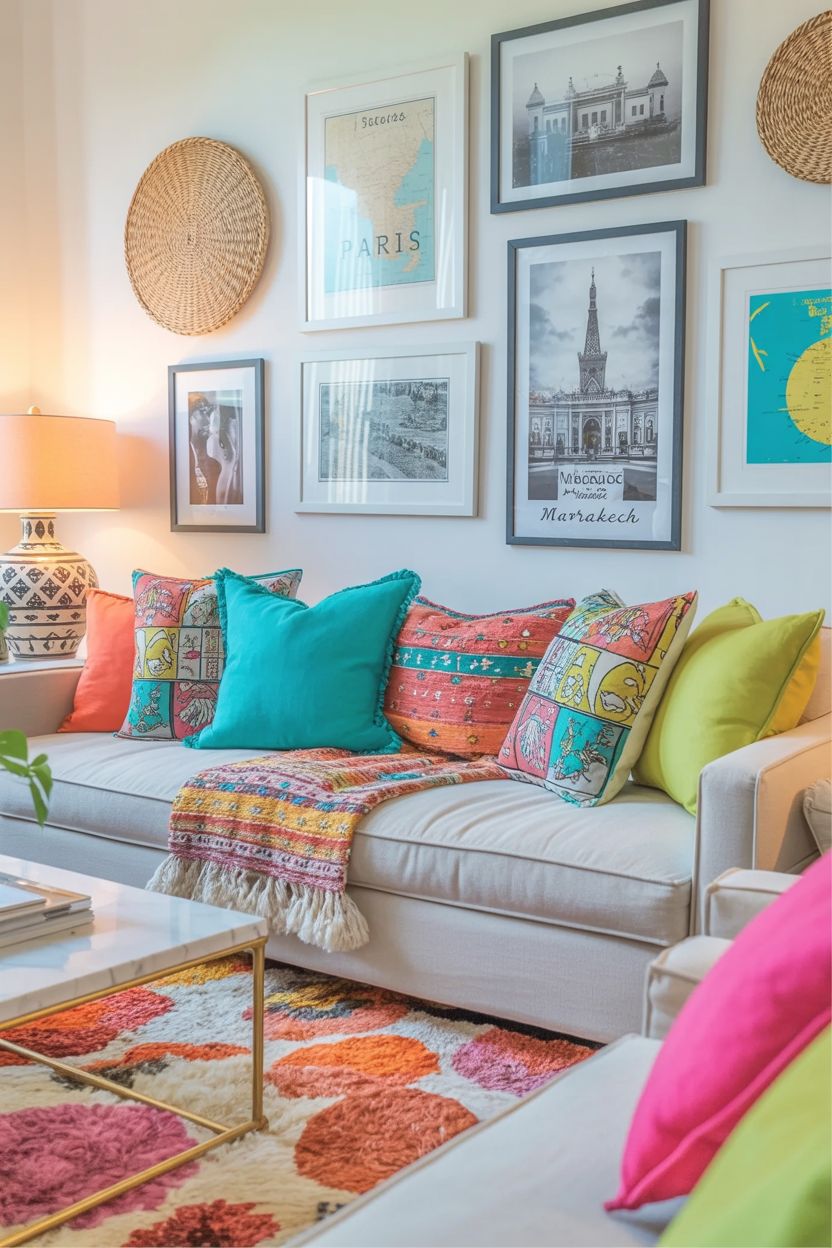
6. Add Travel-Inspired Home Decor
Love to travel? Or just dream of it? Let your home reflect the places that light you up.
Easy ways to start:
Frame your favourite travel photos or display a large world map.
Use globally-inspired textiles: think Moroccan rugs, Turkish throws, or Japanese ceramics.
Incorporate souvenirs like carved bowls, woven baskets, or postcards.
Why it’s a win: Travel-inspired home decor not only adds visual interest, it sparks stories and keeps your wanderlust alive.
7. Personalize with Text, Typography, and Quotes
Words matter. Especially when they’re the ones that inspire, ground, or make you smile.
Ways to use text in your home decor:
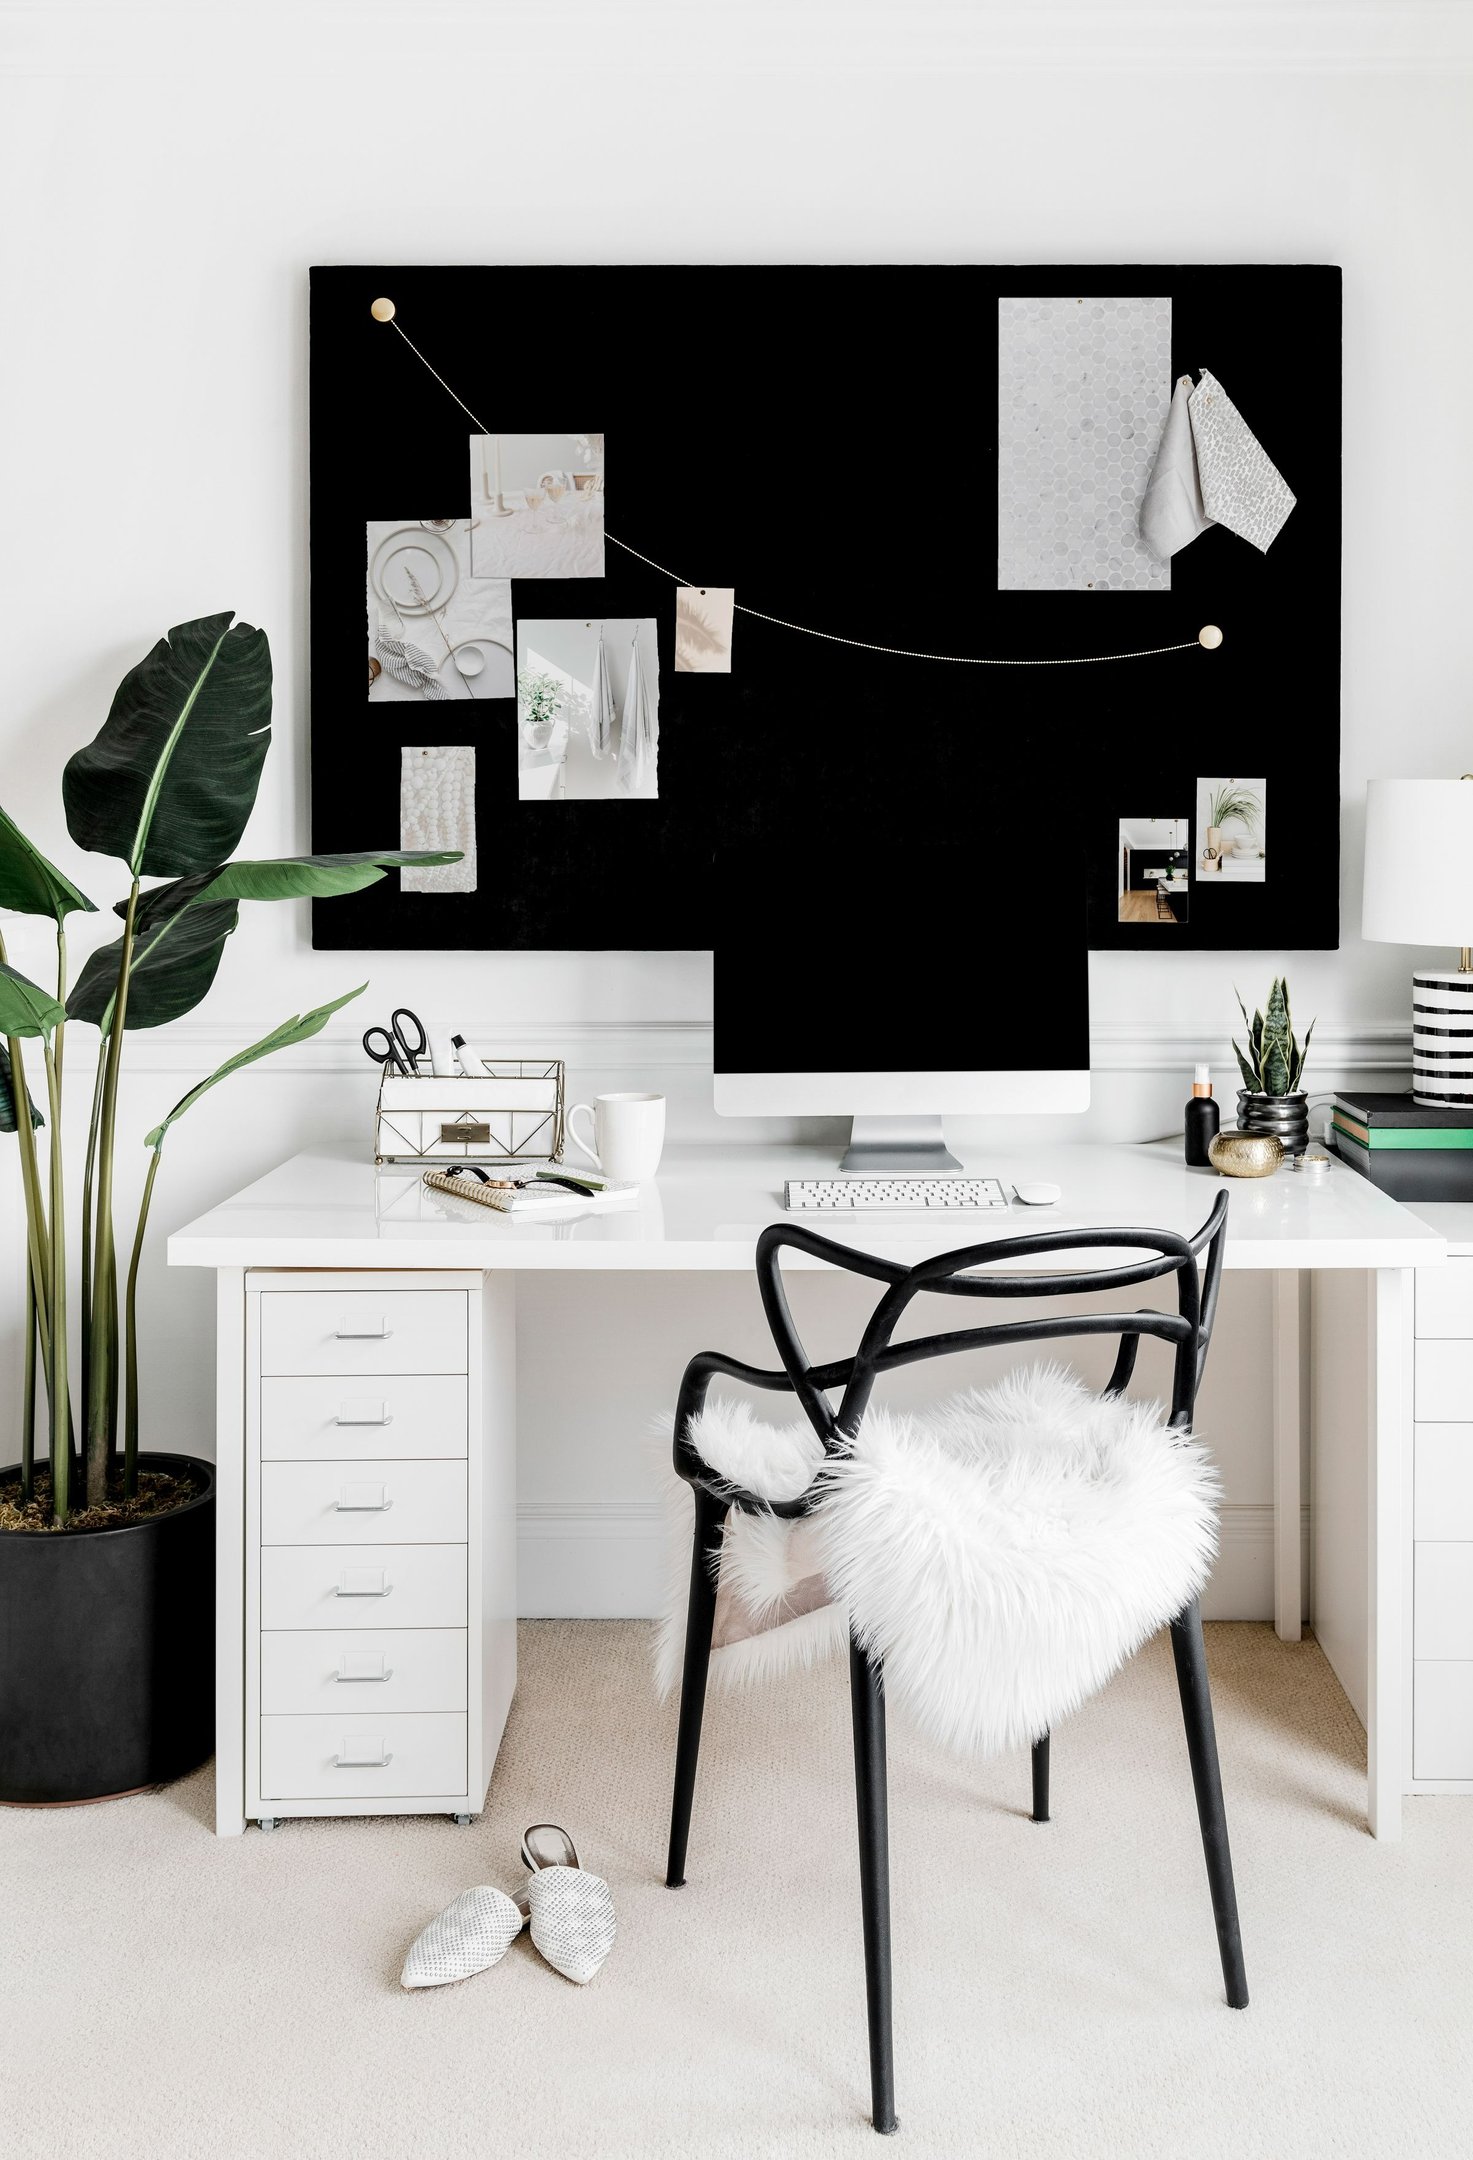
Framed quotes in your home office or entryway
Typography throw pillows or wall decals
DIY murals with lyrics or favourite phrases
Stylicia Tip: Choose fonts and colours that align with your home’s overall aesthetic—minimalist fonts for modern vibes, script fonts for romantic or vintage interiors.
8. Bring in Nature and Greenery
Want to instantly make your home feel more alive and calming? Plants are your best friends.
How to use them:
Start small with a few easy-care plants like pothos or snake plants.
Create a mini herb garden on your windowsill.
Use natural materials like wood, jute, or stone to echo nature indoors.
Bonus: Greenery is scientifically proven to improve mood, reduce stress, and boost productivity—especially in small spaces.
9. Curate Sentimental and Meaningful Pieces
What makes a house feel like home? The memories.
Display sentimental items that have meaning—because nothing adds more personality than the life you’ve lived.
Ideas to try:
Use shadow boxes to preserve keepsakes
Display wedding photos, baby shoes, or hand-written notes
Create a memory corner with objects that tell a story
Why it works: These small details infuse your space with warmth and authenticity.
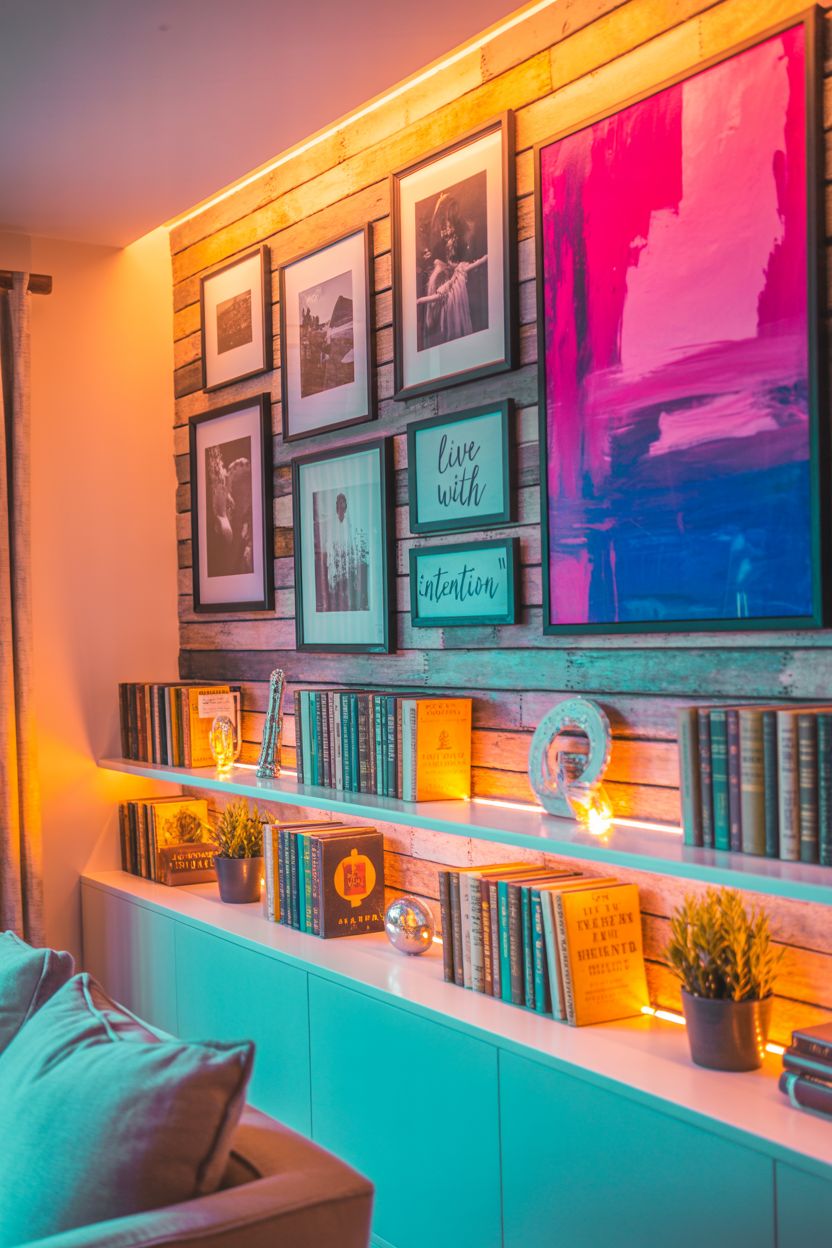
10. Experiment with Unique Lighting Features
Lighting is more than function—it’s an opportunity for self-expression.
Ways to light your personality:
Swap basic fixtures for sculptural pendants or vintage chandeliers
Add string lights or fairy lights for a cozy, magical vibe
Use dimmers or smart bulbs to set the mood just right
Stylicia Tip: Mix ambient, task, and accent lighting for both practicality and style. It’s one of the easiest ways to add personality without cluttering your home.
FAQs: Making Your Home Feel Like You
How can I add personality without clutter?Stick to quality over quantity. Choose a few meaningful items instead of filling every surface.What’s the best way to start?Pick one room. Add a personal photo, a favorite quote, or an accent color that reflects you.Can I mix styles without it looking messy?Absolutely. Just repeat a few elements (like a color or texture) throughout to tie it all together.How do I personalize a rental without making permanent changes?Use removable wallpaper, art, rugs, and statement lighting—you’ll be amazed how much impact you can make without drilling a hole.How do I personalize a small space?Think vertical: wall-mounted shelves, art, or hanging planters. Also, choose multifunctional decor that’s both beautiful and useful.
Your home is your canvas—and there’s no right or wrong way to express yourself. Whether you start with a gallery wall, a plant corner, or a favorite quote on the wall, what matters is that you begin. Decorating isn’t about perfection—it’s about connection.
So go ahead—add those bold colors, frame that postcard from Paris, light the fairy lights. Create a home that doesn’t just look good—but feels like you.
Let your home interiors tell your story.
")
“As a little girl, I dreamed of being a bride. I’d wrap a white curtain around me, pretending it was my gown, and float down the hallway like it was my wedding aisle. Years later, choosing my real dress felt overwhelming—so many silhouettes, laces, and layers. But in the end, I listened to the little girl inside me: ‘Pick the princess gown.’ And I did. This guide is for every bride standing at the same crossroad—exploring 12 unforgettable summer wedding dresses that might just speak to your soul.”
So tell me… Which one speaks to your soul?
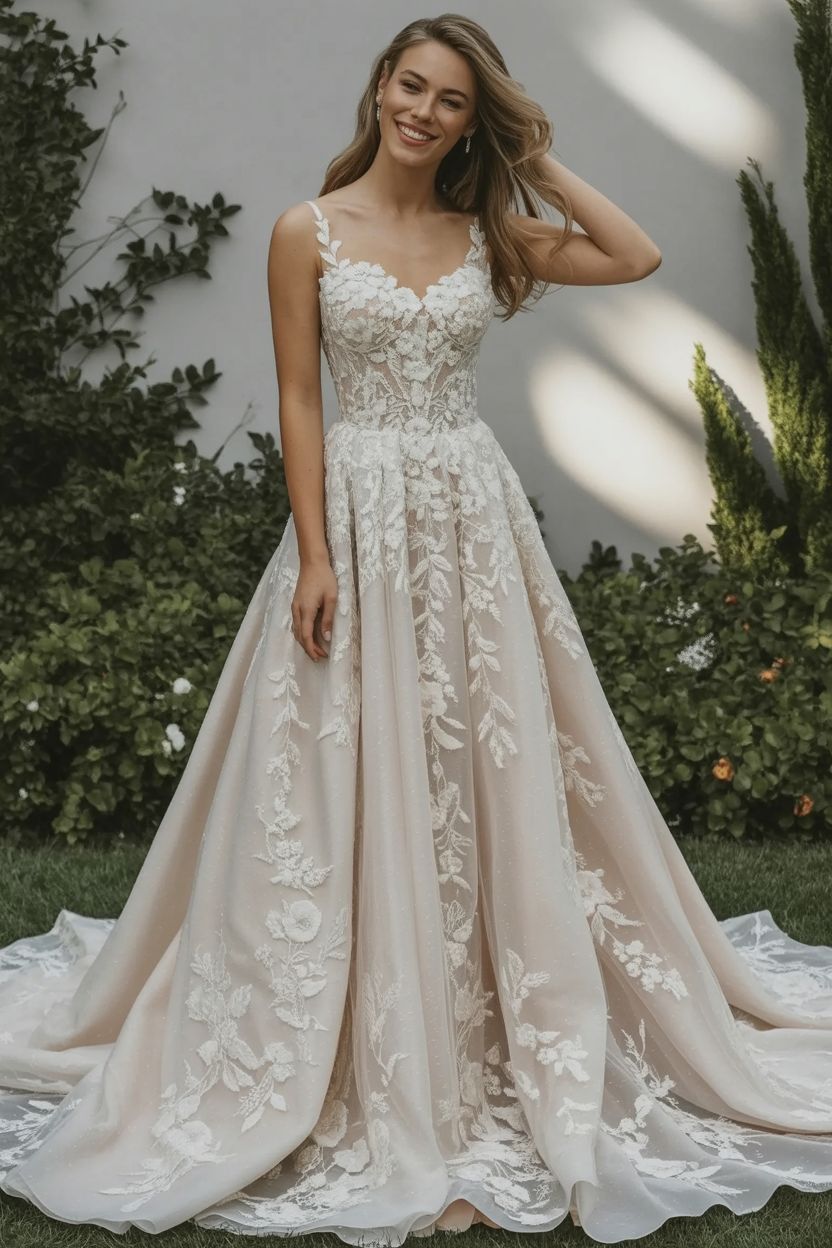
1. Enchanted Bloom (Lace A-Line)
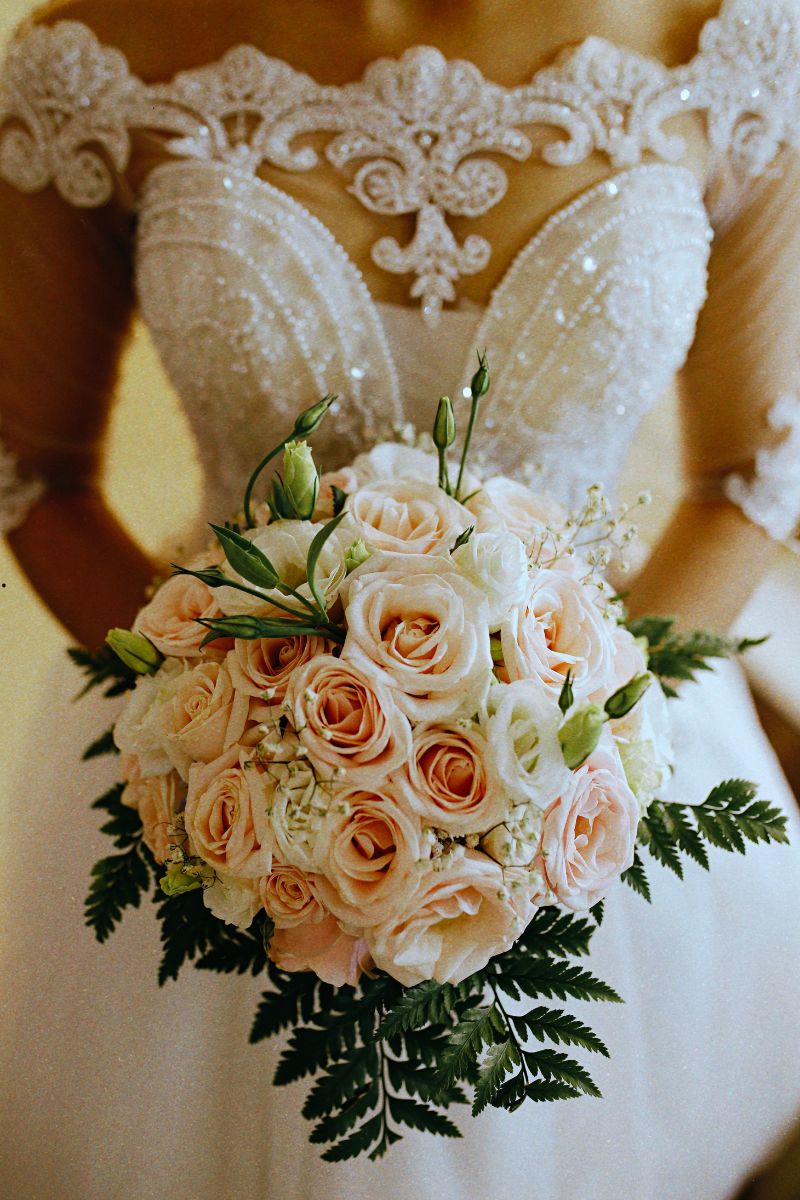
The moment I saw this dress, I thought of secret garden weddings and soft piano music playing in the background. With its delicate floral lace, flowy silhouette and gentle train, this gown brings a storybook romance to life.
Tip: Pair it with a loose low bun and pearl drop earrings for effortless elegance.
Best for: Brides seeking comfort + classic romance
Avoid if: You prefer dramatic or body-hugging silhouettes
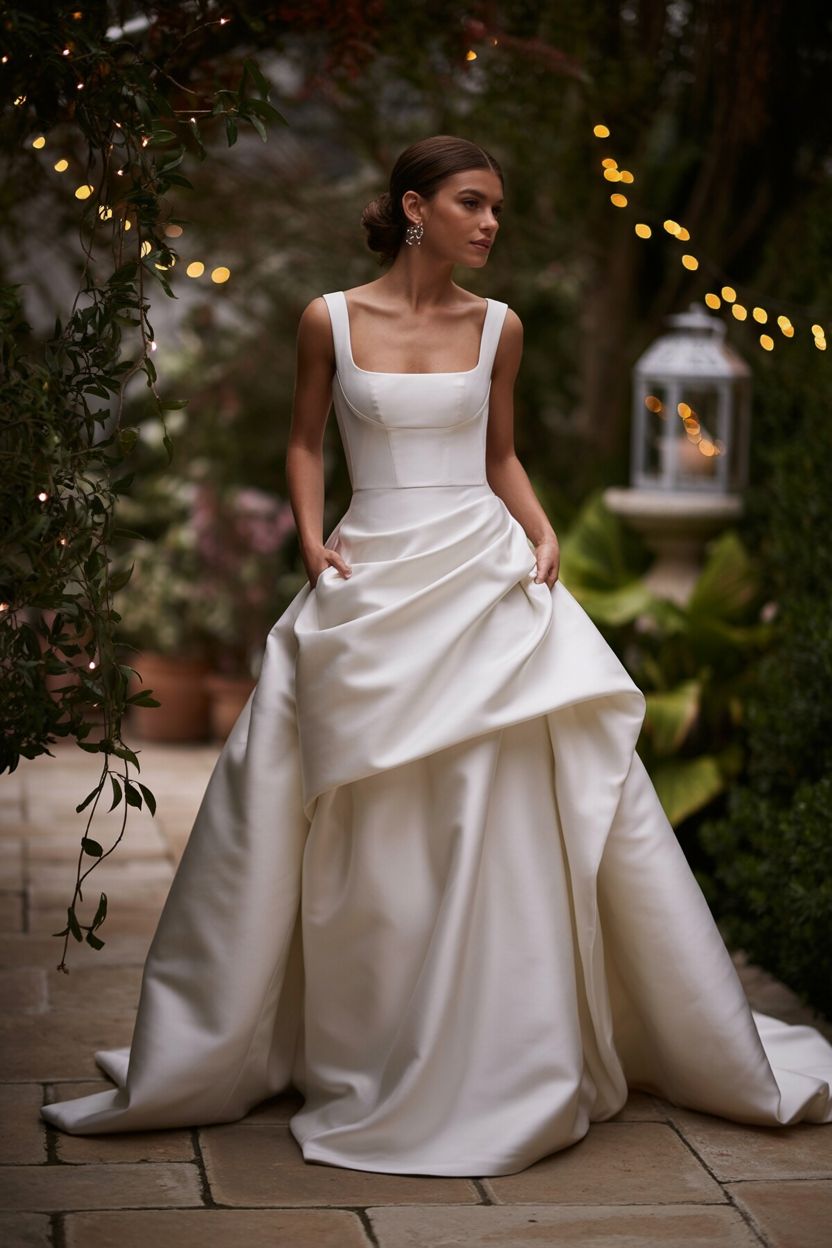
2. Golden Grace (Square Neck Ballgown)
This one made me feel like royalty. The square neckline is regal and modern all at once, while the structured satin skirt gives you that float-down-the-aisle feeling. I imagined holding a bouquet of cream roses and hearing gasps as I walked in.
Tip: Add a cathedral-length veil for full drama.
Best for: Grand venues, formal celebrations
Avoid if: You want lightweight fabrics for a beach or backyard wedding
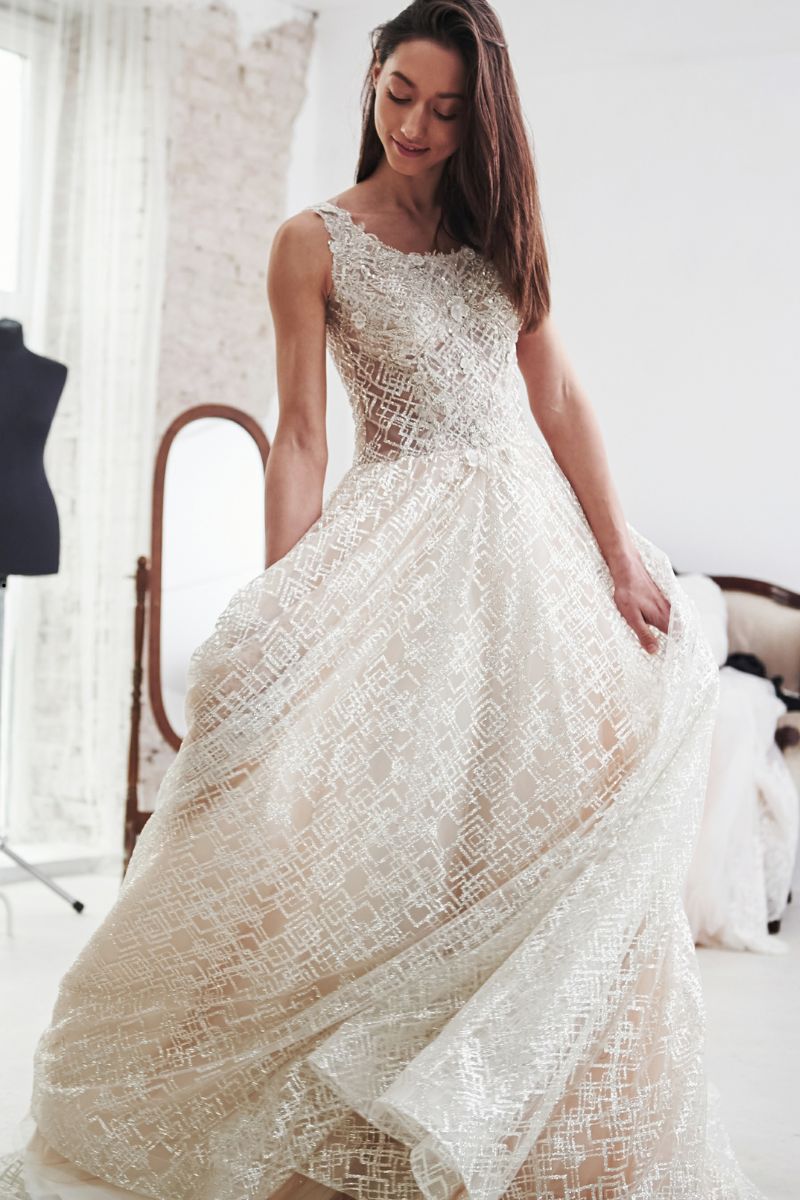
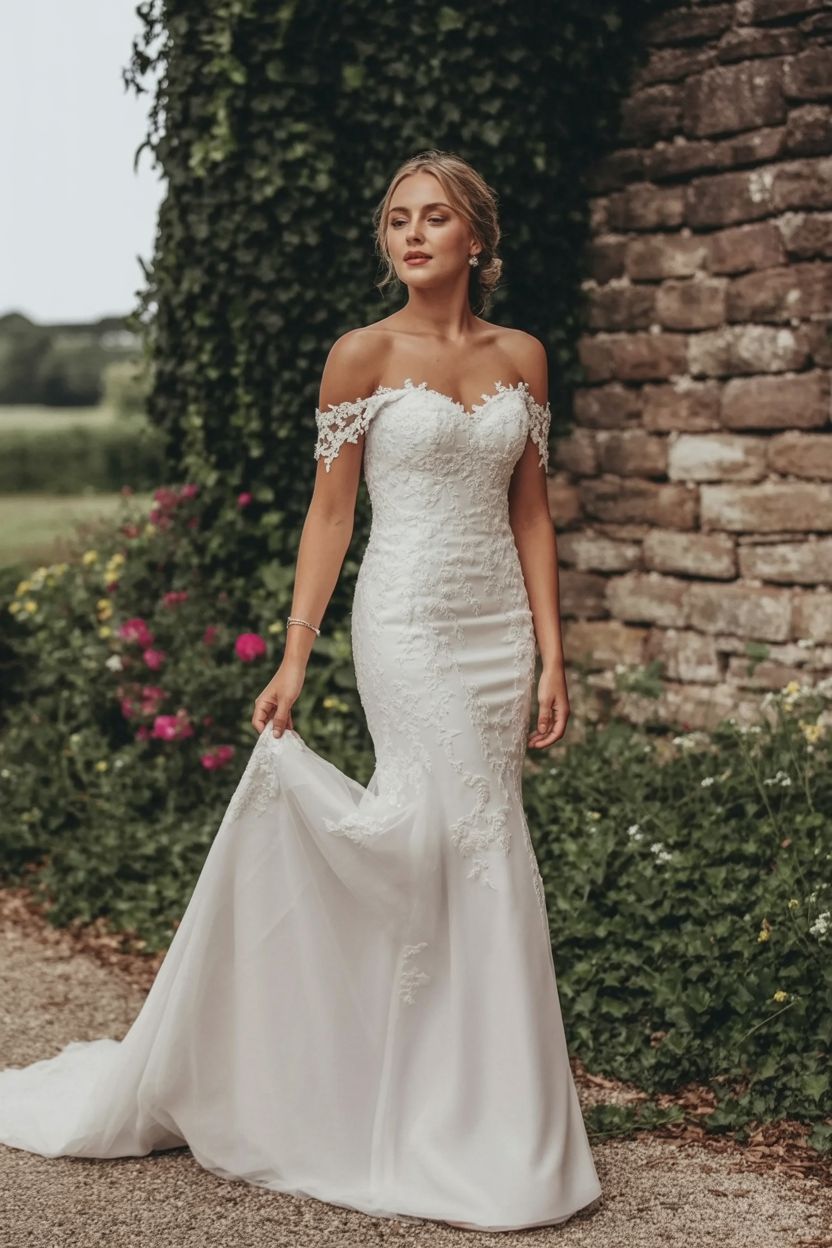
3. Boho Whisper (Lace Sleeve Gown)
There’s something almost poetic about this one. I imagined it swaying gently in the breeze under fairy lights. The lace sleeves, the soft fit, the vintage-inspired embroidery—it feels like a dress that’s already lived a love story.
Tip: Let your hair down in soft waves, and consider a flower crown for full boho magic.
Best for: Rustic outdoor weddings, artistic souls
Avoid if: You want a polished or structured silhouette
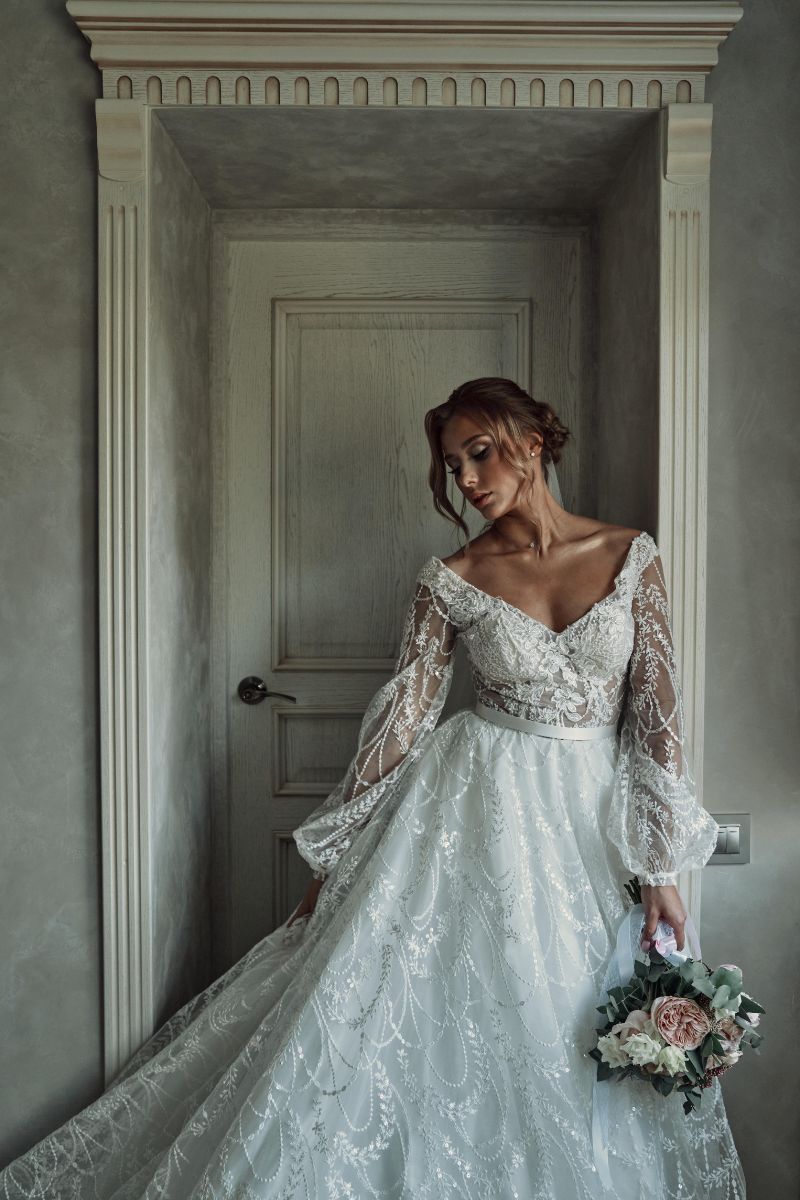
4. Garden Nymph (Off-Shoulder with Puffy Sleeves)
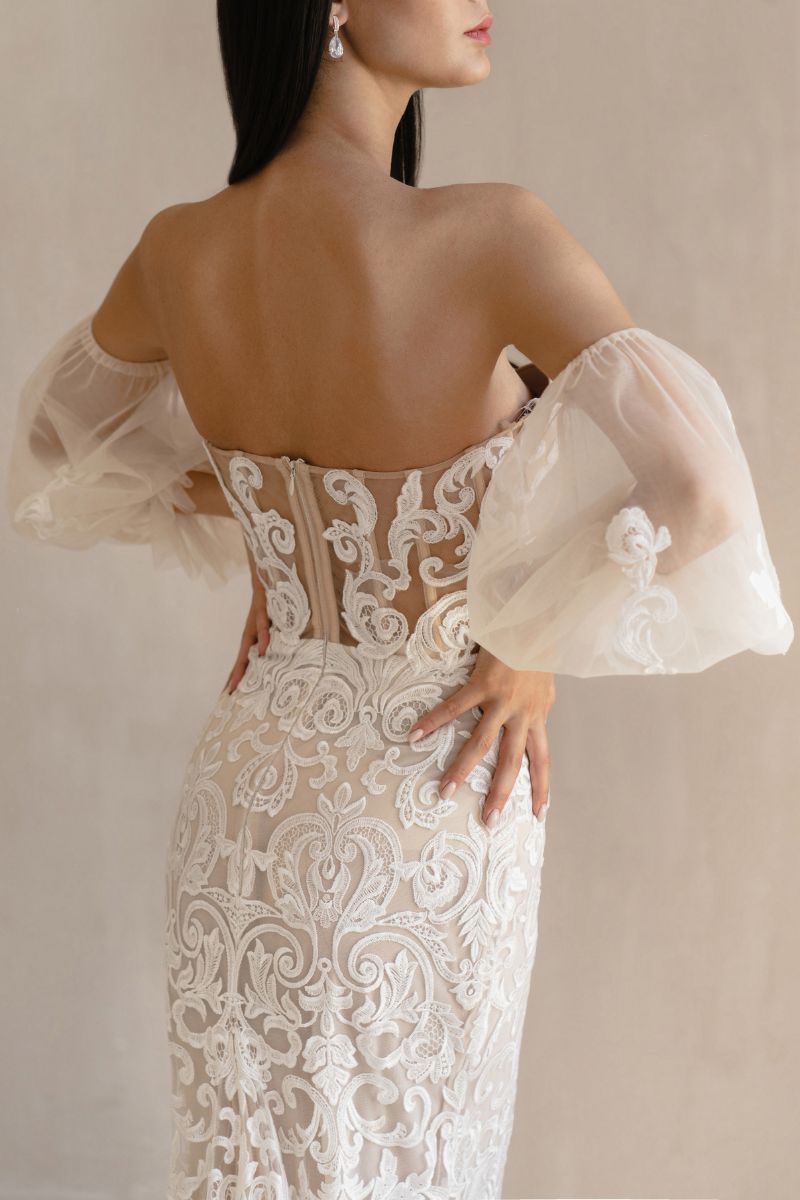
If dresses could flirt, this one would. Light as air and whimsically detailed, it made me feel like I was part of a midsummer night’s dream. The off-shoulder neckline adds romance, while the sheer sleeves bring softness.
Tip: Perfect with delicate vines woven into your hair or gold cuffs for a Grecian goddess vibe.
Best for: Forest or botanical garden weddings
Avoid if: You need strong bust support or minimal fuss
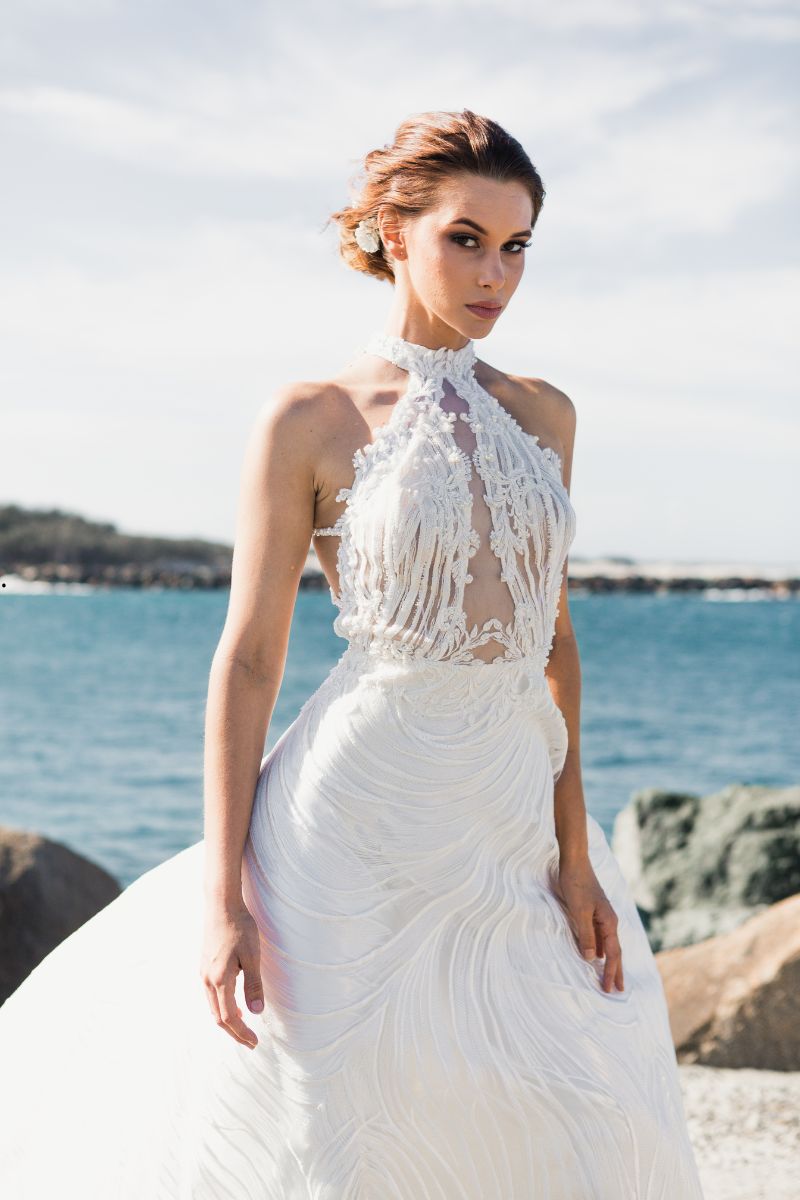
5. Ocean Light (Seashell Detail Gown)
I could almost hear the waves just looking at this dress. The texture mimics seashells, and the fabric moves like water. Perfect for brides who feel most themselves barefoot in the sand.
Tip: Wear your hair in a sleek ponytail or loose beach waves. Minimal jewelry—let the dress shine.
Best for: Beach or coastal weddings
Avoid if: You want a clean, minimalist silhouette
6. Dream Drapes (Beaded Pearl Back)
Pearls draping along your back? Yes, please. This gown is a showstopper—from the 3D floral appliqué on the bodice to the luxurious beaded strands in the back. I imagined wearing this at twilight, with string lights twinkling overhead.
Tip: Keep your neckline simple and sweep your hair up to highlight the back.
Best for: Glamorous evening weddings
Avoid if: You prefer sleek or unembellished designs
7. Tulle Serenity (Layered Tulle Dress)
Stepping into this dress felt like walking into a dream. It moves like mist and catches the light beautifully. The layers of sheer tulle float around you, making every step feel cinematic.
Tip: Choose soft pastel florals or eucalyptus for your bouquet. Don’t over-accessorize—this dress speaks for itself.
Best for: Romantic golden hour ceremonies
Avoid if: You need lots of structure or support
8. Blush Blossom (Floral Appliqué)
This one surprised me. The blush tone made my skin glow, and the 3D floral details gave it a couture edge. If you’re someone who wants to stay traditional but not too traditional, this is your sweet spot.
Tip: Go for soft rose makeup and delicate shoes—think garden fairy, not glam queen.
Best for: Spring or garden weddings, feminine brides
Avoid if: You’re set on a white or ivory-only gown
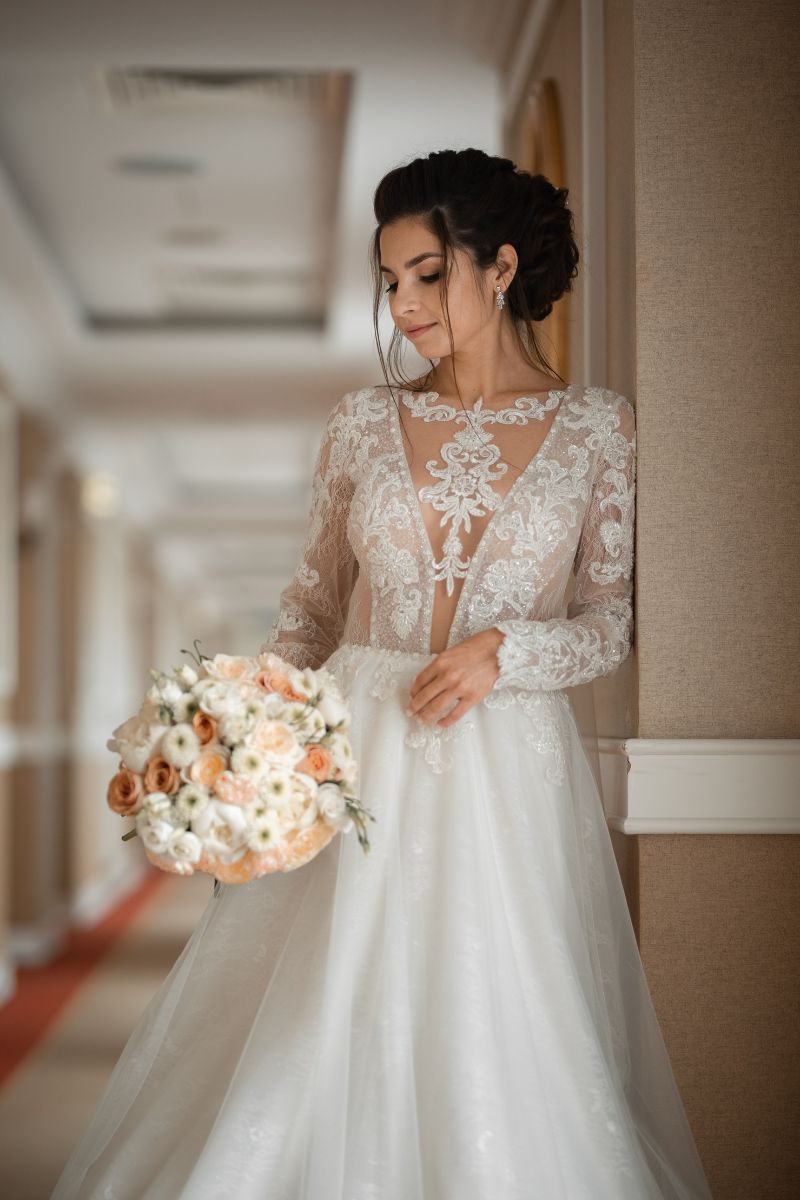
9. Vintage Starlet (Long Sleeve Vintage Lace)
I felt like an old Hollywood bride in this one. The long sleeves and illusion neckline make it sophisticated and graceful, while the lace brings timeless charm. Imagine walking down a candlelit aisle to a string quartet…
Tip: Classic updo and bold lipstick. Add a vintage brooch or family heirloom.
Best for: Indoor ceremonies, traditional brides
Avoid if: You’re planning a hot summer beach wedding
10. Modern Charm (Satin Corset Dress)
Clean lines, modern structure, and a little bit of edge—this is the dress that says “I’m stylish and I know it.” The satin catches the light beautifully, and the corset fit defines the waist with elegance.
Tip: Pair with minimalist jewelry and sleek heels for a city-chic aesthetic.
Best for: Urban weddings, fashion-forward brides
Avoid if: You want flow or volume in your gown
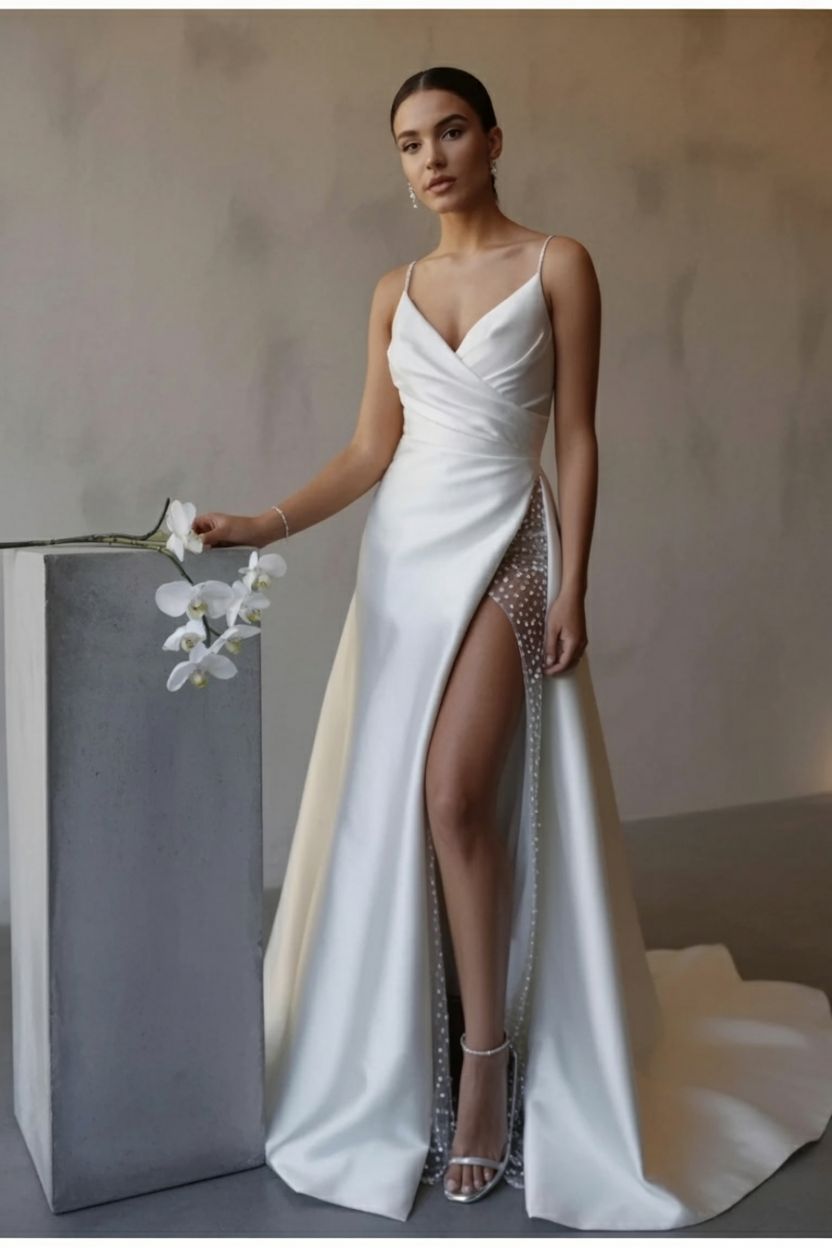
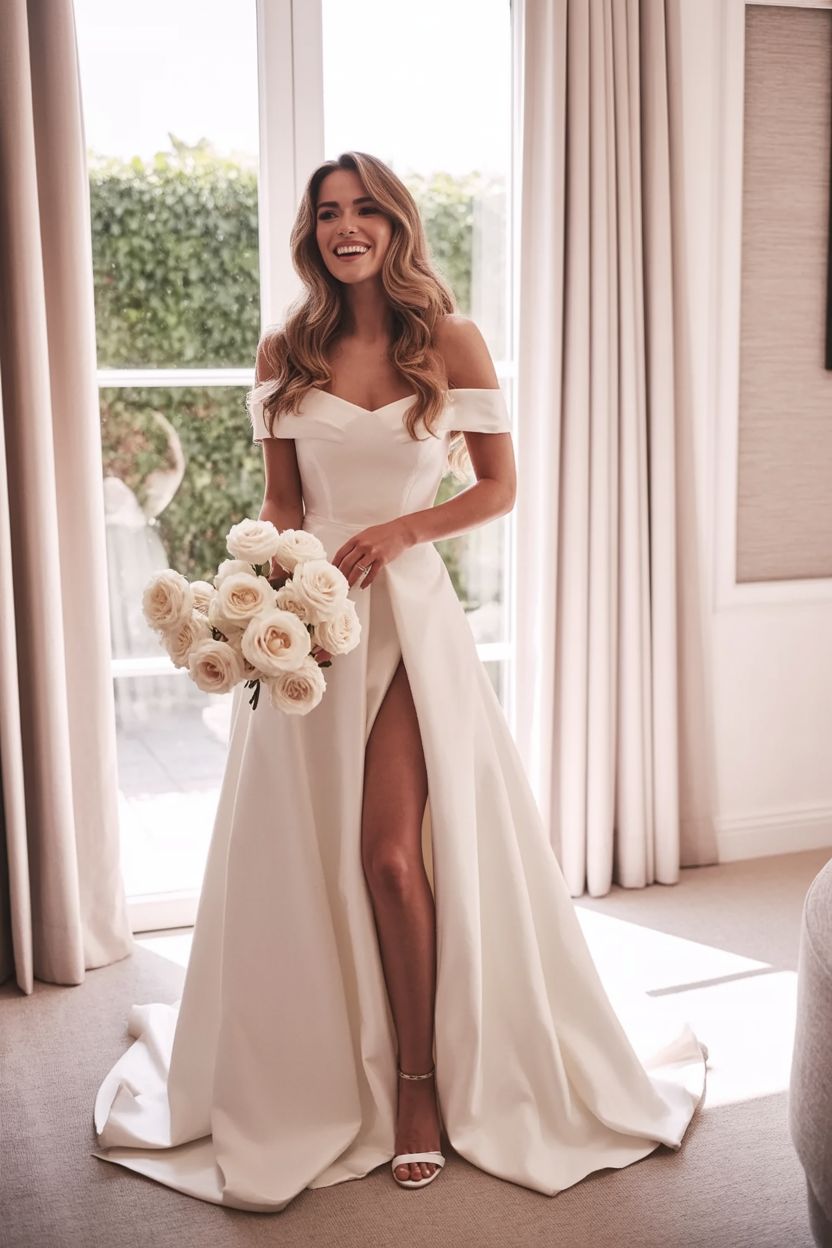
11. Sunset Slip (Simple Slit Gown)
This gown reminds me of golden hour on a rooftop with champagne in hand. It’s sexy but simple, and incredibly wearable. I could see myself slipping into this for a destination elopement or chic beach vows.
Tip: Add statement earrings or a bold lip. Let your confidence be the accessory.
Best for: Destination weddings, summer elopements
Avoid if: You want embellishment or a traditional silhouette
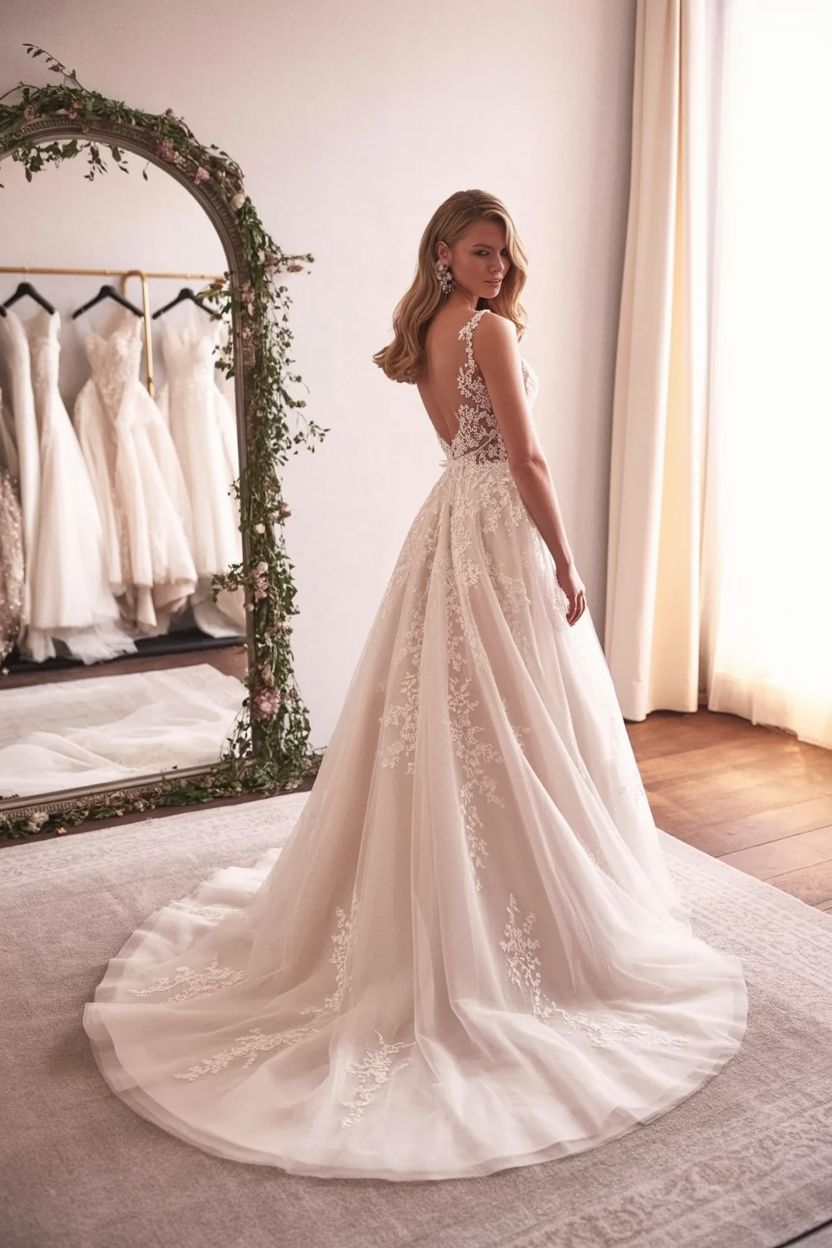
12. Backless Bloom (Illusion Lace Back)
This one’s all about the back. From the front, it’s demure and graceful—but when you turn around, wow. The illusion lace back and train create a moment you’ll never forget.
Tip: Add sparkle to your hair or veil and walk slowly—you’ll want everyone to take it in.
Best for: Garden or vineyard weddings
Avoid if: You prefer high coverage or strong bust/back support
When I finally stood in front of the mirror in my dream dress, I didn’t just see a bride. I saw a little girl’s dream come true. And that feeling? Unmatched.
So, which of these styles awakened something in you? Was it the timeless tulle or the dramatic pearls? Maybe you’re already picturing yourself in blush florals or backless lace.
Save your favourite. Pin it. Dream it. Wear it.
And follow along on Pinterest for more inspiration, stories, and dresses that just might change everything.